5
Rescue equipment should include but not limited to items such as coastguard approved ring buoy with attached
rope and strong, rigid Rescue Pole of at least 3.66m (12’).
Post emergency numbers including:
• Fire (France 18)
• Police
• Ambulance (France 15)
• Poison Control Hotline
• Full home address
Keep a cordless water-resistant phone nearby pool during use.
In case of an accident:
• Take all the children out of the water immediately.
• Call for emergency support and follow their instruction/advice.
• Replace wet clothing with dry clothing.
Watch and react! When supervising children stay close at hand and always be alert.
Teach your children to swim as soon as possible.
All filtering systems are compliant with installation standard NF C 15-100 stating that any electrical appliance
located less than 3.5 meters from the pool and freely accessible must only have a 12V supply. Any electrical
appliance with a 220V mains supply must be located at least 3.5 meters from the edge of the pool. Always ask the
manufacturer for advice before making any change to one or more components of the filtering system.
(For France
only)
PLEASE READ CAREFULLY AND RETAIN FOR FUTURE REFERENCE.
CHOOSE THE CORRECT LOCATION
NOTE: The pool must be set up on a completely flat and level surface. Please do not install the pool if the
surface is Inclined or slope.
Correct condition to set up the pool:
• The selected location has to be capable of uniformly supporting the weight for the entire time the pool is installed,
moreover the location must be flat and must be cleared of all objects and debris including stones and twigs.
• We recommend positioning the pool away from any objects kids could use to climb into the pool.
NOTE: Position the pool near an adequate drainage system to deal with overflow or to discharge the pool.
NOTE: Position the pool near an AC power outlet protected by a RCD (Residual Current Device).
Incorrect conditions to set up the pool:
• On uneven ground the pool may collapse causing serious personal injury and/or damage to personal property and
will void the warranty and prevent any service claims.
• Sand should not be used to create a level base; the ground must be dug out if necessary.
• Directly under overhead power lines or trees. Be sure the location does not contain underground utility pipes, lines
or cables of any kind.
• Do not set up the pool on driveways, decks, platforms, gravel or asphalt surfaces. The selected location should be
firm enough to withstand the pressure of the water; mud, sand, soft / loose soil or tar are not suitable.
• Grass or other vegetation under the pool will die and may cause odors and slime to develop, therefore we
recommend removing all grass from the selected pool location.
• Avoid areas prone to aggressive plant and weed species that may grow through the ground cloth or liner.
NOTE: Check with your local city council for by-laws relating to fencing, barriers, lighting and safety requirements
and ensure you comply with all laws.
NOTE: If have a filter pump, refer to the pump’s manual for instructions.
NOTE: The ladder must match the pool size and should to be used only for entering and exiting the pool. It is
forbidden to exceed the permitted payload of the ladder. Check regularly if the ladder is properly assembled.
Installation
Assembly of the Steel Pro Frame pool can be completed without tools.
Bestway Inflatables will not be responsible for damage caused to the pool due to mishandling or failure to follow
these instructions.
1. Lay out all parts and check that you have the correct quantities as listed in the components list. If you are
missing any part do not assemble the pool, contact Bestway Customers Service.
2. Spread out the pool and make sure the pool is right side up, let it sit exposed to direct sunlight for 1 hour or more
so that the pool is more flexible during set up.
3. Turn the pool so the drain valve is near the area where your plan to drain the water.
ATTENTION: Do not drag the pool on the ground in order to avoid puncturing from sharp objects.
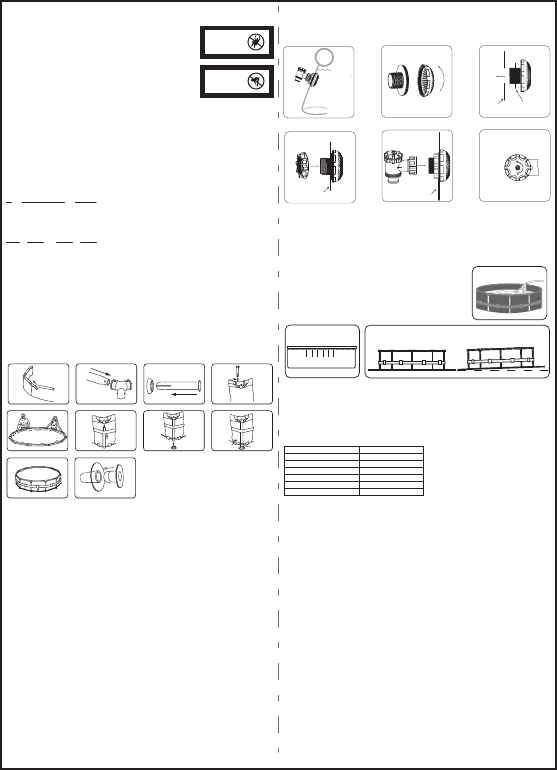
4. Insert the stopper plug into the inlet and outlet on the wall of the pool from the inside of the pool. (See Fig.10)
NOTE: For 5.49m x 1.22m (18’ x 48”), 5.49m x 1.32m (18’ x 52”) pools, please refer to the connection valve
installation on following page.
5. Insert top rail (A) into the pole pockets at the top of the pool. (See Fig.1)
6. Connect top rail (A) with T-Connector (C) at each of corner and insert pins (D) into gasket (F) first and then into
pre-drilled holes of the frame.
NOTE: The gasket cups should face downwards to prevent water leaking into the top rails. (See Fig.2,3,4)
7. Repeat steps 5 and 6 until all top rails (A) are connected with T-Connectors (C) and the top frame is set up. For
ease of assembly slightly raise the last 2 rails to an inverted v shape and insert into the last T-Connectors(C).
Slowly lower until fully connected taking care not to pinch your fingers. (See Fig.5)
8. Put all vertical pool legs (B) inside the bottom rope and the pool wall band. Connect vertical pool leg (B) into the
bottom of the T-Connector (C) . Make sure the vertical pool leg (B) has the spring loaded pins at the top when
connecting the T-Connector (C). (See Fig.6)
NOTE: For 2.44m x 61cm (8’ x 24”) pools, no bottom rope and wall band. For 3.05m x 76cm (10’ x 30”),
3.66m x 76cm (12’ x 30”) pools, no bottom rope.
9. Attach all footings (E) to the bottom of the vertical pool legs (B). (See Fig.7)
10. Tighten the rope at the bottom of the pool until the legs are straight. (See Fig.8)
11. Pull the frame from different directions to ensure all rails, pool legs and connectors are firmly jointed.
(See Fig.9)
12. Ensure drain valve is firmly closed. Smooth out the bottom.
13. Put 1” to 2” water in the pool to cover the floor. Once pool floor is slightly covered, gently smooth out all
wrinkles. Start in the center of the pool and work your way clockwise to the outside.
Connection Valve Assembly
For 5.49m x 1.22m (18’ x 48”), 5.49m x 1.32m (18’ x 52”) pool model
1. Screw the Debris Screen onto the Connector. (See Fig.12)
2. From inside the pool, insert this assembled Unit to the pool’s inlet A and outlet B. (See Fig.13)
NOTE: Ensure the Gasket is properly in place on the assembled Unit inside of the pool liner.
Fig. 1
Fig. 7 Fig. 8
Fig. 9
Fig. 10
Fig. 2
Fig. 5 Fig. 6
Fig. 4Fig. 3
Fig. 18
Fig. 19
Proper Water Level
Flat, Level Ground - CORRECT
Bumpy, Sloping Ground - INCORRECT
Fig. 17
To keep your pool clean:
1. Contact your local pool supply shop for advice and purchase of chemicals and pH kits.One of the most important
factors to increase the life of the liner is to keep continuosly clean and healthy water. Please follow strictly the
instructions from professional technicians for the water treatment through the use of chemicals.
2. Locate a bucket of water next to pool to clean users’ feet before entering pool.
3. Cover the pool when not in use.
4. Skim pool regularly to avoid settled dirt.
5. Check the filter cartridge regularly, change filter cartridge if filter cartridge remains soiled or discolored. Suggest
replacing the filter cartridge every 2 weeks.
6. Gently clean any scum from the side with a clean cloth.
7. To improve the water quality we suggest to use Bestway accessories like skimmer, maintenance kits. Please visit
our website www.bestway-service.com or contact your pool supplier. Please be careful in case of rain water,
kindly check that the water level is not higher than the expected one. If so, please act consequently.
Proper maintenance can maximize the life of your pool.
ATTENTION: Do not use pump when pool is in use.
During the season of use of the swimming pool, the filtration system must be necessarily put into service every day,
enough for a long time to assure at least a complete renewal of the volume of water.
Repair
If your pool is damaged, use the repair patch. -see FAQ’s for instructions.
Dismantling
1. Unscrew the drain valve cap on the outside of the pool counter clockwise and remove.
2. Connect the adaptor to the hose and put the other end of the hose in the area where you are going to drain your
pool. (Check local regulations for drainage by-laws).
3. Screw control ring of the hose adaptor onto the drain valve clockwise. The drain valve will be open and water will
start to drain automatically.
ATTENTION: Water flow can be controlled with the control ring.
4. When draining is finished, unscrew the control ring to close the valve.
5. Disconnect the hose.
6. Screw the cap back onto the drain valve.
7. Air dry pool.
ATTENTION: Do not leave the drained pool outside.
Storage
1. Please remove all the accessories and spare parts of the pool and store them clean and dry.
2. Once pool is completely dry, sprinkle with talcum powder to prevent pool from sticking together, fold pool
carefully. If pool is not completely dry, mould may result and will damage the pool liner.
3. Store liner and accessories in a dry place with a moderate temperature between 5ºC / 41ºF and 38ºC / 100ºF.
4. During rainy season, pool and accessories should be storaged as above instruction also.
5. Unproper draining of the pool might cause serious personal injury and/or damage to personal property.
Filling Pool with Water
ATTENTION: Do not leave pool unattended while filling with water
1. Fill pool until water capacity is 90%, DO NOT OVERFILL as this could cause the pool to collapse. In times of
heavy rainfall you may need to empty some of the water to ensure the level is correct. (See Fig. 17.18)
2. When filling the pool is completed, check that the water is not collecting on any side to ensure the pool is level.
IMPORTANT: If pool is not level, drain water and re-level ground by digging out (See Fig. 19). Never attempt to
move the pool with water in it, serious personal injury or damage to the pool may result.
WARNING: Your pool may contain up to xxxxx liters/xxxx gallons which
equals xxxxx pounds of pressure. If your pool has any bulge or uneven side
then the pool is not level, the sides may burst and the water may discharge
suddenly causing serious personal injury and/or damage to property.
3. Check pool for any leaks at valves or seams, check ground cloth for any
evident water loss. Do not add chemicals until this has been done.
NOTE: In the event of a leak, patch your pool using the Heavy-duty repair
patch provided. Refer to the FAQ’s for further information.
Fig. 11
Fig. 12
Pool Outside
Gasket
Fig. 13
Fig. 16
Pool Outside
Fig. 15
Pool Outside
Fig. 14
No Jumping
Shallow Water
No Diving
Shallow Water
3. From outside of the pool, tighten the Connector Nut onto the assembled Unit. (See Fig. 14)
4. Hand-tighten the Control Valve to the assembled Unit. (See Fig.15)
NOTE: Check that both the Control Valve Gasket and O-ring are correctly positioned on the Control Valve.
OPERATION NOTE: Use the control screw on top of the Control Valve to open and close the Valve. (See Fig.16)
5. Make sure the valve is closed.
NOTE: Drawings for illustration purpose only. May not reflect actual product. Not to scale.
Pool Maintenance
If you do not adhere to the maintenance guidelines below, your health might be at risk, especially that of your
children.
NOTE: The filter pump is used to circulate the water and to filter small particles to keep your water free of
suspended dirt particles. In order to keep your pool water clean and hygienic you must add chemicals.
The following table lists the sequence of the tests that should be carried out for the ideal values and possible
actions. Regularly check the pH value and chlorine concentration weekly and adjust to the ideal values.
TEST
pH value
Cyanuric acid
Free chlorine
Chlorine compound
Algae
Calcium hardness
IDEAL VALUES
7.4– 7.6
30 – 50 ppm
2 – 4 ppm
0
None visible
200 – 400 ppm
S-S-001583


Partecipa alla conversazione su questo prodotto
Qui puoi condividere cosa pensi di Bestway BW56260 Piscina. Se hai una domanda, leggi prima attentamente il manuale. La richiesta di un manuale può essere effettuata utilizzando il nostro modulo di contatto.