TENT PITCHING INSTRUCTIONS – BRAEMAR (UK)
All - in - one pitching:
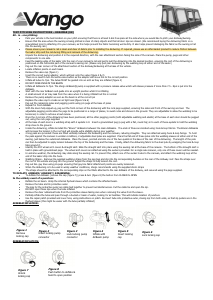
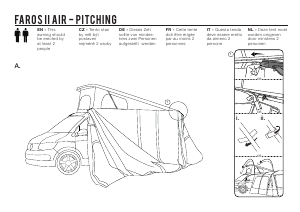
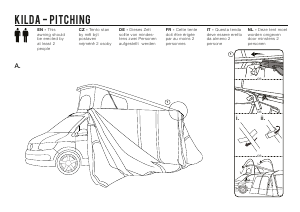
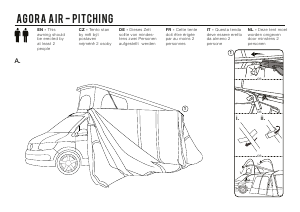
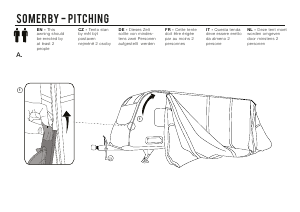
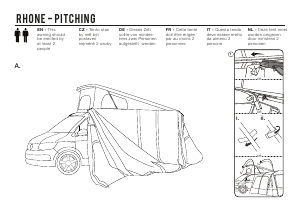
Park your vehicle in the best location on your pitch ensuring that there is at least 4.6m free space at the side where you would like to pitch your AirAway/Awning.
Ensure that the area where the awning is being pitched is clear of sharp objects and that all door zips are closed. (We recommend laying the AirAwning fabric on a
groundsheet prior to attaching it to your caravan, as this helps prevent the fabric becoming wet & dirty. It also helps prevent damaging the fabric as the awning is fed
into the awning rail.)
Please ensure your caravan’s rail is clean and clear of debris prior to installing the AirAwning. If required, please use an aftermarket product to reduce friction between
the kador strip and the rail during fitting and removal of the AirAwning.
Unpack the AirAwning and position it in the required direction, with the rear attachment section facing the side of the caravan. Place the pump, pegs and other
components to one side.
Feed the leading edge of the kador into the rear of your caravan’s rail and gently pull the AirAwning into the desired position, ensuring the roof of the AirAwning is
positioned on the horizontal part of the caravan’s awning rail. (Please only pull your AirAwning by the webbing loop at either end of the kador.)
Peg out the rear corners of the attachment section of the AirAway/AirAwning at the base of the vehicle.
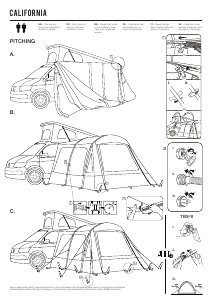
Locate inflation points on each beam
Remove the valve cap (figure 1)
Insert the correct pump adaptor, which will lock onto the valve (figure 2 & 3)
There is no need to turn the white valve button as the adaptor will move this to the correct position
Inflate all tubes to 7psi. The tubes MUST be guided into an arch as they are inflated (figure 4)
DO NOT OVER-INFLATE THE BEAMS
Inflate all AirBeams to 7psi. The Vango AirBeam® pump is supplied with a pressure release valve which will release pressure if more than 7.5 - 8psi is put into the
AirBeam.
Start with the rear AirBeam and guide into an upright position whilst it is inflating
A small amount of air may leak from the valve when it is being inflated but this is normal
Remove the pump adaptor as soon as the beam is at the correct psi
Replace the valve cap to create an air tight seal (figure 5 & 6)
Peg out the remaining poles and pegging points using pin pegs at the base of poles
Repeat for front AirBeam
With the doors fully zipped up, peg out the front corners of the AirAwning with the rock pegs supplied, ensuring the sides and front of the awning are taut. The
adjustable pegging points allow the pegs to be positioned in a range of places, to avoid rocks and stones in the ground. They are adjustable to allow the webbing to be
tensioned, in order to achieve a taut canvas.
Once the 4 corners of the AirAwning have been positioned, all the other pegging points (both adjustable webbing and elastic) at the base of each door should be pegged
out, using the rock pegs supplied.
At the base of each door is a webbing strap with 2 eyelets in it. Insert a groundsheet peg (a peg with a flat, round top) in to each of these eyelets to hold the webbing
strap close to the ground.
Inside the AirAwning, inflate & install the "Bracer" AirBeams between the main AirBeams. The ends of these are located using hook & loop fabrics. The Bracer AirBeams
will increase the tension in the roof and will provide extra stability during poor weather.
2 long pads are provided: these are fitted vertically between the AirAwning and the caravan, reducing draughts. They are attached using hook & loop fixings. To hold
the pads against the caravan in windier conditions, 2 adjustable steel poles are supplied. Place the flat end of these poles into the webbing sleeves at either end of the
awning, just below the outermost AirBeams. Place the lower, pointed end into one of the two eyelets in the base of the rear of the AirAwning. The length of the pole
can then be adjusted to apply tension between the top of the AirAwning and the base. Finally, attach the AirAwning fabric to the steel pole by wrapping the hook & loop
tabs around it.
Identify the PVC wheel arch covers & draught skirt. Slide the draught skirt into place using the awning rail at the base of the caravan. The bottom of the draught skirt is
held in place with groundsheet pegs. The wheel arch covers are attached using the suckers provided. For a single axle caravan, only one of these covers will be needed.
In extreme weather, the AirAwning may slide along the awning rail. To prevent this, attach one of the sucker hooks to the caravan, and attach the webbing loop at the
end of the kador strip into the hook.
Webbing Straps - Remove the supplied webbing straps from the peg bag and clip into the corresponding buckles on the rear of the AirAway roof. Pass the straps over
the roof of the vehicle and peg into the ground. Adjust the straps to fully tension the roof.
Peg out ALL guy lines using pin-pegs ensuring that guy line fabric attachment points are evenly tensioned.
When the AirAwning is to be used in windy weather conditions, Vango recommends using the supplied storm straps
The straps should be attached to the corresponding clips on the fillets attached to the rear AirBeam of the AirAway, and secured using the pegs supplied.
TO DEFLATE AIRBEAM/ AIRAWAY/ AIRAWNING:
To deflate the AirBeam (remove the cap (figure 7)) press & turn (figure 8) the button from CLOSED to OPEN
In the unlikely event of a puncture:
Deflate the air beam. Unzip the internal flysheet sleeve which contains the affected beam.
Remove the tube and its protective outer.
The zips for the protective outer are cable tied together to prevent accidental access. Cut the cable tie and open the zip.
DO NOT open these zips when the tube inflated.
Remove the clear rubberised tube from the protective sleeve taking care when removing the valve from the sleeve.
Partially inflate the tube and pass through a bucket or basin of water, looking for air bubbles. This will indicate location of puncture
Use the repair patch provided and cover hole, using instructions on patch. Re-insert tube into protective outer, closing zip from both ends, so that zip pullers are in the
flysheet sleeve (this might be easier with the tube partially inflated)
AIRBEAM INFLATION:
AIRBEAM DEFLATION:


Partecipa alla conversazione su questo prodotto
Qui puoi condividere cosa pensi di Vango Braemar 420 Veranda. Se hai una domanda, leggi prima attentamente il manuale. La richiesta di un manuale può essere effettuata utilizzando il nostro modulo di contatto.