
VE5882
EN | Instruction manual
NL | Gebruiksaanwijzing
FR | Mode d’emploi
DE | Bedienungsanleitung
ES | Manual de usuario
PT | Manual de utilizador
IT | Manuele utente
SV | Bruksanvisning
PL | Instrukcja obsługi
CS | Návod na použití
SK | Návod na použitie
RU | Руководство по
эксплуатации
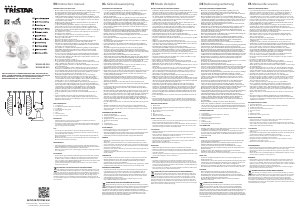
PARTS DESCRIPTION / ONDERDELENBESCHRIJVING / DESCRIPTION DES PIÈCES / TEILEBESCHREIBUNG /
DESCRIPCIÓN DE LAS PIEZAS / DESCRIÇÃO DOS COMPONENTES / DESCRIZIONE DELLE PARTI /
BESKRIVNING AV DELAR / OPIS CZĘŚCI / POPIS SOUČÁSTÍ / POPIS SÚČASTÍ / ПИСАНИЕ ЗАПЧАСТИ
2
12
13
11
6
5
810
9
1
4
3
14
WWW.TRISTAR.EU
Tristar Europe B.V. | Jules Verneweg 87
5015 BH Tilburg | The Netherlands
ENInstruction manual
SAFETY
• This appliance shall not be used by children
aged less than 8 years. This appliance can be
used by children aged from 8 years and above
and persons with reduced physical, sensory or
mental capabilities or lack of experience and
knowledge if they have been given
supervision or instruction concerning use of
the appliance in a safe way and understand
the hazards involved. Children shall not play
with the appliance. Keep the appliance and its
cord out of reach of children aged less than 8
years. Cleaning and user maintenance shall
not be made by children unless older than 8
and supervised.
• By ignoring the safety instructions the
manufacturer cannot be held responsible for
the damage.
• If the supply cord is damaged, it must be
replaced by the manufacturer, its service
agent or similarly qualified persons in order to
avoid a hazard.
• Never move the appliance by pulling the cord
and make sure the cord cannot become
entangled.
• The appliance must be placed on a stable,
level surface.
• The user must not leave the device
unattended while it is connected to the supply.
• This appliance is only to be used for
household purposes and only for the purpose
it is made for.
• To protect yourself against an electric shock,
do not immerse the cord, plug or appliance in
the water or any other liquid.
• Never insert your fingers or any other object
into the air outlet. Take special care to warn
children of these dangers.
• Do not use the unit:
near a source of fire.
in an area exposed to direct sunlight.
in an area where water is likely to splash.
near a bath, a shower or a swimming pool.
• WARNING: Do not wrap the cable around the
main body of the appliance during or after
use.
• WARNING: Misuse of the appliance could
cause personal injury.
• This appliance is intended to be used in
household and similar applications such as:
– Staff kitchen areas in shops, offices and other working
environments.
– By clients in hotels, motels and other residential type
environments.
– Bed and breakfast type environments.
– Farm houses.
Cleaning and maintenance
• Always unplug the fan before cleaning or
assembly.
• Do not allow water to drip on or in the fan
motor housing.
• Clean the appliance with a damp cloth. Never
use harsh and abrasive cleaners, scouring
pad or steel wool, which damages the device.
• Never immerse the electrical device in water
or any other liquid.
• Ensure that the fan is switched off from the
supply mains before removing the guard.
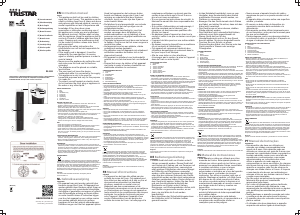
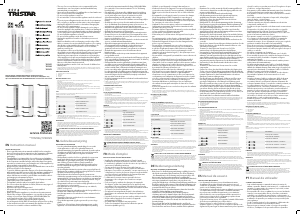
PARTS DESCRIPTION
Name of parts
1. Motor 6. Motor shaft 11. Blade
2. Height adjustment button 7. Base 12. Blade nut
3. Remote control holder 8. Nut 13. Front guard
4. Stand pile 9. Rear guard 14. Remote control
5. Handle 10. Guard stopper
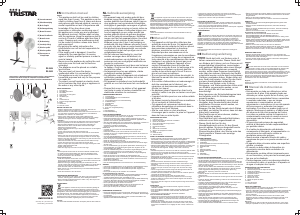
Remote control
Control panel
1. Speed button 4. Swing mode
2. Timer button 5. On/Off button
3. Mode 6. Led indicators
BEFORE THE FIRST USE
• Take the appliance andaccessoriesoutthebox.Removethe
stickers,protective foilorplasticfrom thedevice.
• Before using your appliance for the first time, wipe off all removable parts
with a damp cloth. Never use abrasive products.
• Place the device on a flat stable surface and ensure a minimum of 10
cm. free space around the device. This device is not suitable for
installation in a cabinet or for outside use.
• Put the power cable into the socket. (Note: Make sure the voltage which
is indicated on the device matches the local voltage before connecting
the device. Voltage 220V-240V 50Hz).
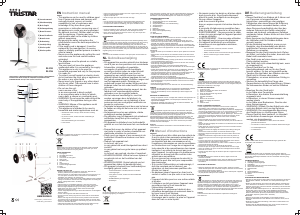
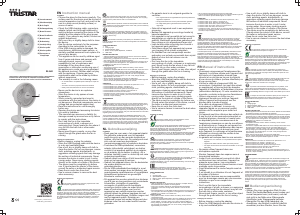
How to assemble
Installing the base
1. Remove the nut from the stand, and insert the stand into the base.
2. Tighten the nut from the bottom of base to secure the stand to the base.
3. Tighten the nut securely, not to be loosened.
Installing the rear guard
4. Remove the guard stopper nut ,cap and Blade nut. Fix the rear guard to
the motor.
5. Tighten the guard stopper nut securely.
Installing the blade
6. Insert the blade into the motor shaft closely.
7. Tighten the blade with blade nut.
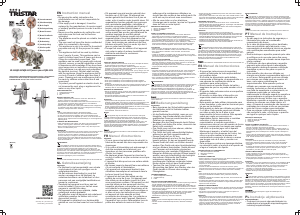
Installing the front guard
8. Align the hook of front guard with the marked spot at the top of rear
guard, then insert the wire rod. Match front and rear guards, insert in order
from top to bottom (all the way around). Engage the clip to fix the front and
rear guard as shown in the figure and fix with screw.
How to adjust the height of slide pipe
Press the height adjustment button to release the lock and enable to
adjust the height of slide pipe.
Attention:
• Make sure to fix the slide pipe before carrying.
• When you have difficulty in raising up the slide pipe or pressing the
height adjustment button, once push down the pipe, then press the
button and raise the pipe.
How to adjust the vertical wind direction by hand
• Adjust to the desired angle with grasping the main body, holding the
handle and oscillating up and down.
USE
• Press the on/off key to activate the fan.
• Press the oscillation key to activate or deactivate the swing function.
• Press the speed key to choose the desired speed (total 6 speed levels).
• Press mode key to select one of three different wind types.
• When the fan is on, press the timer key to set the desired shut down time
0.5-7.5 hours. In stand-by mode, you can pre-set the fan to start in
0.5-7.5 hours.
• Press light button on the remote control to adjust the brightness of the
indicator light or turn off the indicator light.
ENVIRONMENT
This appliance should not be put into the domestic garbage at the
end of its durability, but must be offered at a central point for the recycling
of electric and electronic domestic appliances. This symbol on the
appliance, instruction manual and packaging puts your attention to this
important issue. The materials used in this appliance can be recycled. By
recycling of used domestic appliances you contribute an important push to
the protection of our environment. Ask your local authorities for information
regarding the point of recollection.
Support
You can find all available information and spare parts at www.tristar.eu!
NL
Gebruiksaanwijzing
VEILIGHEID
• Dit apparaat mag niet worden gebruikt door
kinderen jonger dan 8 jaar. Dit apparaat kan
worden gebruikt door kinderen vanaf 8 jaar en
door personen met verminderde lichamelijke,
zintuiglijke of geestelijke vermogens of gebrek
aan de benodigde ervaring en kennis indien ze
onder toezicht staan of instructies krijgen over
hoe het apparaat op een veilige manier kan
worden gebruikt alsook de gevaren begrijpen
die met het gebruik samenhangen. Kinderen
mogen niet met het apparaat spelen. Houd het
apparaat en het netsnoer buiten bereik van
kinderen jonger dan 8 jaar. Laat reiniging en
onderhoud niet door kinderen uitvoeren, tenzij
ze ouder zijn dan 8 jaar en onder toezicht staan.
• Als u de veiligheidsinstructies negeert, kan de
fabrikant niet verantwoordelijk worden
gehouden voor de mogelijke schade.
• Als het netsnoer beschadigd is, moet het
worden vervangen door de fabrikant, de
onderhoudsmonteur van de fabrikant of door
personen met een soortgelijke kwalificatie om
gevaar te voorkomen.
• Verplaats het apparaat nooit door aan het snoer
te trekken en zorg dat het snoer niet in de war
kan raken.
• Het apparaat moet op een stabiele, vlakke
ondergrond worden geplaatst.
• De gebruiker mag het apparaat niet onbeheerd
achterlaten wanneer de stekker zich in het
stopcontact bevindt.
• Dit apparaat is uitsluitend voor huishoudelijk
gebruik en voor het doel waar het voor bestemd
is.
• Dompel het snoer, de stekker of het apparaat
niet onder in water of andere vloeistoffen om
elektrische schokken te voorkomen.
• Steek nooit uw vingers of een voorwerp in de
luchtuitlaat. Waarschuw kinderen voor deze
gevaren.
• Gebruik het apparaat niet:
in de buurt van vuur.
in een gebied dat wordt blootgesteld aan direct
zonlicht.
in een gebied met een grote kans op spattend
water.
in de buurt van een bad, douche of zwembad.
• WAARSCHUWING: Wikkel het snoer tijdens of
na gebruik niet om het hoofddeel van het
apparaat.
• WAARSCHUWING: Onjuist gebruik van het
apparaat kan leiden tot persoonlijk letsel.
• Dit apparaat is bedoeld voor huishoudelijk en
soortgelijk gebruik, zoals:
– Personeelskeukens in winkels, kantoren en andere
werkomgevingen.
– Door gasten in hotels, motels en andere residentiële
omgevingen.
– Bed&Breakfast-type omgevingen.
– Boerderijen.
Reiniging en onderhoud
• Haal de stekker van de ventilator altijd uit het
stopcontact voordat u deze reinigt of monteert.
• Zorg dat er geen water op of in de behuizing
van de ventilatormotor loopt.
• Maak het apparaat schoon met een vochtige
doek. Gebruik nooit krassende en schurende
schoonmaakmiddelen, schuursponzen of
staalwol, aangezien deze het apparaat kunnen
beschadigen.
• Dompel het elektrische apparaat nooit onder in
water of andere vloeistoffen.
• Zorg dat de ventilator is losgekoppeld van de
netvoeding voordat u de afscherming verwijdert.
BESCHRIJVING VAN ONDERDELEN
Naam van onderdelen
1. Motor 6. Motorschacht 11. Blad
2. Knop voor hoogteaanpassing 7. Basis 12. Bladmoer
3. Houder voor
afstandsbediening
8. Moer 13. Voorbehuizing
4. Standaardvoet 9. Achterbehuizing 14.
Afstandsbediening
5. Handgreep 10. Behuizingsstop
Afstandsbediening
Bedieningspaneel
1. Snelheidsknop 4. Zwenkmodus
2. Timerknop 5. Aan/uit-knop
3. Modus 6. Led-indicators
VOOR HET EERSTE GEBRUIK
• Haal het apparaat en de accessoires uit de doos.Verwijder de stickers,
de beschermfolie of het plastic van het apparaat.
• Veeg voor het eerste gebruik van het apparaat alle afneembare
onderdelen af met een vochtige doek. Gebruik nooit schurende
producten.
• Plaats het apparaat op een vlakke, stabiele ondergrond. Zorg voor
minimaal 10 cm vrije ruimte rondom het apparaat. Dit apparaat is niet
geschikt voor inbouw of gebruik buitenshuis.
• Sluit de voedingskabel aan op het stopcontact. (Opmerking: Controleer
of het voltage op het apparaat overeenkomt met de plaatselijke
netspanning voordat u het apparaat aansluit. Voltage 220V-240V 50Hz.)
Montage
De basis installeren
1. Verwijder de moer uit de standaard en plaats de standaard op de basis.
2. Draai de moer onderaan de basis vast om de standaard vast te zetten
op de basis.
3. Draai de moer stevig vast, deze moet niet loskomen.
De achterbehuizing installeren
4. Verwijder de behuizingsstopmoer, de kap en de bladmoer. Bevestig de
achterbehuizing op de motor.
5. Draai de behuizingsstopmoer stevig vast.
Het blad installeren
6. Plaats het blad goed in de motorschacht.
7. Draai het blad vast met de bladmoer.
De voorbehuizing installeren
8. Lijn de haak van de voorbehuizing uit met het gemarkeerde punt op de
achterbehuizing en plaats de walsdraad. Lijn de voor- en achterbehuizing
uit en plaats deze op volgorde van onder naar boven (ga helemaal rond).
Sluit de klem om de voor- en achterbehuizing aan elkaar vast te maken
zoals op de afbeelding wordt weergegeven. Maak de behuizingen aan
elkaar vast met de schroef.
De hoogte van de verschuifbare buis aanpassen
Druk op de knop voor hoogteaanpassing om de vergrendeling vrij te geven
en de hoogte van de verschuifbare buis aan te passen.
Let op:
• Zorg ervoor dat u de buis vastzet voordat u het apparaat gaat dragen.
• Als het niet lukt om de buis hoger te zetten of de knop voor
hoogteaanpassing in te drukken, drukt u de buis één keer omlaag en
drukt u vervolgens op de knop om de buis hoger te zetten.
De verticale windrichting handmatig aanpassen
• Kies de gewenste hoek door het hoofdgedeelte vast te pakken, de
handgreep vast te houden en de zwenking omhoog en omlaag te richten.
GEBRUIK
• Druk op de aan/uit-toets om de ventilator in te schakelen
• Druk op de oscillatietoets om de draaifunctie in of uit te schakelen.
• Druk op de snelheidstoets om de gewenste snelheid te kiezen (6
snelheidsniveaus in totaal).
• Druk op de modustoets om één of drie verschillende soorten wind te
selecteren.
• Als de ventilator is ingeschakeld, drukt u op de timertoets om de
gewenste uitschakeltijd te kiezen: over 0,5 tot 7,5 uur. In de stand-
bymodus kunt u vooraf instellen dat de ventilator over 0,5 tot 7,5 uur
begint.
• Druk op de lichtknop op de afstandsbediening om de helderheid van het
indicatielampje te wijzigen of het indicatielampje uit te schakelen.
MILIEU
Dit apparaat mag aan het einde van de levensduur niet bij het
normale huisafval worden gedeponeerd, maar moet bij een speciaal
inzamelpunt voor hergebruik van elektrische en elektronische apparaten
worden aangeboden. Het symbool op het apparaat, in de
gebruiksaanwijzing en op de verpakking attendeert u hierop. De in het
apparaat gebruikte materialen kunnen worden gerecycled. Met het
recyclen van gebruikte huishoudelijke apparaten levert u een belangrijke
bijdrage aan de bescherming van ons milieu. Informeer bij uw lokale
overheid naar het inzamelpunt.
Support
U kunt alle beschikbare informatie en reserveonderdelen vinden op
www.tristar.eu!
FR
Manuel d'instructions
SÉCURITÉ
• Cet appareil ne doit pas être utilisé par des
enfants de moins de 8 ans. Cet appareil peut
être utilisé par des enfants de 8 ans ou plus et
des personnes présentant un handicap
physique, sensoriel ou mental voire ne
disposant pas des connaissances et de
l'expérience nécessaires en cas de surveillance
ou d'instructions sur l'usage de cet appareil en
toute sécurité et de compréhension des risques
impliqués. Les enfants ne doivent pas jouer
avec l'appareil. Maintenez l'appareil et son
cordon d'alimentation hors de portée des
enfants de moins de 8 ans. Le nettoyage et la
maintenance utilisateur ne doivent pas être
confiés à des enfants sauf s'ils ont 8 ans ou
plus et sont sous surveillance.
• Si vous ignorez les consignes de sécurité, le
fabricant ne peut être tenu pour responsable
des dommages.
• Si le cordon d'alimentation est endommagé, il
doit être remplacé par le fabricant, son
réparateur ou des personnes qualifiées afin
d'éviter tout risque.
• Ne déplacez jamais l'appareil en tirant sur le
cordon et veillez à ce que celui-ci ne s'enroule
pas.
• L'appareil doit être posé sur une surface stable
et nivelée.
• Ne laissez jamais le dispositif sans surveillance
s'il est connecté à l'alimentation.
• Cet appareil est uniquement destiné à des
utilisations domestiques et seulement dans le
but pour lequel il est fabriqué.
• Afin de vous éviter un choc électrique,
n'immergez pas le cordon, la prise ou l'appareil
dans de l'eau ou autre liquide.
• Ne jamais insérer les doigts ou d'autres objets
dans la sortie d'air. Soyez particulièrement
attentif à avertir les enfants de ces dangers.
• Ne pas utiliser l'appareil:
près d'une source d'ignition.
dans un espace exposé à la lumière directe du
soleil.
à proximité d'éclaboussures possibles d'eau.
près d'un bain, d'une douche ou d'une piscine.
• AVERTISSEMENT: Ne pas enrouler le câble
autour du corps principal de l'appareil pendant
ou après utilisation.
• AVERTISSEMENT: Une mauvaise utilisation
de l'appareil peut provoquer des blessures.
• Cet appareil est destiné à une utilisation
domestique et aux applications similaires,
notamment:


Partecipa alla conversazione su questo prodotto
Qui puoi condividere cosa pensi di Tristar VE-5882 Ventilatore. Se hai una domanda, leggi prima attentamente il manuale. La richiesta di un manuale può essere effettuata utilizzando il nostro modulo di contatto.