2 3
GB
GB
remains on for a few seconds to give you the time
to proceed with the following steps. The indicator
lamp fl ashes to signal that this time is almost up,
and then goes off).
3. Press the key that corresponds to the type of
equipment you want to control:
TV: television set, DVD: DVD player, VCR: Video
recorder, SAT/CABLE: satellite receiver, cable,
DVBT, ADSL, AUDIO/AUX: audio equipment
and any other appliance.
4. While the indicator is lit, enter the fi rst digit of the
4-digit code proposed for the set to be controlled
(example: 0166 for a Thomson TV).
5. Direct the remote control towards the set and try to
switch it off by pressing the key G.
6. Should the set not switch off, repeat step 2. Then
type in the next 4-digit code. Try to switch off the
set by pressing key G once. Repeat this procedure
by trying out each of the 4-digit codes.
Check of the programming:
In principle, your set is ready for receiving the remote
control commands.
Check your remote control for proper functioning by
performing the test described on page 2.
Method C – Programming by means
of code retrieval
Should none of the codes work, you still have the
possibility of retrieving the appropriate code without
having to perform any input.
1. Switch on the set you want to control.
2. Hold down the SETUP key until the red indicator
lamp blinks and then remains lit.
3. Press the key that corresponds to the type of
equipment you want to control:
TV: television set, DVD: DVD player, VCR: Video
recorder, SAT/CABLE: satellite receiver, cable,
DVBT, ADSL, AUDIO/AUX: audio equipment
and any other appliance.
4. Direct the remote control towards the set and try to
switch it off by pressing the key G.
5. If the set you want to control switches off, press
OK to memorise the code.
6. Should the set not switch off, press key G as many
times as required (up to 200 times), until the
set switches off. Between two key presses, leave
enough time for the key corresponding to the red
indicator lamp to light up again (about 1 second).
Proceeding this way will enable you to see whether
the set responds or not.
7. Immediately upon the switching-off of the set to be
controlled, press OK to store the code.
Check of the programming:
In principle, your set is ready for receiving the remote
control commands.
Check your remote control for proper functioning by
performing the test described on page 2.
Try out other remote control keys to fi nd out the range
of functions you can control. If you think that not all
of the keys are active, repeat the procedure of this
programming method to fi nd out the code supporting a
wider range of features.
Method D – Automatic
code search
With this method, the remote control scrolls through
the full code list by sending an IR signal to the set to be
controlled remotely. Proceed as follows:
1. Check that your equipment is on. If not, switch it on
manually.
2. Hold down the SETUP key until the red indicator
lamp blinks and then remains lit (the indicator light
remains on for a few seconds to give you the time
to proceed with the following steps. The indicator
lamp fl ashes to signal that this time is almost up,
and then goes off).
3. Release the SETUP key.
4. Press the key corresponding to the type of
equipment (for example TV).
5. Press the Prog+ or standby G or B (DVD/
VCR only) key. After a few seconds, the remote
control begins to scroll through the whole code
list included in the library (at a rate of roughly
1 code per second). Press the Prog+ key once
again to slow down the test speed (1 code every
3 seconds). As soon as the set changes channels,
you must press OK to save the code and stop the
remote control scrolling through the list. If you do
not react quickly enough, you can go back to the
previous code by pressing Prog- or E (DVD/
VCR only) as many times as necessary (you can
go forward by pressing G , Prog+ or B (DVD/
VCR only) if you have gone back too far). As soon
as the set responds again, press OK to save the
code.
Method E – Programming for control of a
COMBO (combined TV-VCR, TV/DVD, VCR/
DVD, … set)
Depending on the COMBO group (TV/VCR, VCR/
DVD, etc.) and the make, you will be required to enter
a single code for both devices in the COMBO, or to
enter two codes, one code per device. Consult the
separate list to discover this.
Before you start programming, you must fi nd the
subcode or code of the subset to be controlled
(television or video recorder, ...). Refer to the list
supplied with this user manual (see page subcodes
or codes).
1. Switch on the COMBO you want to control.
2. Hold the SETUP key down until the red indicator
lamp blinks and then remains lit.
3. Press the key of the fi rst device to control, and then
follow one of the programming methods A, B, C or
D previously described.
4. If a second code programming is required, then
repeat steps 2 and 3 above.
How to retrieve
a programmed code
It may be useful to retrieve the code programmed in
the remote control.
1. Hold down the SETUP key until the red indicator
lamp blinks and then remains lit.
2. Press the key that corresponds to the type of
equipment you want to fi nd the code:
TV: television set, DVD: DVD player, VCR: Video
recorder, SAT/CABLE: satellite receiver, cable,
DVBT, ADSL, AUDIO/AUX: audio equipment
and any other appliance.
3. Press the SETUP key briefl y, so that the red
indicator lamp blinks once.
4. Press the numbered keys in ascending order (0 to
9) until the red indicator lamp blinks once.
5. The number that caused the red indicator lamp to
blink is the fi rst of the four numbers that make up
your code. Make a note of it below.
6. Repeat step 4 to fi nd out the other numbers of the
code.
7. When the fourth number has been found, the red
indicator lamp goes out.
Check of
the programming
- For a television or a satellite receiver: switch on
and, for example, press 2 to change channels,
etc...
- Video recorder: load a tape and then press B.
- DVD player: load a DVD and then press B.
Try other remote control keys to fi nd out the range of
functions you can control. If you think that not all of the
keys are active, try the programming Method B or C.
When you have retrieved the code of
your set, jot it down so that you can use it
whenever needed.
After battery replacement, you may have to
programme the remote control again.
Learning function
If the make of the device you wish to control is not in
the separate code list or if some functions are missing
in the code you have programmed, you can copy
the key functions of the original remote control of
the device into your ROC5209. Depending on the
format of the transmission codes of the original remote
control, your ROC5209 remote control can memorise
up to 150 keys.
Global delete – Delete all the keys copied
(this is recommended the fi rst time you use
this function)
1. Hold down the SETUP key until the red indicator
lamp remains lit.
2. Release the SETUP key.
3. Press twice on the LEARN key. The red indicator
lamp goes out and then relights.
4. Press once on the SETUP key. The red indicator
lamp goes out after several seconds.
5. All the copied keys are now deleted.
Before starting
• The batteries in the 2 remote controls must be in
good condition; change them if necessary.
• First copy 2 or 3 keys from the original remote
control in order to check the compatibility of the
codes of both remote controls. Then carry out a
global delete of these keys before starting the full
learning procedure.
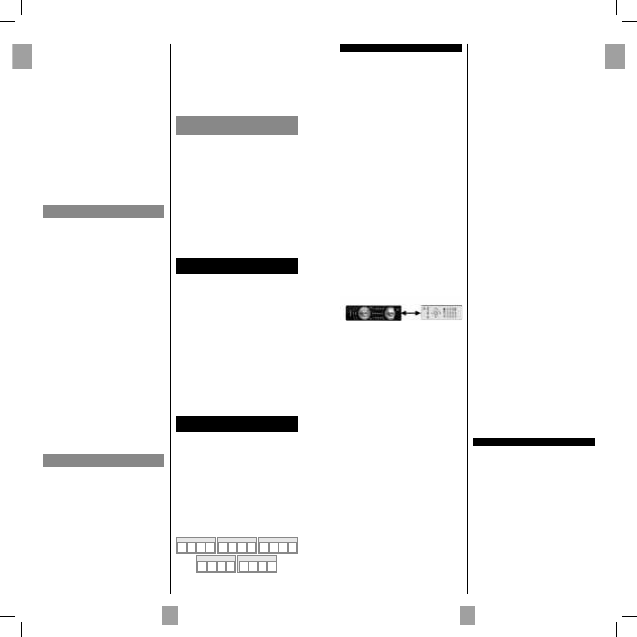
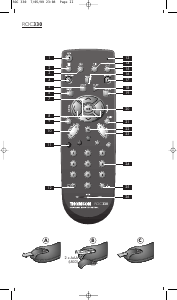
• Lay out the original remote control and your
ROC5209 end to end so as to align the LED
diodes on the 2 remote controls. Where necessary
adjust the height of both remote controls so that the
LED diodes are properly aligned.
• Place the remote controls with the infrared diodes
on a table so that they point each other at a
distance between 15 and 50 mm.
• Do not move the remote controls during the
learning procedure.
• Ensure that the room is not lit by fl uorescents tubes
or low consumption lamps since such light sources
can interfere with the copying.
• The 2 remote controls must be at least one metre
away from any light source.
• Avoid copying VOL and keys codes and the play
keys since depending on the remote controls the
codes of these keys do not necessarily control the
same devices.
• When the memory of your ROC5209 is full,
the mode key will blink for 3 seconds. It is then
not possible to copy any more codes without fi rst
carrying out a global delete.
• When you copy a key, it is possible that the mode
key will blink feebly. In this case, do not release the
key and wait until the blinking stops.
Note 1: if the learning procedure does not seem to
work correctly, try the following:
1. End the learning procedure by pressing SETUP.
2. Check that the LEDs of the two remote controls
are properly aligned. Carry out the alignment
procedure.
3. Modify the distance between the remote controls,
increasing or reducing the distance from 1.5 cm to
5 cm.
4. Restart the procedure from the beginning.
5. If the problem persists and always with the same
key, check that the original remote control is
actually operating: is it sending IR signals? (check
batteries; is it correctly aligned in relation to the
diode on your ROC5209?)
Note 2:
• You cannot copy keys to the LEARN SETUP and
MODE keys.
• All the keys copied to a mode will be deleted if a 4
fi gure code is entered for this mode (and likewise
for direct entry of a code, search of a code or
make).
Identifying the position of the diode on the
original remote control (keys to copy)
If the Infrared LED of the original remote control is not
visible (for example, if hidden behind a dark plastic
plate), the instructions below will help you to locate
it precisely.
1. Place the front of the original remote control (the
part you point at the device to control) around
2.5 cm from the LED of your ROC5209 (see
LEARNING diagram above).
2. Hold down the SETUP key until the red indicator
lamp remains lit.
3. Release the SETUP key.
4. Press once on a mode key (TV, DVD, VCR, …).
The indicator lamp goes out and then relights.
5. Press once on the LEARN key.
6. Hold down one of the keys on the original remote
control while moving the remote control from left
to right. As soon as the 2 remote controls are
correctly aligned, the red indicator lamp blinks
rapidly.
7. To copy the key functions from your original
remote control into your ROC5209, go to step 5
of “To copy keys”.
Note: Some original remote controls don’t transmit
continuous IR signals when a key is held down. If this is
the case, press several times on one of the keys while
moving the remote control from left to right.
To copy keys
1. Hold down the SETUP key until the red indicator
lamp remains lit.
2. Release the SETUP key.
3. Press once on the mode key (TV, DVD,
VCR,...).The indicator lamp goes out then relights.
4. Press the LEARN key once.
5. Press once on the key of your ROC5209 to which
you want to copy one of the keys of your original
remote control.
6. Hold down the key of the original remote control
you wish to copy until the red indicator lamp goes
out and then relights (2 to 3 seconds). In case of
problems, the red indicator lamp will blink for
3 seconds but will remain in learning mode. Try
again or try another key.
7. For the other keys, repeat the procedure from step
5 onwards.
8. Press the SETUP key once when all the desired
keys have been copied. The mode key goes off.
To delete all keys copied under a mode
1. Hold down the SETUP key until the red indicator
lamp remains lit
2. Release the SETUP key.
3. Press once on a mode key (TV, DVD, SAT,...).
The red indicator lamp goes out then relights.
4. Press twice on the LEARN. key. The red indicator
lamp goes out then relights.
5. Press once on the SETUP key. The red indicator
lamp goes out. All the keys copied under this mode
are deleted.
Other functions
Placing all devices on standby
Press the G key twice in less than one second, keeping
it held down the second time. All the devices go on
standby one after the other (the devices which were
already on Standby may turn on).
Adjustment of ALL volume controls under a
specifi c mode
In its delivered state, the ROC5209 is programmed
such that all modes will use their own Volume and
Mute functions if present.
You can allocate the volume control to one of the
modes of the remote control on condition that the
volume control exists on the corresponding device
(e.g. control of TV sound in TV mode, DVD mode, VCR
Mode, etc.).
1. Hold the SETUP key down until the red indicator
lamp blinks and then remains lit.
2. Release the SETUP key
3. Press the H key until the red indicator lamp blinks
once.
SAT/CAB CODEAUDIO/AUX CODE
VCR CODE
TV CODE
DVD CODE
00131867bda.indd Abs1:2-Abs1:300131867bda.indd Abs1:2-Abs1:3 22.09.2009 10:02:37 Uhr22.09.2009 10:02:37 Uhr


Partecipa alla conversazione su questo prodotto
Qui puoi condividere cosa pensi di Thomson ROC5209 Telecomando. Se hai una domanda, leggi prima attentamente il manuale. La richiesta di un manuale può essere effettuata utilizzando il nostro modulo di contatto.