Wir danken Ihnen für das Vertrauen, das Sie Nikon mit dem Kauf des AF Zoom-Nikkor 24–85 mm
f/2.8–4D IF bewiesen haben, und wir hoffen, daß Sie viele Jahre ungetrübte Freude an Ihrem neuen
Objektiv haben werden. Bitte lesen Sie diese Gebrauchsanweisung sorgfältig durch. Bewahren Sie
dieses Benutzerhandbuch für späteres Nachschlagen griffbereit auf.
Hauptmerkmale
• Autofokusbetrieb mit entsprechend ausgerüsteten Nikon-Autofokuskameras (außer F3AF und Kameras, die kein
Bajonett mit AF-Anschlussstück haben); manuelle Schärfeneinstellung mit allen Nikon-Spiegelreflexkameras.
• Dank des Innenfokussiersystems (IF) keinerlei Änderung der Objektivlänge von unendlich bis zur kürzesten
Aufnahmedistanz von 0,5 m (von der Sensorebene gemessen). In der Makroeinstellung sind
Aufnahmedistanzen bis 0,21 m bei einem größtmöglichen Abbildungsverhältnis von 1:2 möglich.
Hervorragende Bildqualität dank einer asphärische Linse. Ein 9-blättrige Objektivverschluß sorgt für natürlich
unscharfen Hintergrund sowohl bei Weitwinkel- als auch Teleeinstellungen. Das Fokussieren bei
Makroeinstellung ist innerhalb eines Brennweitenbereichs von 35–85 mm möglich.
• Für noch genauere Belichtungsregelung wird die Distanz zum Aufnahmeobjekt vom Objektiv an die Kamera
übermittelt, so daß 3D-Matrix-Messung sowie 3D-Multi-Sensor-Aufhellblitzen mit entsprechend geeigneten
Nikon-Kameras und Nikon-Speedlights möglich ist.
Achtung!
• Halten Sie die CPU-Kontakte peinlich sauber, und schützen Sie sie vor Beschädigung!
• Folgendes Zubehör darf nicht an das Objektiv angesetzt werden, da es die CPU-Kontakte beschädigen könnte:
Automatik-Zwischenring PK-1, PK-11 (stattdessen PK-11A verwenden), Automatikring BR-4 (stattdessen BR-6
mit BR-2A verwenden) und Zwischenring K1. Anderes Zubehör kann bei Verwendung des Objektivs mit
gewissen Kameramodellen ungeeignet sein. Einzelheiten entnehmen Sie bitte das jeweiligen Benutzerhandbuch.
• Das Objektiv ist nicht zur Verwendung mit der Nikon F3AF mit angesetztem AF-Sucher DX-1 geeignet.
• In der Telestellung kann es zu leichter Vignettierung kommen, wenn der Makroschalter auf MACRO
(mit Abbildungsverhätnis von ca. 1:2) steht.
Fokussieren, Zoomen und Tiefenschärfe
Mit Nikon-Autofokuskameras (außer F3AF) wählen Sie zunächst durch Drehen des Zoomrings den gewünschten
Bildausschnitt, bevor Sie die automatisch Schärfeneinstellung aktivieren. Bei manueller Schärfeneinstellung spielt
die Brennweiteneinstellung keine Rolle, gestaltet sich bei langen Brennweiten jedoch einfacher, weil dann das Bild
größer und die Schärfentiefe geringer ist. Wenn Ihre Kamera über einen Schärfentiefenknopf oder –hebel verfügt,
können Sie die Schärfentiefe im Sucher betrachten.
Aufgrund der optischen Eigenschaften des Objektivs ergibt sich eine geringfügige Änderung der Brennweite
während des Zoomens bei Nahaufnahmen. Fokussieren Sie deshalb nach dem Zoomen nach, wenn der
Fokussierwähler der Kamera nicht auf C (Continuous Servo AF) steht.
• Die Entfernungsskala zeigt nicht den genauen Abstand zwischen Motiv und Kamera an. Die Werte sind
Näherungswerte und können nur als Richtlinie dienen.
Makroeinstellung (Abb. A)
Der normale Schärfenbereich geht von unendlich (∞) bis 0,5 m. Bei Einstellen des Makroschalters auf MACRO
sind Aufnahmedistanzen bis 0,21 m möglich. Das Fokussieren bei Makroeinstellung ist innerhalb eines
Brennweitenbereichs von 35–85 mm möglich. Der Makrobereich wird anhand einer orangeroten Linie auf dem
Objektivtubus angezeigt. Das größtmögliche Abbildungsverhältnis ergibt sich bei 35 mm Brennweite und beträgt
dann 1:3,6; bei 85 mm ist es 1:2.
Bevor Sie den Makroschalter wieder auf NORMAL zurückstellen, sorgen Sie dafür, daß der Fokussierring zwischen
unendlich (∞) bis 0,5 m eingestellt ist.
Empfohlene Einstellscheiben (Tabelle 1)
Für bestimmte Nikon-Kameras stehen verschiedene auswechselbare Einstellscheiben zur Verfügung, um jeder
Aufnahmesituation gerecht zu werden. Die zur Verwendung mit diesem Objektiv empfohlenen sind aufgelistet.
Verriegelung auf kleinster Blende (Abb. B)
Für Programm- und Blendenautomatik muß der Blendenring auf kleinster Öffnung (22) verriegelt werden.
1. Drehen Sie den Blendenring, bis die Blendenzahl 22 dem Blendenindex gegenübersteht.
2. Schieben Sie den Riegel in Richtung auf den Blendenring, so daß die beiden orangefarbenen Punkte
aufeinander ausgerichtet sind.
Zur Entriegelung schieben Sie den Riegel in die entgegengesetzte Richtung.
Gleitende Lichtstärke/zwei Blendenindizes (Abb. C)
Beim Durchfahren des Brennweitenbereichs von 24 mm auf 85 mm verringert sich die Anfangsöffnung um
ca. 1 Blende. Kameras mit Innenmessung gleichen dies automatisch aus. Auch bei TTL-Blitzautomatik mit einem
Nikon Blitzgerät ist keine Korrektur erforderlich. Eine geringe Korrektur kann jedoch an der Nah- bzw. Ferngrenze
der Blitzreichweite erforderlich werden.
Bei Verwendung eines Handbelichtungsmessers oder bei Aufnahmen im Computer-Blitzbetrieb wählen Sie den
Blendenindex nach der jeweils eingestellten Brennweite: Der Blendenindex (Linie) gilt für 24 mm, der Punkt für
85 mm. Am Blendenindex (Linie) ist der Blendenring bei jeder Blendenstufe mit Rastungen versehen. Für
Brennweiten zwischen den beiden Extremen verwenden Sie eine Mittelstellung zwischen beiden Blendenindizes.
Zur Bestimmung der korrekten Blende siehe Abb. C–Zusammenhang zwischen Brennweite und größter Öffnung.
Blitzaufnahmen mit Kameras mit eingebautem Blitz
Unter Vignettierung versteht man die Abdunkelung der Bildecken, wenn das Blitzlicht von der Gegenlichtblende
oder, je nach Brennweite oder Aufnahmedistanz, vom Objektivtubus verdeckt wird.
• Soll Vignettierung vermieden werden, so verwenden Sie einfach keine Gegenlichtblende.
• Aktuelle Angaben zur Verschattung mit diesem Objektiv finden Sie im Kamerahandbuch.
Verwenden der Bajonett-Gegenlichtblende HB-25
Anbringen der Gegenlichtblende
Richten Sie den Gegenlichtblende-Anbringindex ( ) an der Gegenlichtblende mit dem Gegenlichtblende-
Montageindex am Objektiv aus, und drehen Sie die Gegenlichtblende gegen den Uhrzeigersinn (von der
Kameraseite aus gesehen), bis sie einrastet.
• Stellen Sie sicher, dass der Gegenlichtblende-Montageindex und der Gegenlichtblende-Einstellindex
() aneinander ausgerichtet sind.
• Wurde die Gegenlichtblende nicht korrekt angebracht, können Randabschattungen auftreten.
• Zum Anbringen und Abnehmen der Gegenlichtblende halten Sie diese an ihrer Basis, nicht amAußenrand fest.
• Soll die Gegenlichtblende verstaut werden, bringen Sie diese in Umkehrstellung an.
Abnehmen der Gegenlichtblende
Halten Sie die Gegenlichtblende an ihrer Basis fest (nicht an der Außenkante) und lösen Sie sie durch
Drehen im Uhrzeigersinn (von der Kameraseite aus gesehen).
Pflege des Objektivs
• Reinigen Sie die Linsenoberfläche mit einem leicht mit Linsenreiniger angefeuchteten weichen, sauberen
Baumwolltuch oder Linsenreinigungspapier. Wischen Sie dabei in einer größer werdenden Kreisbewegung von
innen nach außen.
• Verwenden Sie keinesfalls Verdünnung oder Benzin zur Reinigung, da dieses zu Beschädigungen führen,
Gesundheitsschäden verursachen oder ein Feuer auslösen könnte.
• Zum Schutz der Frontlinse empfiehlt es sich, stets ein NC-Filter aufgesetzt zu lassen. Die Gegenlichtblende
wirkt als zusätzlicher Frontlinsenschutz.
• Bei Aufbewahrung des Objektivs in seinem Köcher sollten beide Objektivdeckel aufgesetzt sein.
• Bei längerer Nichtbenutzung sollte das Objektiv an einem kühlen, trockenen Ort aufbewahrt werden. Halten Sie
das Objektiv von direkter Sonneneinstrahlung oder Chemikalien wie Kampfer oder Naphthalin fern.
• Halten Sie das Objektiv von Wasser fern, das zur Korrosion und zu Betriebsstörungen führen kann.
• Einige Teile des Objektivs bestehen aus verstärktem Kunststoff. Lassen Sie das Objektiv deshalb nie an
übermäßig heißen Orten zurück!
Technische Daten
Objektivtyp: AF Zoom-Nikkor mit D-Charakteristik, eingebauter CPU und Nikon-Bajonett
Brennweite: 24–85 mm
Maximale Blendenöffnung: f/2,8–4
Optischer Aufbau: 15 Linsen in 11 Gruppen (2 asphärische Linsenelemente)
Bildwinkel: 84°–28˚30’ mit Nikon-Film-Spiegelreflexkameras im 35 mm-Format (135)
und Digital-Spiegelreflexkameras im Nikon-FX-Format
61° – 18°50’ mit Digital-Spiegelreflexkameras im Nikon-DX-Format
71° – 23° mit IX240-Systemkameras
Brennweitenskala: 24, 28, 35, 50, 70, 85mm
Entfernungsdaten: Werden an Kameras übertragen
Zoomen: Manuell über separaten Zoomring
Schärfeneinstellung: Innenfokussierung nach dem Nikon-IF-System; manuell über separaten
Fokussierring
Entfernungsskala: Unterteilt in Meter und Fuß, und zwar von 0,5 m bis unendlich (∞);
Makroschalter in Stellung MACRO bis ca. 0,21 m
Max. Abbildungsverhältnis: 1:16,7 (bei 24 mm) bis 1:5,9 (bei 85 mm) (Normal)
1:3,6 (bei 35 mm) bis 1:2 (bei 85 mm) (Makro)
Makrofokussierung: Bei Umschalten des Makroschalters
Infrarotkompensationsindex: Nur für 24-mm-Einstellung vorgesehen
Blendenskala: f/2,8–f/22, sowohl auf der Standardskala als auch der Skala für
Blendendirekteinspiegelung
Verriegelung für kleinste
Blende: Vorhanden
Blendenart: Vollautomatisch
Belichtungsmessung: Offenblendenmessung bei Kameras mit AI-Blendenkupplung oder CPU-
Interface-System; Arbeitsblendenmessung bei allen anderen Kameras
Befestigungsgröße: 72 mm (P = 0,75mm)
Abmessungen: ca. 78,5 mm Durchm. x 82,5 mm (Länge bis Flansch);
Gesamtlänge ca. 93,5mm
Gewicht: ca. 545 g
Änderungen von technischen Daten und Design durch den Hersteller vorbehalten.
Kamera Verwendbare Brennweite / Aufnahmedistanz
Serie F55
•
35 mm / 1,5 m oder mehr
•
50 mm / 1,0 m oder mehr
•
70 mm oder länger / Keine Beschränkung
Serie F65, Serie F50, F-601
•
50 mm / 1,0 m oder mehr
•
70 mm oder länger / 0,7 m oder mehr
Serie F60
•
50 mm / 0,7 m oder mehr
•
70 mm oder länger / 0,6 m oder mehr
Serie F70
•
28 mm / 1,5 m oder mehr
•
35 mm oder länger / Keine Beschränkung
Serie F75
•
35 mm / 0,8 m oder mehr
•
50 mm oder länger / Keine Beschränkung
Serie F80
•
28 mm / 1,0 m oder mehr
•
35 mm oder länger / Keine Beschränkung
Pronea 600i
•
24 mm / 2,5 m oder mehr
•
28 mm / 1,0 m oder mehr
•
35 mm / 0,7 m oder mehr
•
50 mm oder länger / Keine Beschränkung
Pronea S
•
50 mm / 2,0 m oder mehr
•
70 mm oder länger / 1,0 m oder mehr
はじめに
このたびは、ニッコールレンズをお買い上げいただきありがとうございます。
ご使用の前に使用説明書をよくお読みのうえ、十分に理解してから正しくお使いください。お読
みになった後は、お使いになる方がいつでも見られる所に必ず保管してください。
主な特長
●
ニコンのAF[オートフォーカス(カメラのレンズマウントにAFカップリングがないもの、F3AFを除
く)]カメラとの組み合わせでオートフォーカス撮影ができます。また、マニュアル(手動)によるピン
ト合わせも可能です。
●
ニコン独自のIF(インナーフォーカス)により、最短撮影距離0.5m(撮像面から、マクロ撮影時 約
0.21m、最大撮影倍率1/2倍)を達成するとともに、非球面レンズや良好なボケ味を表現する円形
絞りの採用により、コンパクトながら優れた描写性能を発揮します。また、焦点距離35〜85mmの
範囲では、マクロ撮影ができます。
●
被写体までの距離情報をカメラに伝達する機能を備えていますので、距離情報に対応したニコンカメ
ラやスピードライト使用時、より的確な露出制御を実現する3D-マルチパターン測光や3D-マルチBL
調光を可能とします。
注記
●
レンズのCPU信号接点は汚さないようにご注意ください。
●
CPU信号接点を破損しますので、オート接写リングPK-1・PK-11、K1リング、オートリングBR-4
はご使用になれません(PK-11の代わりにはPK-11Aリングを、また、オートリングBR-4の代わりに
はBR-6とBR-2Aを組み合わせてご使用ください)。その他のアクセサリーとカメラとの組み合わせ
使用に際しては、必ず各製品の使用説明書も併せてご参照ください。
●
ニコンF3AF用DX-1ファインダーと組み合わせての使用はできません。
●
テレ側のマクロ撮影(倍率1/2倍近傍)を行う際に、若干ケラレを生じる場合があります。
ピント合わせ/ズーミング/被写界深度
ニコンAF(オートフォーカス)カメラでオートフォーカス撮影を行う場合は、ズームリングを回転させ構
図を決めてから、ピント合わせを行ってください。マニュアルフォーカス撮影を行う場合は、どの焦点
距離でもピント合わせは行えますが、長焦点になるほど像が大きく、被写界深度も浅くなりますのでピ
ントが合わせやすくなります。プレビュー(絞り込み)機構を持つカメラでは、撮影前に被写界深度を確
認することができます。
なお、このレンズは光学系の特性上、近距離撮影時には、ズーミング動作に伴いピントが変化します。し
たがって、カメラのフォーカスモードがC(コンティニュアスAFモード)以外の場合は、ズーミング動作
を行った後に再度ピント合わせを行ってください。
●
距離目盛は目安であり、被写体までの距離を保証するものではありません。
マクロ撮影(近接撮影)(図A)
このレンズは、ズームリングが焦点距離35〜85mmの位置において通常撮影からマクロ撮影に切り換
え可能なマクロスイッチを装備しています。マクロスイッチをMACRO側に切り換えますと、最短撮影
距離約0.21m(撮像面から)までのマクロ撮影が可能になります。マクロ領域は、距離目盛のオレン
ジ色のラインで示されています。最大撮影倍率は焦点距離35mmで1/3.6倍、同85mmで1/2倍で
す。なお、マクロスイッチをNORMAL側(通常撮影)に戻すときは、フォーカスリングが無限遠(∞)〜
0.5mの位置にあることを確認してから切り換えてください。
ファインダースクリーンとの組み合わせ(表1)
ニコンF6、F5、F4、F3シリーズカメラには、多種類のファインダースクリーンがあり、レンズの
タイプや撮影条件に合わせて最適なものを選べます。このレンズに適したファインダースクリーンは、
表のとおりです。(なお、ご使用に際しては、必ず、各カメラの使用説明書も併せてご参照ください。)
最小絞りロックレバー(図B)
プログラムオートやシャッター優先オートによる撮影時は、絞りリングを最小絞りに固定しておくことが
できます。まずレンズの絞りリングを回し、最小絞り(最も大きい数値)を絞り指標に合わせます。次に、
最小絞りロックレバーを絞りリングの方向にスライドして2つのオレンジ指標を合わせます。これで絞り
リングは最小絞りでロックされます。ロックレバーを反対方向にスライドするとロックは解除されます。
開放F値の変化と2つの絞り指標(図C)
このレンズはズーミングにより、開放F値が最大約1段変化します。
TTL露出計内蔵カメラの場合、カメラが自動補正しますので補正の必要がなく、常に適正な露出が得ら
れます。また、ニコン製スピードライトのTTLモードによるフラッシュ撮影の場合も、適正な露出が得ら
れます。ただし、絞り値の変化に伴い調光距離も変わりますので、調光距離範囲に被写体が入るように、
絞り値や撮影距離を調節して撮影してください。
外部露出計で測光したり、TTLモード以外のフラッシュ撮影を行う場合は、次のように絞り値を設定し
てください。焦点距離24mmのときは線の絞り指標に、85mmのときは点の絞り指標に合わせます。
その他の焦点距離のときは、選んだ焦点距離に応じて2つの絞り指標の間に合わせます。線の絞り指標
には、クリックストップが付いています。なお、TTLモード以外のフラッシュ撮影では、2つの絞り指標
の中間に絞り目盛を合わせることで、どの焦点距離でも、ほぼ適正な露出が得られます。厳密な露出を
得るには、図Cの開放F値変化表を参照して調節してください。
カメラの内蔵フラッシュ使用時のケラレについて
カメラの内蔵フラッシュのケラレとは、フラッシュの光がレンズのフードや、焦点距離、撮影距離に
よってはレンズの先端でさえぎられて影になり、写真に映り込む現象です。
●
ケラレを防止するために、レンズフードは取り外して使用してください。
●
このレンズをカメラに取り付けたときのケラレの最新情報は、カメラの使用説明書でご確認
ください。
バヨネットフードHB-25の取り付け、取り外し
■取り付け方
レンズ先端のフード着脱指標とフード取り付け指標()を合わせ、カメラ側から見て左回りにカチ
ッと音がするまでフードを回転させ、確実に取り付け
ます。
●
フード着脱指標とフードセット指標()が合っていることを確認してください。
●
フードが正しく取り付けられないと撮影画面にケラレを生じますのでご注意ください。
●
フード先端を強くつかむと着脱が困難になります。着脱の際は、フードの根元(取り付け部分)付近を
持って回転させてください。
●
収納時はフードを逆向きにレンズに取り付けることができます。
■取り外し方
フードの根元付近を持ち、カメラ側から見て右回りにフードを回転させて取り外します。
レンズのお手入れと取り扱い上のご注意
●
レンズ表面のホコリや汚れは、市販のレンズクリーナーを湿らせた柔らかい木綿の布で、中心から外
側に円を描くように拭き取ります。
●
シンナーやベンジンなどの有機溶剤は絶対に使用しないでください。
●
レンズ表面の汚れや傷を防ぐために、NCフィルターを常用することをおすすめします。また、レンズ
フードも役立ちます。
●
レンズをケースに入れるときは、必ず、レンズキャップを前後に取り付けてください。
●
レンズを長期間使用しないときは、カビやサビを防ぐために、高温多湿のところを避けて風通しのよ
い場所に保管してください。また、直射日光のあたるところ、ナフタリンや樟脳のあるところも避け
てください。
●
レンズを水に濡らすと、部品がサビつくなどして故障の原因となりますのでご注意ください。
●
ストーブの前など、高温になるところに置かないでください。極端に温度が高くなると、外観の一部
に使用している強化プラスチックが変形することがあります。
仕様
型式: ニコンFマウントCPU内蔵Dタイプ、AFズームレンズ
焦点距離: 24mm― 85mm
最大口径比: 1:2.8― 4
レンズ構成: 11群15枚(非球面レンズ2枚)
画角: 84°―28°30′ … 35mm判一眼レフカメラ
FXフォーマットのデジタル一眼レフカメラ
61°―18°50′ … DXフォーマットのデジタル一眼レフカメラ
71°― 23° ……… IX240カメラ
焦点距離目盛: 24、28、35、50、70、85mm
撮影距離情報: カメラへの撮影距離情報出力可能
ズーミング: ズームリングによる回転式
ピント合わせ: IF(ニコン内焦)方式、マニュアルフォーカス可能
撮影距離目盛: ∞〜0.5m、2ft(併記)、マクロ領域は0.5m〜約0.21m
最大撮影倍率: 通常時:1/16.7〜1/5.9倍(24〜85mm)
マクロ時:1/3.6〜1/2倍(35〜85mm)
マクロ機能: マクロスイッチによる切り換え式
赤外指標: 焦点距離24mm時のみ
絞り目盛: 2.8、4、5.6、8、11、16、22、
最小絞りでロック可能(ファインダー内直読み用目盛併記)
絞り方式: 自動絞り
測光方式: CPU・AI方式のカメラでは開放測光、従来方式のカメラでは絞り込み測光
アタッチメントサイズ:
72mm(P=0.75mm)
大きさ: 約78.5(最大径)× 約82.5mm(長さ:バヨネットマウント基準面から
レンズ先端まで)、全長約93.5mm
質量: 約545g
●
仕様、外観の一部を、改善のため予告なく変更することがあります。
You are now the proud owner of the AF Zoom-Nikkor 24
–
85mm f/2.8
–
4D IF, a lens that will provide you with years of
exciting picture-taking opportunities. Before using this lens, please read these instructions. Also, keep this user’s manual
handy for future reference.
Major features
• Autofocus operation is possible with Nikon autofocus cameras (except the F3AF and cameras with lens mounts that do
not have AF coupling); manual focus possible with all Nikon SLRs.
• Thanks to its internal focusing (IF) system, there is no change in the overall length of the lens from infinity to its closest
focusing distance of 0.5m (1.6 ft) (from focal plane). In the macro range, this range extends to approx. 0.21m (0.7 ft)
with a maximum reproduction ratio of 1:2. In addition, outstanding image quality is provided through the use of an
aspherical lens element, while a 9-bladed diaphragm creates a naturally blurred background when using either wide
apertures and/or telephoto zoom settings. Macro focusing is possible within the 35–85mm range.
• For more accurate exposure control, subject distance information is transmitted from the lens to the camera body,
providing 3D Matrix Metering and 3D Multi-Sensor Balanced Fill-Flash with appropriate Nikon cameras and
Speedlights.
Important!
• Be careful not to soil or damage the CPU contacts.
• Do not attach the following accessories to this lens, as they might damage the CPU contacts: Auto Extension Ring PK-1,
PK-11 (use PK-11A), Auto Ring BR-4 (use BR-6 with BR-2A) and K1 Ring. Other accessories may not be suitable when
this lens is used with certain camera bodies. For details, refer to user’s manual for each product.
• This lens is not compatible with a Nikon F3AF camera when the AF Finder DX-1 is attached.
• At a telephoto setting, slight vignetting may occur when shooting subjects with the macro switch set to MACRO (at a
reproduction ratio of approx. 1:2).
Focusing, zooming and depth of field
With Nikon autofocus cameras (except the F3AF), first turn the zoom ring until the desired composition is framed in the
viewfinder before performing autofocus. For manual focus, focusing is possible at any focal length, but is easier at longer
focal lengths, because the image is larger and depth of field is shallower. If your camera has a depth of field preview (stop-
down) button or lever, depth of field can be observed while looking through the camera viewfinder.
Due to the optical characteristics of this lens, the focused distance varies as the focal length changes when taking close up
pictures. Therefore, perform autofocus or manual focus after zooming in or out using an autofocus mode other than in C
(Continuous Servo AF).
•The distance scale does not indicate the precise distance between the subject and the camera. Values are approximate
and should be used only as a general guide.
Macro focusing (Fig. A)
Normal focus extends from infinity (∞) to 0.5m (1.6 ft). When the macro switch is set to MACRO, the lens will focus down
to approx. 0.21m (0.7 ft). Macro focusing is possible within the 35–85mm range. The macro range is indicated by an
orange line on the lens barrel. A maximum reproduction ratio of approximately 1:3.6 is obtained at the 35mm setting,
while a reproduction ratio of 1:2 is possible at 85mm.
When moving the macro switch back to NORMAL, make sure the focus ring is set between infinity (∞) and 0.5m (1.6 ft).
Recommended focusing screens (Table 1)
Various interchangeable focusing screens are available for certain Nikon SLR cameras to suit any type of lens or picture-
taking situation. Those recommended for use with this lens are listed in the table.
Minimum aperture lock (Fig. B)
For programmed auto or shutter-priority auto exposure shooting, use the minimum aperture lock lever to lock
the lens aperture at f/22.
1. Set the lens to its minimum aperture (f/22) by aligning it with the aperture index.
2. Slide the lock lever toward the aperture ring, so the two orange dots are aligned.
To release the lock, slide the lever in the opposite direction.
Variable aperture/two aperture indexes (Fig. C)
Zooming the lens from 24mm to 85mm decreases the maximum aperture approx. 1 f/stop. For cameras with TTL metering,
there is no need to adjust the aperture. Likewise, for TTL auto flash photography with Nikon Speedlights, no adjustment is
required. However, when the flash-to-subject distance approaches either the near or far limit of the automatic shooting
range, the aperture may need to be adjusted slightly.
When using a separate exposure meter or taking photographs in the non-TTL flash mode, select the appropriate aperture
index according to the focal length setting in the following way: The aperture index (line) is used for the 24mm focal
length setting and the dot for the 85mm setting. Click stops are provided at the aperture index (line) for each aperture
setting. For zoom settings between 24 and 85mm, align the aperture ring between the two indexes to obtain the best
overall exposure. To determine the correct aperture, refer to Fig. C–Relationship between focal length and maximum
aperture.
Taking flash pictures using cameras with a built-in flash
Vignetting is the darkening of the corners around the image that occurs when the light emitted from the flash is obstructed
by the lens hood, or lens barrel depending on the focal length or shooting distance.
• To prevent vignetting, do not use the lens hood.
• For the latest information on vignetting with this lens, see the camera manual.
* Sold exclusively in the U.S.A.
Using bayonet hood HB-25
Attaching the hood
Align the lens hood attachment index ( ) on the hood with the lens hood mounting index on the lens, and turn the hood
counterclockwise (as viewed from the camera side) until it click stops.
• Make sure that the lens hood mounting index aligns with the lens hood setting index ( ).
• If the lens hood is not correctly attached, vignetting can occur.
• To facilitate attachment or removal of the hood, hold it by its base rather than its outer edge.
• To store the lens hood, attach it in the reverse position.
Detaching the hood
While holding its base rather than its edge, turn the hood clockwise (as viewed from the camera side) to detach.
Lens care
• To remove dirt and smudges, use a soft, clean cotton cloth or lens tissue moistened with lens cleaner. Wipe in a circular
motion from the center outward.
• Never use thinner or benzene to clean the lens as this might damage the lens, result in a fire, or cause health problems.
• To protect the front lens element, an NC filter is recommended at all times. A lens hood also helps protect the front of
the lens.
• When storing the lens in the lens case, attach both front and rear caps.
• When the lens will not be used for a long time, store it in a cool, dry place to prevent mold. Also store the lens away
from direct sunlight or chemicals such as camphor or naphthalene.
• Do not get water on the lens or drop it in water as this will cause it to rust and malfunction.
• Reinforced plastic is used for some parts of the lens. To avoid damage, never leave the lens in an excessively hot place.
Specifications
Type of lens: D-type AF Zoom-Nikkor lens having built-in CPU and Nikon bayonet mount
Focal length: 24mm–85mm
Maximum aperture: f/2.8–4
Lens construction: 15 elements in 11 groups (2 aspherical lens elements)
Picture angle: 84˚–28˚30’ with 35 mm (135) format Nikon film-SLR cameras and Nikon FX format digital
SLR cameras
61°–18°50’ with Nikon DX format digital SLR cameras
71˚–23˚ with IX240 system cameras
Focal length scale: 24, 28, 35, 50, 70, 85mm
Distance information: Output to camera body
Zoom control: Manually via separate zoom ring
Focusing: Nikon Internal Focusing (IF) system; manually via separate focus ring
Shooting distance scale: Graduated in meters and feet from 0.5m (2 ft) to infinity (∞); macro focusing down to
approx. 0.21m (0.7 ft) possible with macro switch set to MACRO
Max. reproduction ratio: 1:16.7 (at 24mm) – 1:5.9 (at 85mm) (normal),
1:3.6 (at 35mm) – 1:2 (at 85mm) (macro)
Macro focusing: Selected with Macro switch
Infrared compensation index
: Provided for 24mm setting only
Aperture scale: f/2.8 – f/22 on both standard and aperture-direct-readout scales
Minimum aperture lock: Provided
Diaphragm: Fully automatic
Exposure measurement: Via full-aperture method with AI camera or cameras with CPU interface system; via stop-
down method with other cameras
Attachment size: 72mm (P = 0.75mm)
Dimensions: Approx. 78.5mm dia. x 82.5mm (extension from the camera’s lens mounting flange);
overall length is approx. 93.5mm
Weight: Approx. 545g (19.2 oz)
Specifications and designs are subject to change without any notice or obligation on the part of the manufacturer.
English Deutsch
Sonderzubehör
・
Einschraubfilter 72mmø
・
Objektivbeutel CL-S2
別売アクセサリー
・72mmネジ込み式フィルター ・ソフトケース CL-S2
日本語
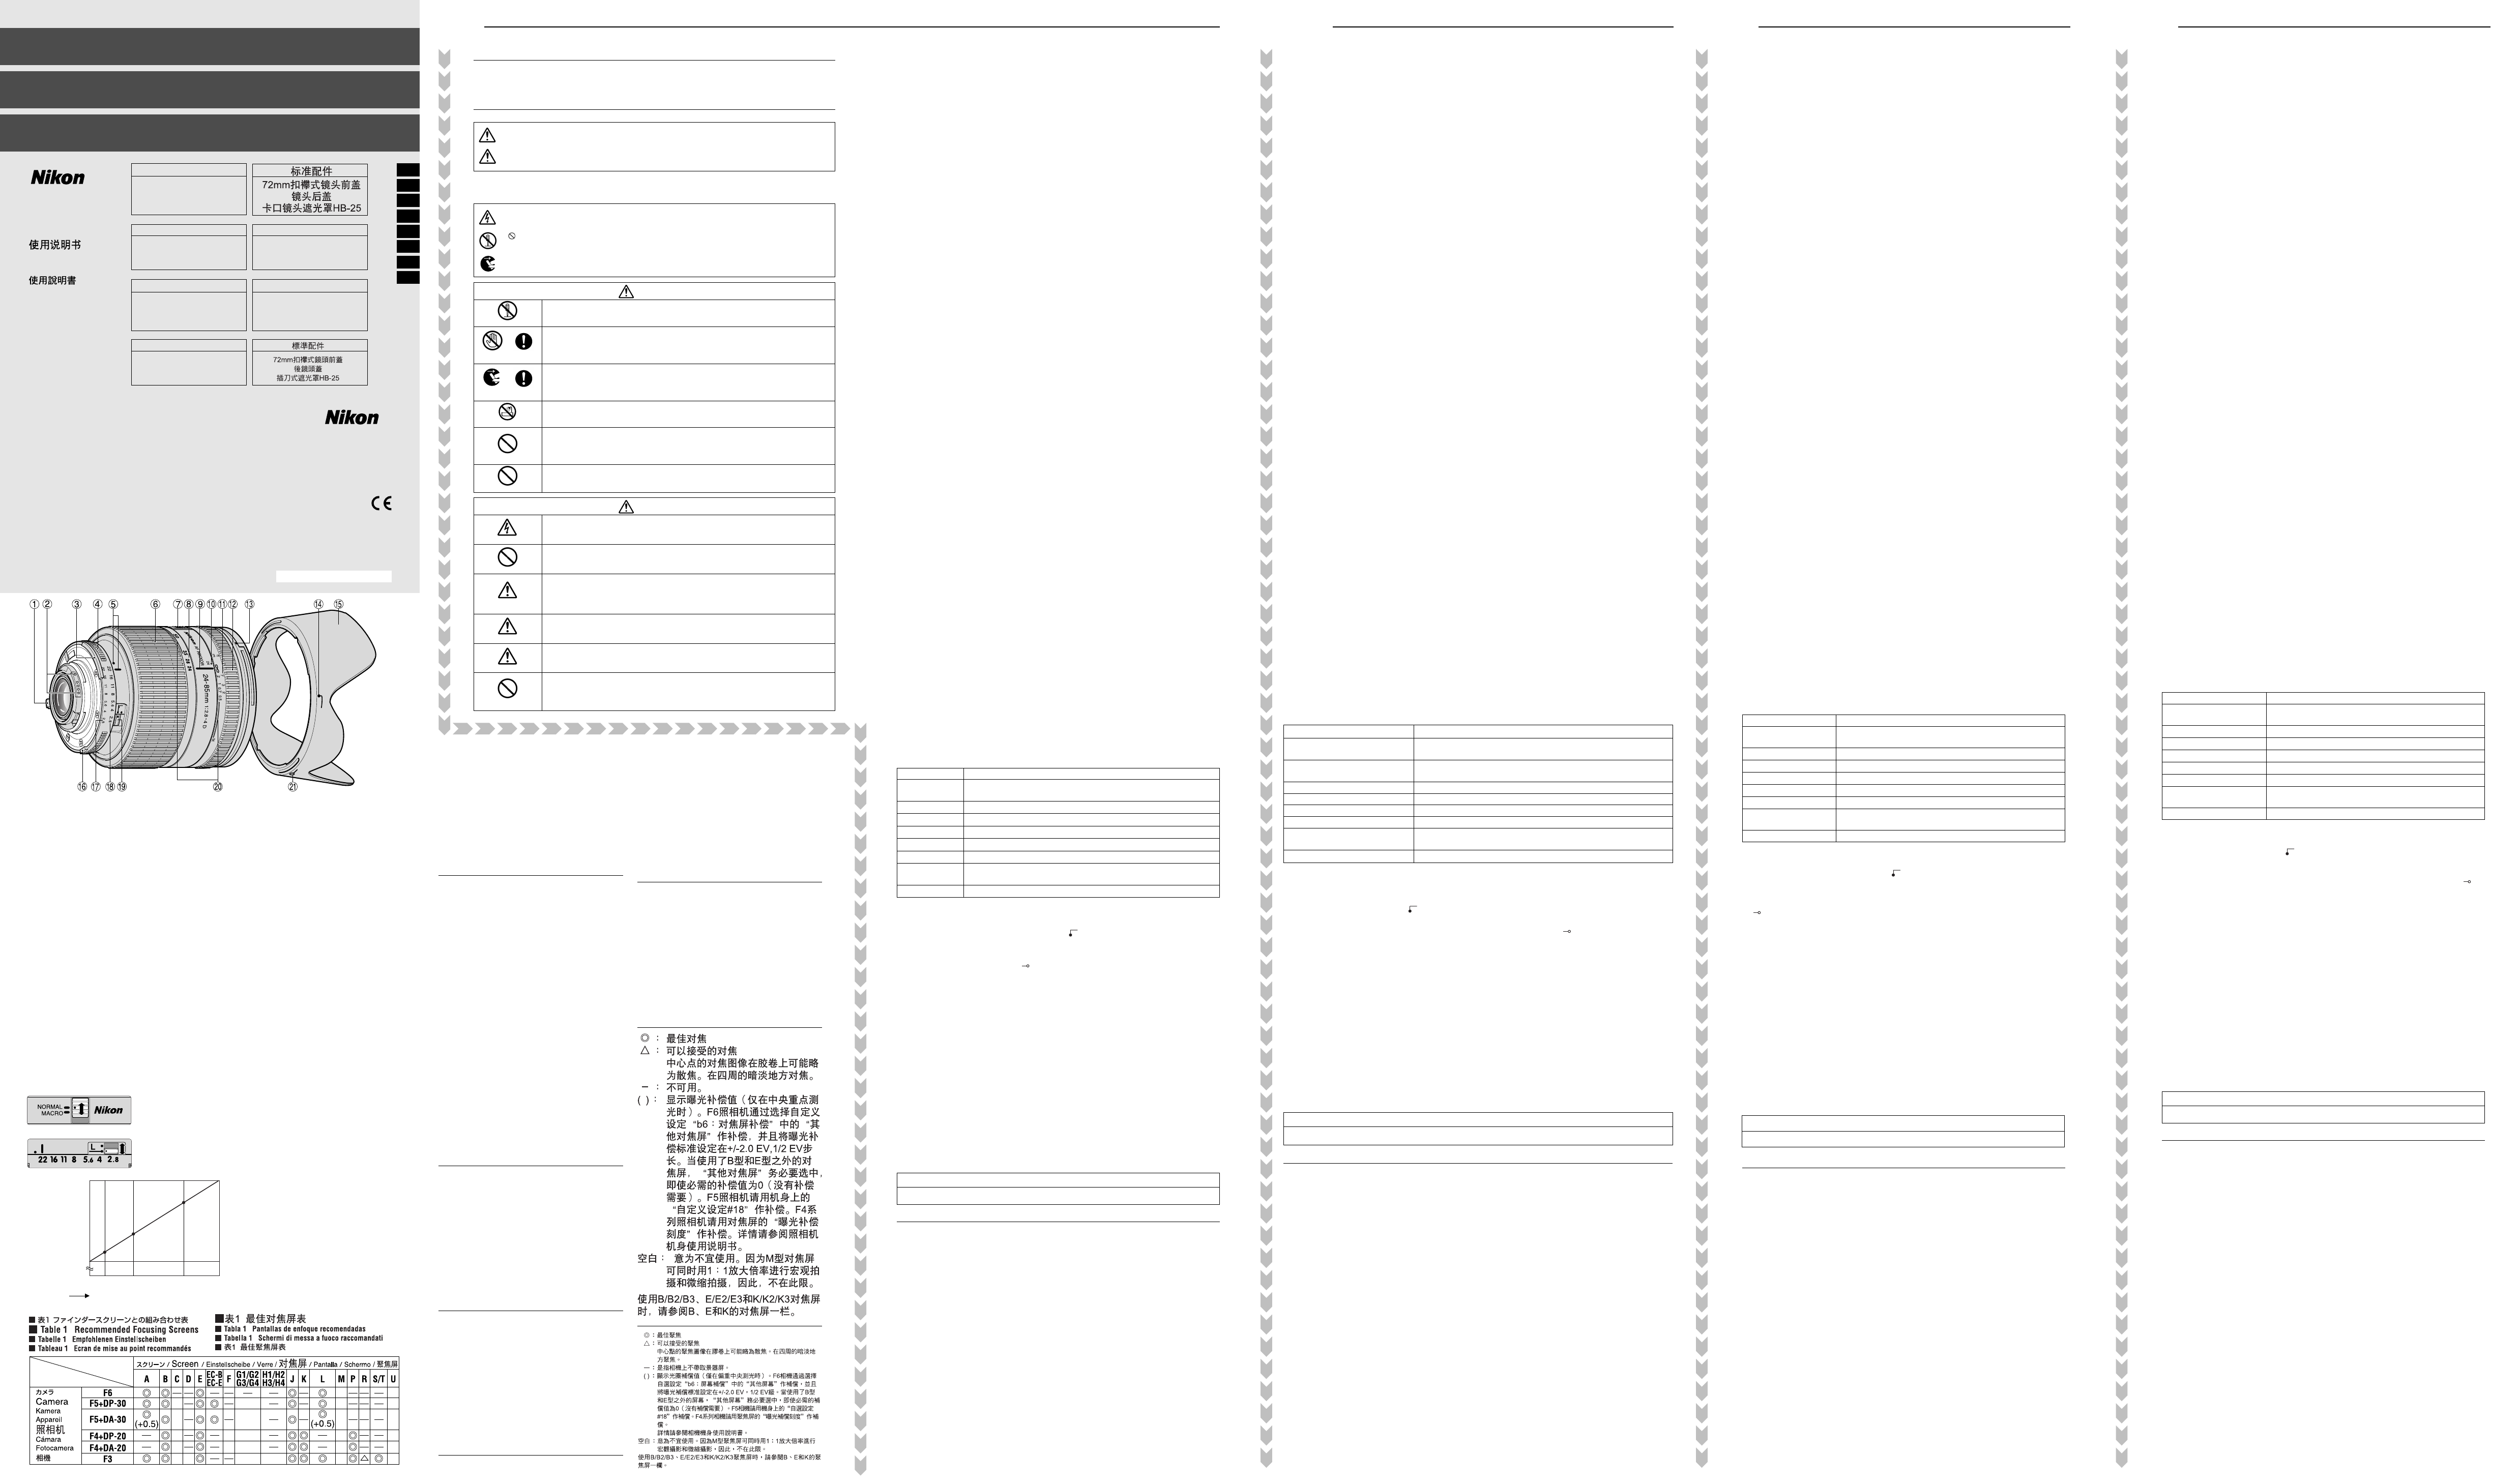
構図の決定やピント合わせの目的には
◎:最適です。
△:スプリットの合致像は見えますが、ピント合わせは精度上
適しません。
―:各カメラに存在しないファインダースクリーンを指します。
() : 中央部重点測光時の補正値です。F6カメラの場合、測光値の
補正は、カメラのカスタムメニュー「b6:スクリーン補正」
を「B orE以外」にセットして行います。B型およびE型以外
を使用する場合は、補正量が0でも、「B or E以外」にセット
してください。F5カメラの場合は、カスタムセッティング
No.18の設定で測光値の補正を行います。F4シリーズカメラ
の場合は、ファインダースクリーン露出補正ダイヤルを回し
て補正を行います。詳しくはカメラの使用説明書をご覧くだ
さい。
空欄: 使用不適当です。ただし、Mスクリーンの場合、撮影倍率1/1
倍以上の近接撮影に用いられるため、この限りではありません。
*上記以外のカメラでB/B2/B3、E/E2/E3、K/K2/K3スクリー
ンをご使用の場合は、それぞれB、E、Kスクリーンの欄をご覧く
ださい。
◎: Excellent focusing
△ : Acceptable focusing
The in-focus image in the central spot may prove
to be slightly out of focus on film. Focus on the
surrounding matte area
―: Not available.
() : Indicates degree of exposure compensation needed
(Center-Weighted metering only). For F6 cameras,
compensate by selecting “Other screen” in Custom
Setting “b6: Screen comp.” and setting the EV level
to -2.0 to +2.0 in 0.5 EV steps. When using
screens other than type B or E, “Other screen” must
be selected even when the required compensation
value is “0” (no compensation required). For F5
cameras, compensate using Custom Setting #18
on the camera body. For F4-Series cameras,
compensate using the Exposure Compensation
Dial for the focusing screen.
See user’s manual of the camera body for more
details.
Blank box means not applicable. Since type M screen can
be used for both macrophotography at a 1:1
magnification ratio and for photomicrography, it has
different applications than other screens.
When using the B/B2/B3, E/E2/E3 and K/K2/K3 focusing
screens in cameras other than those listed above, refer to
the columns for the B, E and K screens.
◎:Hervorragende Scharfeinstellung
△ : Brauchbare Scharfeinstellung.
Das im mittleren Kreis scharf eingestellte Bild könnte auf dem Film leicht
unscharf abgebildet werden. Stellen Sie auf dem umliegenden Mattfeld scharf.
―:Nicht möglich
() : Zeigt den Betrag zusätzlich erforderlicher Belichtungskorrektur ( Nur
mittenbetonte Belichtungsmessung). Bei F6-Kameras korrigieren Sie durch Wahl
von “Andere” in der Individualfunktion “b6: Einstellscheibe” und Einstellen des
LW-Werts im Bereich zwischen –2,0 und +2,0 in 0,5-LW-Schritten. Bei
Gebrauch von anderen Scheiben als B oder E, ist “Andere” auch dann zu wählen,
wenn der erforderliche Korrekturwert “0” beträgt (keine Korrektur nötig). Zur
Einstellung des Korrekturwerts am F5 Kameragehäuse dient die
Individualfunktion Nr. 18. Mit den F4-Serien-Geräten durch den Belichtung-
Kompensationsanzeiger für Visiermattscheiben kompensieren.
Näheres hierzu finden Sie im Benutzerhandbuch des Kameragehäuses.
Ein Leerfeld bedeutert: unbrauchbar. Da die Einstellscheibe M sowohl für
Maktrofotografie bis zum Abbildungsmaßstab 1:1 als auch Mikrofotografie eingesetzt
werden kann, unterscheidet sich ihr Anwendungsbereich von dem anderer
Einstellscheiben.
Bei Verwendung der Scheiben B/B2/B3, E/E2/E3 bzw. K/K2/K3 in anderen als den
obengenannten Kameras gelten die Spalten für die Scheiben B, E und K.
◎:Mise au point excellente
△ : Mise au point passable
L’image mise au point dans le cercle central pourrait s’avérer légèrement floue
sur la pellicule. La mise au point doit donc être faite sur la couronne dépolie
entourant le cercle central du verre de visée.
―:Non disponible
( ) :Indique la compensation de l’exposition additionnelle requise (Mesure pondérée
centrale uniquement). Pour les appareils F6, corrigez en sélectionnant “Activ.:
autre” dans le réglage personnalisé “b6: Plage visée” et en réglant le niveau IL de
-2,0 à +2,0 par pas de 0,5 IL. Lorsque vous utilisez des verres autres que ceux de
type B ou E, il faut sélectionner “Activ.: autre” même lorsque la valeur de
correction est de “0” (pas de correction nécessaire). Pour les appareils F5,
compenser en utilisant le réglage personnalisé n° 18 sur l’appareil. Pour les
appareils de la série F4, compenser en utilisant le cadran de compensation de
l’exposition prévu pour les filtres de mise au point.
Voyez le manuel d’utilisation de l’appareil photo pour plus de détails.
Un blanc indique aucune application. Du fait que le verre M peut être utilisé pour la
macrophotographie à un rapport d’agradissement 1:1 et pour la photomicrographie, il
a des applications diffèrentes de celles des autres verres.
Lors de l’utilisation de verres B/B2/B3, E/E2/E3 ou K/K2/K3 dans des appareils autres
que ceux indiqués ci-dessus, se reporter aux colonnes sur verres B, E, et K.
◎:Enfoque excelente
△ : Enfoque aceptable
La imagen enfocada en el circulo central puede resultar ligeramente desenfocada
en la fotografía. Se aconseja enfocar mediante el área mate circundante.
―:No existe
( ) : Indica la cantidad de compensación adicional necesaria (Solamente medición
ponderada central). Para cámaras F6, compense seleccionando “Otra pantalla”
en el ajuste personal del usuario “b6: Compens pantalla” y ajustando el nivel EV
a -2,0 a +2,0 en pasos de 0,5 EV. Cuando se utilice una pantalla que no sea de
tipo B o E, debe seleccionarse “Otra pantalla” incluso cuando el valor de
compensación requerido sea “0” (no se requiere compensación). Para la cámara
F5 compense usando el ajuste personal del usuario No. 18 en el cuerpo de la
cámara. Para las cámaras de la serie F4, compense usando el dial de
compensación de exposición para las pantallas de enfoque.
Para más detalles, consulte el manual del usuario de la cámara.
Los blancos significan inaplicable. Como la pantalla de tipo M se usa para
macrofotografía a una razón de aumento de 1:1 asi como para microfotografía, su
aplicación es distinta a la de las demás pantallas.
Cuando se utilicen las pantallas de enfoque B/B2/B3, E/E2/E3 y K/K2/K3 en cámaras
distintas de las relacionadas arriba, ver las columnas correspondientes a las pantallas B,
E y K.
◎:Messa a fuoco eccellente
△ : Messa a fuoco accettabile
L’immagine messa a fuoco al centro potrebbe risultare leggermente fuori fuoco
sulla pellicola. Mettere a fuoco la zona circostante il soggetto.
―:Non disponibile.
( ) : Indica il valore della compensazione di esposizione aggiuntiva richiesto
(Solamente misurazione a preferenza centrale). Con le fotocamere F6,
compensare selezionando “Otra pantalla” nell’impostazione personalizzata “b6:
Compens pantalla”, quindi impostando il livello EV tra -2.0 e +2.0 ad intervalli
di 0,5 EV. Quando si utilizzano schermate diverse da B o E, è necessario
selezionare “Otra pantalla” anche quando il valore di compensazione richiesto è
pari a “0” (nessuna compensazione necessaria). Per la fotocamera F5,
compensare utilizzando l’impostazione personalizzata 18 sul corpo della
fotocamera. Per gli apparecchi della serie F4, compensare utilizzando il
quadrante di compensazione dell’esposizione previsto per i filtri di messa a fuoco.
Per ulteriori dettagli, fare riferimento al manuale d’uso della fotocamera.
Il quadrato vuoto non è applicabile. Come lo schermo del tipo M può essere utilizzato
per macrofotografia con rapporto di ingrandimento 1:1 e fotomicrografia, esso
presenta differenti applicazioni che agli altri schermi.
Impiegando gli schermi B/B2/B3, E/E2/E3 ed K/K2/K3 con fotocamere diverse da
quelle elencate sopra, fate riferimento alle rispettive colonne delle versioni B, E e K.
Camera Usable focal length / shooting distance
F55-Series/N55-Series* • 35mm / 1.5m or greater • 50mm / 1.0m or greater
• 70mm or longer / No restriction
F65-Series/N65-Series* • 50mm / 1.0m or greater
F50-Series/N50*, F-601/N6006* • 70mm or longer / 0.7m or greater
F60-Series/N60* • 50mm / 0.7m or greater • 70mm or longer / 0.6m or greater
F70-Series/N70* • 28mm / 1.5m or greater • 35mm or longer / No restriction
F75-Series /N75-Series* • 35mm / 0.8m or greater • 50mm or longer / No restriction
F80-Series/N80-Series* • 28mm / 1.0m or greater • 35mm or longer / No restriction
Pronea 600i/6i* • 24mm / 2.5m or greater • 28mm / 1.0m or greater
• 35mm / 0.7m or greater • 50mm or longer / No restriction
Pronea S • 50mm / 2.0m or greater • 70mm or longer / 1.0m or greater
カメラ ケラレなく撮影できる焦点距離と撮影距離
ニコンUs ・焦点距離35mmでは撮影距離1.5m以上。 ・焦点距離50mmでは撮影距離1.0m以上。
・焦点距離70mm以上では制約なし。
ニコンU、F50D、F-601
・焦点距離50mmでは撮影距離1.0m以上。 ・焦点距離70mm以上では撮影距離0.7m以上。
F60D ・焦点距離50mmでは撮影距離0.7m以上。 ・焦点距離70mm以上では撮影距離0.6m以上。
F70D ・焦点距離28mmでは撮影距離1.5m以上。 ・焦点距離35mm以上では制約なし。
ニコンU
2
・焦点距離35mmでは撮影距離0.8m以上。 ・焦点距離50mm以上では制約なし。
F80D/S ・焦点距離28mmでは撮影距離1.0m以上。 ・焦点距離35mm以上では制約なし。
プロネア600i ・焦点距離24mmでは撮影距離2.5m以上。 ・焦点距離28mmでは撮影距離1.0m以上。
・焦点距離35mmでは撮影距離0.7m以上。 ・焦点距離50mm以上では制約なし。
プロネアS ・焦点距離50mmでは撮影距離2.0m以上。 ・焦点距離70mm以上では撮影距離1.0m以上。
AF Zoom-Nikkor
24-85mm
f
/
2.8-4D IF
NIKON CORPORATION
Printed in Japan TT5B20(80) 8MNJA774-20
使用説明書の内容が破損などによって判読できなくなったときは、ニコンサービス機関にて新しい使用説明書をお求めください(有料)。
No reproduction in any form of this manual, in whole or in part (except for brief
quotation in critical articles or reviews), may be made without written authorization
from NIKON CORPORATION.
使用説明書
User’s Manual
Benutzerhandbuch
Manuel d’utilisation
付属アクセサリー
72mmスプリング式レンズキャップ
裏ぶた
バヨネットフード HB-25
Serienmäßiges Zubehör
Aufsteckbarer 72mm-Frontobjektivdeckel
Objektivrückdeckel
Bajonett-Gegenlichtblende HB-25
Accessoires fournis
Bouchon avant d'objectif diamètre 72 mm
Bouchon arrière
Pare-soleil baïonnette HB-25
Standard accessories
72mm snap-on front lens cap
Rear lens cap
Bayonet hood HB-25
Vous êtes maintenant l'heureux propriétaire d'un AF Zoom-Nikkor 24–85mm f/2,8–4D IF, un objectif
qui vous permettra de prendre des photos remarquables pendant des années. Avant d'utiliser cet
objectif, veuillez lire ce mode d'emploi. Conservez ce manuel d'
utilisation à portée de la main pour
toute référence ultérieure.
Principales caractéristiques
• L'autofocus est possible avec un boîtier autofocus Nikon (sauf F3AF et les appareils photo à monture d'objectif
sans couplage AF), la mise au point manuelle avec tous les appareils reflex Nikon.
• Grâce à son système de mise au point interne (IF), la longueur totale de l'objectif ne change pas de l'infini à la
focale la plus rapprochée de 0,5 m (à partir du plan focal). En macro, la plage va jusqu'à environ 0,21 m à un
taux de reproduction de 1:2. De plus, l'élément asphérique procure une qualité d'image remarquable, alors que
le diaphragme à 9 lames crée un fond naturel flou à l'emploi des réglages de grande ouverture et/ou du zoom
téléobjectif. La mise au point macro est possible sur la plage de 35–85 mm.
• Pour assurer un contrôle d'exposition plus précis, l'information de distance au sujet est transmise de l'objectif
au boîtier, ce qui permet la mesure matricielle 3D et le dosage auto flash/ambiance par multi-capteur 3D avec
les appareils et flashes Nikon convenables.
Important
• Veiller à ne pas salir ni endommager les contacts CPU.
• Ne pas essayer de monter les accessoires suivants, car ils risquent d’abimer les contacts: Bague d’auto-rallonge
PK-1, PK-11 (utilisez PK-11A), Bague auto BR-4 (utilisez la bague BR-6 avec BR-2A) et Bague K1.
D’autres accessoires peuvent ne pas convenir lorsque l’objectif est utilisé avec certains appareils. Se référer aux
manuels d’utilisation.
• Cet objectif n’est pas compatible avec le boîtier F3AF équipé du viseur DX-1.
• Au rélage télébjectif, un léger vignettage peut survenir à la prise de sujets avec la commande de macro réglée
à MACRO (à un taux de reproduction d’environ 1:2).
Mise au point, cadrage au zoom et profondeur de champ
Avec les appareils autofocus Nikon (sauf le F3AF), tournez d'abord la bague de zoom jusqu'au cadrage de la
composition souhaitée dans le viseur avant d'effectuer l'autofocus. En manuel, la mise au point est possible à
toute focale, mais plus facile à des focales plus longues parce que l'image est plus grande et la profondeur de
champ réduite. Si votre boîtier est doté d'un bouton ou levier de prévisionnage de la profondeur de champ
(fermeture), vous pouvez contrôler la profondeur de champ en regardant dans le viseur de l'appareil.
A cause des caractéristiques optiques de cet objectif, en prise de vue rapprochée, la distance de mise au point
change avec la focale. Effectuez donc une mise au point autofocus ou manuelle après le cadrage au zoom avec un
mode autofocus autre que C (AF motorisé en continu).
• L’échelle de distance n’indique pas la distance précise entre le sujet et l’appareil photo. Les valeurs sont
approximatives et ne doivent être considérées que comme une estimation générale.
Mise au point macro (Fig. A)
La mise au point normale va de l'infini (∞) à 0,5 m. Quand la commande macro est réglée à MACRO, l'objectif
fera la mise au point jusqu'à environ 0,21 m. La mise au point macro est possible sur la plage de 35–85 mm. La
plage macro est indiquée par une ligne orange sur le barillet de l'objectif. Un taux de reproduction maximum
d'environ 1:3,6 est obtenu au réglage 35 mm, alors que le taux de reproduction de 1:2 est possible à 85 mm.
En ramenant la commande macro à NORMAL, vérifiez que la bague de macro est réglée entre l'infini (∞) et 0,5m.
Ecrans de mise au point recommandés (Tableau 1)
Divers écrans de mise au point sont disponibles pour certains appareils Nikon SLR qui s’adaptent à toutes les
conditions de prise de vues. Les écrans recommandés avec cet objectif sont listés.
Blocage d’ouverture minimale (Fig. B)
En mode Programme ou Auto priorité vitesse, réglez puis verrouillez le diaphragme sur l’ouverture minimale (f/22).
1. Réglez le diaphragme sur l’ouverture mini (f/22) en alignant sur l'index d'ouverture.
2. Glissez le curseur de blocage vers la bague de diaphragme de sorte que les deux points orange soient alignés.
Pour débloquer, glissez le curseur dans l’autre direction.
Ouverture variable/double repère de réglage. (Fig. C)
La variation de la focale de 24 mm à 85 mm implique une réduction de l’ouverture maximale de 1 de valeur environ.
Aucune compensation n’est nécessaire pour un appareil muni de système TTL. De même, la photographie au flash
avec des flashes TTL Nikon ne requiert aucune correction. Néanmoins, lorsque la distance de prise de vue est proche
des limites inférieure ou supérieure de l’automatisme, une légère correction est conseillée.
Avec une cellule indépendante ou en photographie au flash non TTL, utilisez le repère approprié à la focale de la
façon suivante: L'index (ligne) sert pour la focale de 24 mm, et le point pour la focale de 85 mm. Un crantage est
prévu sur l'index (ligne) pour chaque réglage d'ouverture. Pour les focales intermédiaires, choisir une position de
réglage entre les deux index. Pour déterminer l'ouverture correcte, ajustez l'ouverture en vous référant à la
Fig. C–Relation entre la distance focale et l'ouverture maximale.
Photographie au flash avec des appareils ayant un flash intégré
Le vignettage est l’assombrissement des coins de l’image qui se produit lorsque la lumière émise par le flash est
retenue par le parasoleil, ou la monture de l’objectif en fonction de la focale ou de la distance de prise de vue.
• Pour éviter le vignettage, n’utilisez pas le parasoleil.
• Pour obtenir les dernières informations sur le vignettage avec cet objectif, reportez-vous au manuel de
l'appareil photo.
Utilisation d’un parasoleil baïonnette HB-25
Fixation du parasoleil
Alignez l’index de fixation du parasoleil ( ) sur le parasoleil avec l’index de montage du parasoleil sur
l’objectif et tournez le parasoleil dans le sens inverse des aiguilles d’une montre (vue du côté de l’appareil)
jusqu’au déclic de mise en place.
• Vérifiez que l’index de montage du parasoleil est bien aligné sur l’index de réglage du parasoleil ( ).
•Si le parasoleil de l’objectif n’est pas correctement fixé, on assiste à un effet de vignettage.
• Il vous sera plus facile de fixer ou de retirer le parasoleil si vous le tenez par la base et non par le bord
extérieur.
• Avant de ranger l’objectif, fixez le parasoleil à l’envers.
Démontage du parasoleil
Tout en maintenant la base plutôt que le bord extérieur, tournez le parasoleil dans le sens des aiguilles
d’une montre (vue du côté de l’appareil) pour le démonter.
Soin de l’objectif
• Utilisez un chiffon en coton doux et propre ou du tissu de nettoyage pour objectif légèrement humidifié de
liquide de nettoyage pour objectif pour éliminer la saleté et les taches. Essuyez avec des mouvements
circulaires du centre vers l'extérieur.
• Ne jamais employer de solvant ou de benzènes qui pourrait endommager l’objectif, prendre feu ou nuire à la santé.
• Il est recommandé d’utiliser un filtre NC en permanence, pour protéger la lentille frontale. Un parasoleil assure
également une bonne protection contre les chocs.
• Lors du rangement de l’objectif dans son étui, penser à remettre en place les bouchons avant et arrière.
• En cas d’inutilisation pour une longue période, entreposer le matériel dans un endroit frais, sec et aéré pour
éviter les moisissures. Tenir le matériel éloigné des sources de lumière, et des produits chimiques (camphre,
naphtaline, etc.).
• Eviter les projections d’eau ainsi que l’immersion, qui peut provoquer la rouille et des dommages irréparables.
• Divers matériaux de synthèse sont utilisés dans la fabrication. Pour éviter tout problème, ne pas soumettre
l’objectif à de fortes chaleurs.
Caractéristiques
Type d’objectif: Zoom-Nikkor AF de type D avec processeur et monture baïonnette Nikon
Focale: 24–85 mm
Ouverture maximale: f/2,8–4
Construction optique: 15 éléments en 11 groupes (2 éléments asphériques)
Champ angulaire: 84˚–28˚30’ avec les reflex argentiques 24x36 Nikon et reflex numériques
Nikon au format FX
61° – 18°50’ avec les reflex numériques Nikon au format DX
71° – 23° avec les appareils photo IX240
Focales: 24, 28, 35, 50, 70, 85mm
Informations sur la distance: A l'appareil
Zooming: Manuel avec bague de zoom séparée
Mise au point: Système Internal Focusing (IF) Nikon; manuel par bague de mise au point séparée
Echelle des distances: Graduée en mètres et pieds de 0,5 m (2 ft) à l'infini (∞); mise au point macro
jusqu'à env. 0,21 m possible avec la commande macro réglée à MACRO
Rapport de reproduction max: 1:16,7 (à 24 mm) à 1:5,9 (à 85 mm) (normal),
1:3,6 (à 35 mm) à 1:2 (à 85 mm) (macro)
Mise au point macro: Sélectionnée avec la commande macro
Index de correction
infrarouge: Fourni pour le réglage 24 mm seulement
Echelle des ouvertures: f/2,8–f/22 pour les échelles standard et de lecture directe de l'ouverture
Verrouillage d'ouverture
minimale: Oui
Diaphragme: Entièrement automatique
Mesure de l’exposition: Par la méthode à pleine ouverture pour les appareils AI ou les appareils avec
le système d’interface CPU; par la méthode à ouverture réelle avec les autres
appareils
Taille des accessoires: 72 mm (P = 0,75 mm)
Dimensions: Env. 78,5mm diam. x 82,5 mm (rallonge de la bride de montage d’objectif de
l’appareil); longueur hors-tout est env. 93,5 mm
Poids: Env. 545 g
Les caractéristiques et les schémas sont susceptibles d’être modifiés sans préavis ni obligation de la part du
constructeur.
Appareil Distance focale / distance de prise de vue utilisable
Série F55
•
35 mm / 1,5 m ou plus
•
50 mm / 1,0 m ou plus
•
70 mm ou plus / Pas de limite
Série F65, Série F50, F-601
•
50 mm / 1,0 m ou plus
•
70 mm ou plus / 0,7 m ou plus
Série F60
•
50 mm / 0,7 m ou plus
•
70 mm ou plus / 0,6 m ou plus
Série F70
•
28 mm / 1,5 m ou plus
•
35 mm ou plus / Pas de limite
Série F75
•
35 mm / 0,8 m ou plus
•
50 mm ou plus / Pas de limite
Série F80
•
28 mm / 1,0 m ou plus
•
35 mm ou plus / Pas de limite
Pronea 600i
•
24 mm / 2,5 m ou plus
•
28 mm / 1,0 m ou plus
•
35 mm / 0,7 m ou plus
•
50 mm ou plus / Pas de limite
Pronea S
•
50 mm / 2,0 m ou plus
•
70 mm ou plus / 1,0 m ou plus
Accessoires en option
・
Filtres vissants 72mm
・
Pochette souple CL-S2
Français
△記号は、注意(警告を含む)を促す内容を告げるものです。図の中や近くに具体的な注意内容(左図
の場合は感電注意)が描かれています。
記号は、禁止の行為(してはいけないこと)を告げるものです。図の中や近くに具体的な禁止内容(左
図の場合は分解禁止)が描かれています。
●記号は、行為を強制すること(必ずすること)を告げるものです。図の中や近くに具体的な強制内
容(左図の場合は電池を取り出す)が描かれています。
この表示を無視して、誤った取り扱いをすると、人が死亡または重傷を負う可能性が想定される
内容を示しています。
この表示を無視して、誤った取り扱いをすると、人が傷害を負う可能性が想定される内容および
物的損害の発生が想定される内容を示しています。
安全上のご注意
ご使用の前に「安全上のご注意」をよくお読みのうえ、正しくお使いください。この「安全上のご注意」は製品
を安全に正しく使用していただき、あなたや他の人々への危害や財産への損害を未然に防止するために、重要な
内容を記載しています。お読みになった後は、お使いになる方がいつでも見られる所に必ず保管してください。
表示について
表示と意味は次のようになっています。
注意
警告
警告
分解したり、修理や改造をしないこと
感電したり、異常動作をしてケガの原因となります。
落下などによって破損し、内部が露出したときは、露出部に手を触れないこと
感電したり、破損部でケガをする原因となります。カメラの電池を抜いて、販売店または
ニコンサービス機関に修理を依頼してください。
熱くなる、煙が出る、こげ臭いなどの異常時は、速やかにカメラの電池を取り出すこと
そのまま使用すると火災、やけどの原因となります。電池を取り出す際、やけどに充分注意し
てください。電池を抜いて、販売店またはニコンサービス機関に修理を依頼してください。
水につけたり、水をかけたり、雨にぬらしたりしないこと
発火したり感電の原因となります。
引火、爆発のおそれのある場所では使用しないこと
プロパンガス・ガソリンなど引火性ガスや粉塵の発生する場所で使用すると、爆発や火災の
原因となります。
レンズまたはカメラで直接太陽や強い光を見ないこと
失明や視力障害の原因となります。
接触禁止
すぐに修理依頼を
分解禁止
水かけ禁止
電池を取る
使用禁止
見ないこと
注意
ぬれた手でさわらないこと
感電の原因になることがあります。
製品は幼児の手の届かないところに置くこと
ケガの原因になることがあります。
逆光撮影では、太陽を画角から充分にずらすこと
太陽光がカメラ内部で焦点を結び、火災の原因になることがあります。画角から太陽をわ
ずかに外しても火災の原因になることがあります。
使用しないときは、レンズにキャップをつけるか太陽光のあたらない所に保管すること
太陽光が焦点を結び、火災の原因になることがあります。
三脚にカメラやレンズを取り付けたまま移動しないこと
転倒したりぶつけたりしてケガの原因になることがあります。
窓を閉め切った自動車の中や直射日光が当たる場所など、異常に温度が高くな
る場所に放置しないこと
内部の部品に悪い影響を与え、火災の原因となることがあります。
感電注意
放置禁止
移動注意
放置禁止
保管注意
お守りいただく内容の種類を、次の絵表示で区分し、説明しています。
使用注意
すぐに修理依頼を
絵表示の例
Optional accessories
・
72mm screw-in filters
・
Flexible lens pouch CL-S2
J
p
En
De
Fr
Sc
Es
It
Tc
Accesorios estándar
Tapa frontal a presión de 72 mm
Tapa trasera de objetivo
Parasol de bayoneta HB-25
Accessori in dotazione
Tappo anteriore da 72mm dia.
Tappo posteriore
Paraluce a baionetta HB-25
Manual del usuario
Manuale d’uso

Partecipa alla conversazione su questo prodotto
Qui puoi condividere cosa pensi di Nikon Nikkor AF Zoom-Nikkor 24-85mm f/2.8-4D IF Obiettivo. Se hai una domanda, leggi prima attentamente il manuale. La richiesta di un manuale può essere effettuata utilizzando il nostro modulo di contatto.