
Thank you for purchasing this Group 1-2-3 car seat. If you require assistance with this
product, please contact our customer service department.
SAFETY INSTRUCTIONS
Please read these instructions carefully before use and keep them for future reference. If you do not
follow these instructions, your child safety may be at risk.
• The hard items and plastic parts of the car seat must be placed and installed so as they may not, in
normal use, become trapped under a movable seat or in the vehicle door.
• Keep all the straps that x the car seat to the vehicle fully tightened and adjust the straps used to
hold the child. Make sure the straps are not twisted.
• Ensure that the harness lap straps are positioned as low as possible, to support your child’s pelvis.
• Replace the car seat if it has been subject to severe impact in an accident.
• It is dangerous to modify or add to the car seat in any way without approval from the appropri-
ate authority, or not to carefully follow the instructions for installation provided by the child seat
manufacturer.
• Keep the car seat out of direct sunlight so that the child does not get burned.
• Do not leave a child unattended in a car seat.
• Ensure that luggage and other items that may injure the child in the event of an accident are cor-
rectly stowed away.
• Do not use the car seat without its cover.
• Do not replace the car cover with a cover that has not been recommended by the manufacturer, as
it plays a direct role in ensuring that the restraint system works eciently.
• If in doubt over the installation and correct use of your car seat, please contact the manufacturer.
• Do not use weight-bearing anchorage points other than those specied in the instruction manual
or indicated on the car seat.
• Always use the rear seat if possible, even if the Highway Code allows the car seat to be placed on
the front seat.
• Always ensure that the car seatbelt is properly fastened.
• Always check that there are no scraps of food or other debris in either the harness buckle or the
seatbelt buckle.
• In winter, make sure that the child is not wearing over-bulky clothes.
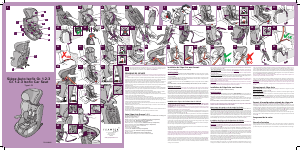
Your Group 1-2-3 car seat
This is a Group 1-2-3 car seat that is designed for children weighing between 9 and 36 kg (ap-
prox. 9 months to 12 years). (1)
A. Adjustable headrest + cover
B. Diagonal belt guide (used only for Group 2/3)
C. Harness strap (x2 - used only for Group 1)
D. Reducer cushion (if tted on this model)
E. Harness buckle + crotch strap (used only for Group 1)
F. Harness adjustment strap (x2 - used only for Group 1)
G. ISOFIX/EASYFIX adjustment handle
H. Lifting armrest (x2)
I. ISOFIX/EASYFIX connector (x2)
J. Adjuster (x2 - used only for Group 1)
K. Safety pads (x2 - used only for Group 1)
L. Shell + cover
M. Top Tether strap (used only for Group 1)
N. ISOFIX/EASYFIX connector release button (x2)
Installing the car seat with the harness
Group 1, 9 to 18 kg (approx. 9 months to 4 years)
WARNING
• This is an ISOFIX SAFETY RESTRAINT DEVICE FOR CHILDREN. It is compliant with Regulation 44/04
for use in a vehicle tted with an ISOFIX anchoring system.
• It may be used in vehicles tted with seats approved as universal ISOFIX positions (refer to your car
manual), according to the category and size of the child safety restraint.
• The mass group and the ISOFIX size class for which this product is suitable are: B1 / 9-18 kg.
If in doubt, please contact the car seat manufacturer or the retailer.
Adjusting the harness
Make sure that the harness of your car seat is adjusted to the height of your child before installing it
in your vehicle. The shoulder harnesses can be adjusted to 3 dierent heights and must pass through
the holes closest to your child’s shoulders. If your child’s shoulders are between two levels always
use the higher of the two. To adjust the height of the harnesses, remove the upper section of one of
the straps by pivoting the metal anchor located behind the headrest (2), and then pulling the end of
the strap through the slots of the shell and the cover (3). Feed the end of the harness strap through
the same slots at the desired height, both in the cover and the shell (4) and reattach it behind the
backrest (5). Make sure that the metal anchor is correctly positioned and that the end of the strap is
not twisted. Repeat the procedure with the second strap.
Installing the car seat and placing the child in the vehicle
This car seat must only be tted on the rear seat of a vehicle equipped with ISOFIX fastenings
and a Top Tether anchor (universal ISOFIX). Please refer to your car manual.
WARNING! Your ISOFIX Group 1 car seat MUST be tted using the Top Tether strap provided! Your
child’s safety cannot be guaranteed if you install your ISOFIX Group 1 car seat without the Top Tether
strap.
Put the headrest of the car seat at its lowest position. Fold the Top Tether strap over the back of the
car seat so that it does not get trapped during installation (6). Extend the ISOFIX/EASYFIX connectors
from the car seat as far as possible (7).
Position the car seat on the rear seat of the vehicle bring the ISOFIX/EASYFIX connectors in line with
the seat’s ISOFIX anchor points (8). Click the ISOFIX/EASYFIX connectors into the anchor points; the
indicators on each connector should turn from red to green (9). Release the safety catch of the ISO-
FIX/EASYFIX system by pulling the red handle attached to the base and gently pushing the car seat
(10). With the safety catch released, push the car seat by exerting equal pressure on both sides until
the rear of the car seat is pressed rmly against the vehicle seat.
Bring the Top Tether strap over the vehicle seat and attach the clasp to the vehicle’s Top Tether anchor
point (11).
Depending on the make of your car, the additional Top Tether anchor point may be located:
• Behind the rear seat of the vehicle.
• On the oor to the rear of the vehicle.
• On the ceiling to the rear of the vehicle.
Please refer to your car user manual to locate the additional Top Tether anchor point. Never attach the
Top Tether to a point that is not recommended by the vehicle manufacturer. Never alter the vehicle
yourself in order to try and fasten the Top Tether (for example by piercing, screwing or attaching an
anchor point yourself).
Push the car seat against the back of the vehicle seat and pull on the loose end of the Top Tether
strap. When the belt is fully tightened, the indicator on the Top Tether strap will turn from red to
green (12).
Open the buckle of the harness by pressing on the red button in the centre of the buckle (13). Sit
your child in the car seat. The lifting armrests make it easier for you to seat the child and to put on
the harness.
To close the harness, join together both ends of the shoulder straps and slide them into the buckle
harness. You should hear it click (14).
• Tightening the harness: Pull on the adjusting straps located on the harness. You do not need to
press on the adjuster buttons (15). IMPORTANT: A poorly tting harness can be dangerous. You
should not be able to slide more than two ngers between the shoulder strap and the child’s chest.
• Loosening the harness: Press on the adjuster buttons located on the upper part of the harness,
while pulling at the same time on the lower harness sections (16). Press on the red harness buckle
button to free your child completely.
Some ISOFIX car seat models are tted with a buckle that sets o an audible alarm (available as an
option). This alarm warns the parents if the child opens the buckle at an inopportune moment dur-
ing the journey.
IMPORTANT: Before each journey, check that the armrests have been lowered. A properly adjusted
harness is essential to ensure maximum protection for your child. There should not be more than two
ngers width between the harness and the child.
Installing the car seat without the harness
Group 2-3, 15 to 36kg (approx. 3 to 12 years)
WARNING
• This is a ‘SEMI-UNIVERSAL’ SAFETY RESTRAINT DEVICE FOR CHILDREN. It is compliant with Regula-
tion 44/04 and may only be used in vehicles specied in the adjoining list of approved vehicles.
• It can only be tted on vehicles with 3-point safety belts, whether xed or inertia-reel, compliant
with UN/ECE N°16 or an equivalent standard.
If in doubt, please contact the car seat manufacturer or the retailer.
Ensure that the harness and the Top Tether strap of your car seat are removed before beginning
installation in your vehicle.
Removing the harness and the Top Tether strap
Remove the Top Tether strap (17) and store it carefully for future use. Press on the red harness button
to undo the harness if necessary. Repeat steps (2) and (3) on each upper section of the harness. Take
one section of the harness and feed it to the back (18), attach the metal anchor of the harness to the
back of the seat (19). The metal anchor must be positioned between the shell and the car seat cover.
Repeat the procedure on the second section of the harness. Check that the harness connectors have
also been passed behind the back rest. Remove the crotch strap by twisting the metal keeper and by
passing it through the slots in the base and the cover (20).
Installing the car seat and placing the child in the vehicle
Your car seat is tted with an adjustable headrest that has been designed to support your child
throughout growth by providing maximum lateral protection.
IMPORTANT: When using the car seat without the harness, it must only be installed with a 3-point
safety belt (21). Never install the car seat within 2-point safety belt (22)!
Raise the adjustable headrest to its highest position. Extend the ISOFIX/EASYFIX connectors from
the car seat as far as possible (7). Position the car seat on the rear seat of the vehicle bringing the
ISOFIX connectors in line with the seat’s ISOFIX anchor points (23). Click the ISOFIX connectors into
the anchor points; the indicators on each connector should turn from red to green (24). Ensure that
the vehicle seat belt buckle remains accessible and that it has not been placed under the car seat.
Release the safety catch of the ISOFIX/EASYFIX system by pulling the red handle attached to the base
and gently pushing the car seat (25). With the safety catch released, push the car seat by exerting
equal pressure on both sides until the rear of the car seat is pressed rmly against the vehicle seat and
then feed the diagonal strap of the belt through the headrest guide (26).
Sit your child in the car seat. The lifting armrests make it easier for you to seat the child and put on the
harness. Make sure that the child’s back is fully in contact with the back of the car seat. Pull and fasten
the vehicle seat belt. Pass the diagonal strap of the belt under the armrest opposite the belt guide
used. The waist strap of the belt passes under both armrests (27). Lower the adjustable headrest and
adjust it to the height of your child (28). It should be positioned so that it surrounds your child’s head,
providing maximum lateral protection, whilst guiding the diagonal belt over the child’s shoulder so
that there is no contact with the child’s neck (29) (30). Tighten the vehicle seat belt.
Ensure that the belt is properly tightened, that it is not twisted and that it is not at the level of your
child’s neck.
To remove your child from the car seat, simply unbuckle the seatbelt and place it at the side of the
car seat. The belt will remain suspended from the headrest belt guide. IMPORTANT: Before each
journey, check that the armrests have been lowered. Secure your car seat with the vehicle seat belt
at all times, even when your child is not in the car seat. An unsecured car seat can cause injuries in
the event of a collision.
Removing the car seat
Step 1 (Group 1): Loosen the Top Tether strap (31), then release the strap from its anchor point and
bring it towards you (32).
Step 1 (Group 2/3): Remove the diagonal strap of the seatbelt from the belt guide of the adjustable
headrest (33).
Step 2 (all groups): Pull the car seat using the red handle on the ISOFIX base (34). On either side
of the seat, release the ISOFIX connectors from their anchor points by pulling the release buttons
towards you. The indicators will turn from green to red (35) (36). The car seat can now be removed
(37).
Returning to the original configuration of the car
seat
Follow the instructions below if you wish to return to the harness conguration.
Re-install the crotch strap, making sure that the metal keeper is correctly in place under the seat (38).
Via the front of the backrest, between the cover and the shell, grasp and twist the metal anchor of one
of the two other sections of the harness, simultaneously pulling the section through from the back
(39). Re-install it via the front of the backrest at the desired height (40). Make sure the metal anchor
of the harness section is correctly in place behind the backrest (41). Repeat the procedure with the
second section of the harness. Make sure the harnesses are not twisted.
Re-install the Top Tether strap, passing it between the backrest and the car seat cover. Make sure that
the metal anchor is correctly in place behind the backrest (42).
Storing the instruction manual
(43)
Cleaning
All the fabric parts are removable. Minor stains can be removed using a sponge and soapy water
or hand-washed at 30°C in soapy water. Do not use bleach, do not iron, do not machine wash or
tumble dry.
Vielen Dank, dass Sie unseren Kindersitz der Gruppe 1-2-3 gekauft haben. Sollten Sie Hilfe zu diesem Pro-
dukt benötigen, wenden Sie sich bitte an unseren Kundendienst.
SICHERHEITSHINWEISE
Lesen Sie diese Anleitung vor dem Gebrauch des Kindersitzes sorgfältig durch, und bewahren Sie sie als Referenz auf.
Bei Nichteinhaltung dieser Anleitung wird die Sicherheit Ihres Kindes gefährdet.
• Die starren Komponenten und die Kunststoteile des Kinderrückhaltesystems müssen so platziert und montiert
werden, dass sie bei normalem Gebrauch des Fahrzeugs nicht unter einem beweglichen Sitz oder in der Fahrzeugtür
eingeklemmt werden können.
• Alle Gurte zur Befestigung des Rückhaltesystems im Fahrzeug müssen stra gezogen werden. Die Gurte zum An-
schnallen des Kindes müssen korrekt angelegt und eingestellt werden. Die Gurte dürfen nicht verdreht sein.
• Achten Sie darauf, dass die Beckengurte so niedrig wie möglich sitzen, um das Becken perfekt zu unterstützen.
• Das Rückhaltesystem muss ausgewechselt werden, wenn es bei einem Unfall stark belastet wurde.
• Die Sicherheit wird gefährdet, wenn das System ohne Genehmigung der zuständigen Behörde verändert oder er-
gänzt wird oder wenn die Herstellerangaben zur Montage des Kinderrückhaltesystems nicht genau befolgt werden.
• Schützen Sie den Sitz vor direkter Sonneneinstrahlung, um zu verhindern, dass sich das Kind verbrennt.
• Lassen Sie Kinder in einem Rückhaltesystem niemals unbeaufsichtigt.
• Achten Sie darauf, dass Gepäckstücke oder andere Gegenstände, die bei einem Aufprall Verletzungen verursachen
können, richtig gesichert sind.
• Das Kinderrückhaltesystem darf nicht ohne den zugehörigen Sitzbezug verwendet werden.
• Der Sitzbezug darf nur durch einen vom Hersteller empfohlenen Bezug ersetzt werden, da er direkte Auswirkungen
auf die Funktion des Rückhaltesystems hat.
• Wenden Sie sich in Zweifelfällen hinsichtlich Montage und Verwendung des Sitzes an den Hersteller des Kinderrück-
haltesystems.
• Es dürfen keine anderen als die in den Anweisungen beschriebenen und am Rückhaltesystem gekennzeichneten
Befestigungspunkte verwendet werden.
• Die Befestigung auf dem Rücksitz ist stets vorzuziehen, auch in Fällen, in denen die Straßenverkehrsbestimmungen
eine Montage auf dem Vordersitz erlauben.
• Stellen Sie sicher, dass der Sicherheitsgurt des Fahrzeugs eingerastet ist.
• Stellen Sie sicher, dass das Gurtschloss des Hosenträgergurts oder das Gurtschloss des Fahrzeuggurts frei von Lebens-
mittelresten oder anderen Fremdkörpern ist.
• Achten Sie im Winter beim Anschnallen des Kindes darauf, dass es nicht zu dick angezogen ist.
Ihr Kindersitz Gruppe 1-2-3
Dieser Kindersitz gehört der Gruppe 1-2-3 an und ist für Kinder zwischen 9 und 36 kg (ca. 9 Monate bis 12
Jahre) geeignet. (1)
A. Verstellbare Kopfstütze + Bezug
B. Diagonalgurtführung (Verwendung nur bei Gruppe 2/3)
C. Gurtband des Hosenträgergurts (2x - Verwendung nur bei Gruppe 1)
D. Stützkissen (sofern Ihr Produkt damit ausgestattet ist)
C. Gurtschloss des Hosenträgergurts + Schrittgurt (Verwendung nur bei Gruppe 1)
F. Verstellgurt des Hosenträgergurts (2x - Verwendung nur bei Gruppe 1)
G. Verstellhebel des ISOFIX/EASYFIX-Systems
H. Hochklappbare Armlehne (2x)
I. ISOFIX/EASYFIX-Verbindungsstück (2x)
J. Verstellvorrichtung (2x - Verwendung nur bei Gruppe 1)
K. Gurtpolster (2x - Verwendung nur bei Gruppe 1)
L. Schale + Bezug
M. Top-Tether-Gurt (2x - Verwendung nur bei Gruppe 1)
N. Entriegelungstaste der ISOFIX/EASYFIX-Verbindungsstücke (2x)
Einbau des Kindersitzes mit Hosenträgergurt
Gr. 1, von 9 bis 18 kg (ca. von 9 Monaten bis 4 Jahren)
ACHTUNG
• Dies ist ein ISOFIX-KINDERRÜCKHALTESYSTEM. Es ist nach der Regelung Nr. 44, Änderungen 04, zur Benutzung in
einem Fahrzeug mit ISOFIX-Anbindungen zugelassen.
• Es kann je nach Kategorie des Kinderrückhaltesystems und der Bauartgenehmigung in Fahrzeuge eingebaut wer-
den, die über Sitzplätze mit einer Zulassung für universelle ISOFIX-Einrichtungen verfügen (siehe Handbuch des
Fahrzeugs).
• Dieses System ist für folgende ISOFIX-Gewichtsgruppen und -Größenklassen geeignet: B1 / 9-18 kg.
In Zweifelsfällen wenden Sie sich an den Hersteller des Rückhaltesystems oder Ihren Händler.
Einstellen des Hosenträgergurtes
Vor der Montage im Fahrzeug müssen Sie den Hosenträgergurt des Kindersitzes an die Größe des Kindes anpassen.
Zum Anpassen der Hosenträgergurte können drei verschiedene Höhen gewählt werden. Ziehen Sie die Gurte durch
das Schlitzpaar, das sich in Schulterhöhe des Kindes bendet. Falls die Schulterhöhe des Kindes zwischen zwei Schlitz-
höhen liegt, ist das Schlitzpaar oberhalb der Schultern zu verwenden. Um die Höhe der Hosenträgergurte einzustellen,
müssen Sie eines der oberen Enden des Hosenträgergurts herausziehen. Drehen Sie dazu die Metallschnalle hinten an
der Rückenlehne (2), und ziehen Sie anschließend das Gurtende durch die Schlitze in der Rückenlehne der Schale und
im Bezug (3). Schieben Sie das Ende des Hosenträgergurts auf die gewünschte Höhe. Verwenden Sie dazu dieselben
Schlitze in Bezug und Schale (4). Befestigen Sie das Gurtende wieder hinten an der Rückenlehne (5). Vergewissern
Sie sich, dass die Metallschnalle fest sitzt und das Ende des Hosenträgergurts nicht verdreht ist. Wiederholen Sie den
Vorgang für das zweite obere Gurtende.
Einbau des Sitzes in das Fahrzeug und Anschnallen des Kindes
Dieser Kindersitz darf ausschließlich auf der Rücksitzbank eines Fahrzeugs mit ISOFIX-Anbindungen und ei-
ner Top-Tether-Verankerung (ISOFIX universell) eingebaut werden. Diese Information nden Sie im Handbuch
Ihres Fahrzeugs.
ACHTUNG! Der ISOFIX-Kindersitz der Gruppe 1 muss unbedingt mit dem mitgelieferten Top-Tether-Gurt befestigt
werden! Wenn Sie den Kindersitz ohne den Top-Tether-Gurt einbauen, kann keine Garantie für die Sicherheit Ihres
Kindes übernommen werden.
Stellen Sie die Kopfstütze des Kindersitzes möglichst tief ein. Legen Sie den Top-Tether-Gurt nach vorne über die Rü-
ckenlehne des Kindersitzes, damit er beim Einbau nicht eingeklemmt wird (6). Ziehen Sie die ISOFIX/EASYFIX-Verbin-
dungsstücke des Kindersitzes (7).
Stellen Sie den Kindersitz so auf die Rückbank des Fahrzeugs, dass sich die ISOFIX/EASYFIX-Verbindungsstücke vor
den ISOFIX-Anbindungen der Rückbank benden (8). Rasten Sie die ISOFIX/EASYFIX-Verbindungsstücke in die An-
bindungen ein; die Anzeigen an jedem Verbindungsstück müssen von Rot zu Grün wechseln (9). Entriegeln Sie die
Sicherungsraste des ISOFIX/EASYFIX-Systems, indem Sie an dem roten Hebel des Unterteils ziehen und den Kindersitz
leicht nach hinten drücken (10). Nachdem die Sicherungsraste entriegelt ist, schieben Sie den Kindersitz gegen die
Rückbank, bis seine Rückseite fest anliegt; drücken Sie dabei gleichmäßig gegen die Rückenlehne des Kindersitzes.
Legen Sie den Top-Tether-Gurt über die Rückbank des Fahrzeugs, und haken Sie den Karabinerhaken des Gurtes in die
Top-Tether-Verankerung des Fahrzeugs ein (11).
Je nach Fahrzeugmodell kann sich die zusätzliche Top-Tether-Verankerung an folgenden Stellen benden:
• Hinter der Rückbank des Fahrzeugs.
• Am Boden hinten im Fahrzeug.
• An der Decke hinten im Fahrzeug.
Lesen Sie im Handbuch Ihres Fahrzeugs nach, wo sich die zusätzliche Top-Tether-Verankerung bendet. Befestigen Sie
den Top-Tether-Gurt niemals an einer Stelle, die nicht vom Fahrzeughersteller empfohlen ist. Auf keinen Fall dürfen Sie
Veränderungen an Ihrem Fahrzeug vornehmen, um den Top-Tether-Gurt zu befestigen (indem Sie zum Beispiel selbst
eine Verankerung anbohren, anschrauben oder befestigen).
Drücken Sie den Kindersitz gegen die Rückbank des Fahrzeugs, und ziehen Sie am freien Ende des Top-Tether-Gurtes.
Sobald die optimale Gurtspannung erreicht ist, wechselt die Anzeige des Top-Tether-Gurtes von Rot zu Grün (12).
Önen Sie das Gurtschloss der Hosenträgergurte, indem Sie auf den roten Knopf in der Mitte des Schlosses drücken
(13). Setzen Sie Ihr Kind in den Kindersitz. Die hochklappbaren Armlehnen erleichtern den Zugang zum Kindersitz
und seinen Einbau.
Um den Hosenträgergurt zu verriegeln, fügen Sie die beiden Schließteile zusammen, und stecken Sie diese in das
Gurtschloss. Sie müssen einen deutlichen Klicklaut hören (14).
• Hosenträgergurt straen: Ziehen Sie an den Gurtstraern, die sich an den Hosenträgergurten benden. Die Ver-
stelltasten müssen dafür nicht gedrückt werden (15). ACHTUNG: Ein nicht festsitzender Gurt ist gefährlich. Man sollte
zwischen Schultergurt und Brustkorb des Kindes nicht mehr als zwei Finger einschieben können.
• Hosenträgergurt lockern: Drücken Sie auf die Verstelltasten, die sich am oberen Ende der Hosenträgergurte be-
nden. Fassen Sie die unteren Gurtenden, und ziehen Sie gleichzeitig daran (16). Drücken Sie den roten Knopf am
Hosenträgergurtschloss, um Ihr Kind vollständig abzuschnallen.
Manche ISOFIX-Kindersitzmodelle sind optional mit einem Gurtschloss mit Alarmton ausgestattet. Der Alarm ertönt,
wenn das Schloss geönet wird, sodass die Eltern gewarnt werden, wenn das Kind das Schloss während der Fahrt
önet.
ACHTUNG: Vergewissern Sie sich vor jeder Fahrt, dass die Armlehnen heruntergeklappt sind. Die korrekte Einstellung
des Hosenträgergurts ist für den optimalen Schutz Ihres Kindes unerlässlich. Zwischen dem Hosenträgergurt und dem
Kind sollte maximal zwei Fingerbreit Platz sein.
Einbau des Kindersitzes ohne Hosenträgergurt
Gr. 2-3, von 15 bis 36 kg (von ca. 3 bis 12 Jahren)
ACHTUNG
• Dies ist ein ‚HALB-UNIVERSELLES‘ ISOFIX-KINDERRÜCKHALTESYSTEM. Es ist nach der Regelung Nr. 44, Änderungen
04 zugelassen. Dieses Rückhaltesystem darf ausschließlich in den Fahrzeugen verwendet werden, die in der beigefüg-
ten Liste der zulässigen Fahrzeuge aufgeführt sind.
• Nur geeignet für Fahrzeuge mit 3-Punkt-Sicherheitsgurten (fest oder mit Aufrollvorrichtung) gemäß der UN/ECE-
Regelung Nr. 16 oder einem vergleichbaren Standard.
In Zweifelsfällen wenden Sie sich an den Hersteller des Rückhaltesystems oder Ihren Händler.
Bevor Sie mit der Montage in Ihrem Fahrzeug beginnen, müssen Sie den Hosenträgergurt und den Top-Tether-
Gurt des Kindersitzes entfernen.
Ausbau des Hosenträgergurts und des Top-Tether-Gurts
Bauen Sie den Top-Tether-Gurt (17) aus, und bewahren Sie ihn für eine mögliche spätere Verwendung sorgfältig auf.
Drücken Sie, falls notwendig, den roten Knopf am Gurtschloss, um die Hosenträgergurte zu entriegeln. Wiederholen
Sie die Schritte (2) und (3) für die beiden oberen Enden des Hosenträgergurts. Nehmen Sie ein Ende des Hosenträ-
gergurts und führen Sie es auf die Rückseite der Rückenlehne (18). Befestigen Sie die Metallschnalle des Hosenträger-
gurts von hinten an der Rückenlehne des Sitzes (19). Die Metallschnalle muss zwischen der Sitzschale und dem Bezug
des Kindersitzes positioniert werden. Wiederholen Sie die Schritte für den zweiten Hosenträgergurt. Vergewissern Sie
sich, dass die Verbindungsstücke des Hosenträgergurts ebenfalls hinter der Rückenlehne verlaufen. Entfernen Sie den
Schrittgurt, indem Sie die Metallschnalle drehen und den Schrittgurt durch die Schlitze in Sitzäche und Bezug ziehen
(20).
Einbau des Sitzes in das Fahrzeug und Anschnallen des Kindes
Zur Ausstattung Ihres Kindersitzes gehört eine verstellbare Kopfstütze, die das Kind in seiner gesamten Wachstum-
sphase begleitet und ihm optimalen seitlichen Schutz bietet.
ACHTUNG: Bei der Konguration ohne Hosenträgergurt darf Ihr Kindersitz ausschließlich mittels 3-Punkt-Sicherheits-
gurten (21) eingebaut werden, bauen Sie den Kindersitz nie mit einem 2-Punkt-Sicherheitsgurt (22) ein!
Stellen Sie die verstellbare Kopfstütze des Kindersitzes möglichst hoch ein. Ziehen Sie die ISOFIX/EASYFIX-Verbin-
dungsstücke des Kindersitzes (7). Stellen Sie den Kindersitz so auf die Rückbank des Fahrzeugs, dass sich die ISOFIX/
EASYFIX-Verbindungsstücke vor den ISOFIX-Anbindungen der Rückbank benden (23). Rasten Sie die ISOFIX/EASY-
FIX-Verbindungsstücke in die Anbindungen ein; die Anzeigen an jedem Verbindungsstück müssen von Rot zu Grün
wechseln (24). Vergewissern Sie sich, dass das Gurtschloss des Fahrzeuggurts erreichbar bleibt, und dass es sich nicht
unter dem Unterteil des Sitzes bendet.
Entriegeln Sie die Sicherungsraste des ISOFIX/EASYFIX-Systems, indem Sie an dem roten Hebel des Unterteils ziehen
und den Kindersitz leicht nach hinten drücken (25). Nachdem die Sicherungsraste entriegelt ist, schieben Sie den
Kindersitz gegen die Rückbank, bis seine Rückseite fest anliegt; drücken Sie dabei gleichmäßig gegen die Rückenlehne
des Kindersitzes. Führen Sie dann den Diagonalgurt des Sicherheitsgurts durch die Führung der Kopfstütze (26).
Setzen Sie Ihr Kind in den Kindersitz. Die hochklappbaren Armlehnen erleichtern den Zugang zum Kindersitz und sei-
nen Einbau. Vergewissern Sie sich, dass der Rücken Ihres Kindes sicheren Kontakt mit der Rückenlehne des Kindersitzes
hat. Ziehen Sie den Fahrzeuggurt heraus, und schließen Sie ihn. Schieben Sie den Diagonalgurt des Sicherheitsgurts
unter der Armlehne, die gegenüber dem verwendeten Fahrzeuggurt liegt, hindurch. Den Beckengurt führen Sie unter
beiden Armlehnen hindurch (27). Stellen Sie die verstellbare Kopfstütze entsprechend der Größe Ihres Kindes ein (28).
Die Kopfstütze muss so positioniert werden, dass sie den Kopf des Kindes umschließt und somit maximalen seitlichen
Schutz bietet. Führen Sie dazu den Diagonalgurt über die Schulter des Kindes, und achten Sie darauf, dass der Gurt
nicht am Hals anliegt (29) (30). Straen Sie den Fahrzeuggurt.
Vergewissern Sie sich, dass der Gurt stra anliegt, nicht verdreht ist und nicht am Hals Ihres Kindes sitzt.
Um Ihr Kind aus dem Kindersitz herauszunehmen, müssen Sie lediglich das Gurtschloss des Fahrzeuggurts önen.
Der Gurt kann in der Gurtführung der Kopfstütze eingehängt bleiben. ACHTUNG: Vergewissern Sie sich vor jeder
Fahrt, dass die Armlehnen heruntergeklappt sind. Lassen Sie den Kindersitz auch dann mit dem Fahrzeuggurt befes-
tigt, wenn Ihr Kind nicht darin sitzt. Im Falle eines Aufpralls kann ein nicht gesicherter Kindersitz zu einem Geschoss
werden.
Ausbau des Kindersitzes
Schritt 1 (Gruppe 1): Lockern Sie den Top-Tether-Gurt (31), anschließend haken Sie den Gurt aus seiner Verankerung
aus und legen ihn nach vorne (32).
Schritt 1 (Gruppe 2/3): Nehmen Sie den Diagonalgurt des Sicherheitsgurts aus der Gurtführung der verstellbaren
Kopfstütze (33).
Schritt 2 (alle Gruppen): Betätigen Sie den roten Hebel am ISOFIX-Unterteil, und ziehen Sie den Kindersitz nach vor-
ne (34). Lösen Sie die beiden ISOFIX-Verbindungsstücke aus ihrer Anbindung, indem Sie die Entriegelungstasten der
Verbindungsstücke zu sich ziehen. Die Anzeigen der Verbindungsstücke wechseln jetzt von Grün zu Rot (35) (36). Sie
haben den Sitz erfolgreich ausgebaut und können ihn von der Rückbank nehmen (37).
Wiederanbringen des Hosenträgergurts
Befolgen Sie die nachstehende Anleitung, wenn Sie den Kindersitz wieder mit dem Hosenträgergurtsystem verwen-
den möchten.
Befestigen Sie wieder den Schrittgurt, und stellen Sie sicher, dass die Metallschnalle sicher unter der Sitzäche (38)
angebracht ist. Nehmen und drehen Sie die Metallschnalle eines der beiden Enden des Hosenträgergurts auf der Vor-
derseite der Rückenlehne zwischen Bezug und Schale, und ziehen Sie dieses Ende des Hosenträgergurts gleichzeitig
nach hinten (39) und befestigen Sie es auf der Vorderseite der Rückenlehne in der gewünschten Höhe (40). Achten
Sie darauf, dass die Metallschnalle des Endes des Hosenträgergurts sicher hinter der Rückenlehne (41) angebracht ist.
Wiederholen Sie den Vorgang für das zweite Ende des Hosenträgergurts. Stellen Sie sicher, dass die Hosenträgergurte
nicht verdreht sind.
Bauen Sie den Top-Tether-Gurt wieder ein, indem Sie ihn zwischen der Rückenlehne und dem Bezug des Kindersitzes
durchführen. Vergewissern Sie sich, dass die Metallschnalle einwandfrei in ihrer Mittelvertiefung auf der Rückseite der
Rückenlehne sitzt (42).
Aufbewahrung der Anleitung
(43)
Pflegehinweise
Alle Textilteile sind abnehmbar. Verwenden Sie bei leichter Verschmutzung einen feuchten Schwamm mit Seifenlauge,
oder waschen Sie den Bezug von Hand bei 30 °C. Verwenden Sie kein chlorhaltiges Reinigungsmittel. Nicht für Wasch-
maschinen und Trockner geeignet.
GB DE
Grazie per aver acquistato un seggiolino per auto del gruppo 1-2-3. Per ricevere assistenza su que-
sto prodotto o richiedere la sostituzione di un accessorio, è possibile rivolgersi al nostro servizio
consumatori.
ISTRUZIONI DI SICUREZZA
Leggere attentamente le istruzioni prima dell’utilizzo e conservare il presente manuale per poterlo consultare
in futuro. In caso di mancata osservanza di queste istruzioni, la sicurezza del bambino potrebbe essere com-
promessa.
• Gli elementi rigidi e i componenti in materiale plastico del dispositivo di ritenuta per bambini devono essere
posizionati e installati in maniera tale che non possano, in condizioni normali di utilizzo del veicolo, incastrarsi
sotto un sedile mobile o nella porta del veicolo.
• Mantenere tese tutte le cinghie che servono a ssare il dispositivo di ritenuta al veicolo e regolare quelle che
servono a ritenere il bambino. Le cinghie non devono inoltre essere attorcigliate.
• Vericare che le cinghie subaddominali siano il più basse possibile per ritenere adeguatamente il bacino.
• Sostituire il dispositivo qualora abbia subito violente sollecitazioni durante un incidente.
• È pericoloso modicare o completare il dispositivo in qualsiasi modo senza l’approvazione dell’autorità com-
petente oppure non seguire scrupolosamente le istruzioni riguardanti l’installazione fornite dal fabbricante del
dispositivo di ritenuta per bambini.
• Tenere il seggiolino al riparo dai raggi solari per evitare che il bambino possa ustionarsi.
• Non lasciare un bambino incustodito in un dispositivo di ritenuta per bambini.
• Vericare che i bagagli e gli altri oggetti in grado di provocare ferite all’occupante del sedile in caso di urto siano
saldamente ssati.
• Non utilizzare il dispositivo di ritenuta per bambini senza la fodera.
• Per sostituire la fodera del seggiolino, utilizzarne esclusivamente una consigliata dal costruttore, in quanto essa
inuisce direttamente sul funzionamento del dispositivo di ritenuta.
• In caso di dubbi riguardo all’installazione e al corretto utilizzo del seggiolino, contattare il fabbricante del di-
spositivo di ritenuta per bambini.
• Non utilizzare punti di contatto di sostegno diversi da quelli descritti nelle istruzioni e contrassegnati sul sistema
di ritenuta.
• Preferire sempre i sedili posteriori anche qualora il codice della strada consenta l’installazione nel sedile ante-
riore.
• Vericare sempre che la cintura del veicolo sia allacciata.
• Vericare sempre che non ci siano residui di cibo o di altro tipo nella bbia dell’imbracatura o della cintura del
veicolo.
• In inverno, prestare attenzione a non collocare il bambino nel seggiolino con vestiti troppo voluminosi.
Seggiolino per auto del Gruppo 1-2-3
Questo seggiolino per bambini appartiene al Gruppo 1-2-3 ed è stato concepito per bambini con peso
compreso tra 9 e 36 kg (ovvero da 9 mesi a 12 anni circa). (1)
A. Appoggiatesta regolabile + fodera
B. Guida della cinghia per cintura toracica (da utilizzare esclusivamente nell’ambito del Gruppo 2/3)
C. Cinghia dell’imbracatura (x2 - da utilizzare esclusivamente nell’ambito del Gruppo 1)
D. Cuscino riduttore (se in dotazione con il prodotto acquistato)
E. Fibbia dell’imbracatura + cinghia inguinale (da utilizzare esclusivamente nell’ambito del Gruppo 1)
F. Cinghia di regolazione dell’imbracatura (x2 - da utilizzare esclusivamente nell’ambito del Gruppo 1)
G. Impugnatura di regolazione del sistema ISOFIX/EASYFIX
H. Bracciolo sollevabile (x2)
I. Connettore ISOFIX/EASYFIX (x2)
J. Regolatore (x2 - da utilizzare esclusivamente nell’ambito del Gruppo 1)
K. Protezione imbottita (x2 - da utilizzare esclusivamente nell’ambito del Gruppo 1)
L. Scocca + fodera
M. Cinghia Top Tether (da utilizzare esclusivamente nell’ambito del Gruppo 1)
N. Pulsante di sblocco dei connettori ISOFIX/EASYFIX (x2)
Installazione del seggiolino per auto con l’imbracatura
Gr. 1, da 9 a 18 kg (da 9 mesi a 4 anni circa)
AVVERTENZA
• Questo è un DISPOSITIVO DI RITENUTA PER BAMBINI ISOFIX. È omologato ai sensi del regolamento n°44, serie di
emendamenti 04, per un utilizzo in un veicolo dotato di un sistema di ancoraggio ISOFIX.
• Può essere installato in veicoli dotati di sedili omologati come posizioni ISOFIX universali (consultare il manua-
le d’uso del veicolo), in base alla categoria del dispositivo di ritenuta per bambini e del modello.
• Il gruppo di peso e la classe di taglia ISOFIX per cui è adatto questo dispositivo sono: B1/9-18 kg.
In caso di dubbi, contattare il fabbricante del dispositivo di ritenuta o il rivenditore.
Regolazione dell’imbracatura
Assicurarsi che l’imbracatura del seggiolino per auto sia adatta alla taglia del bambino prima di iniziare l’installa-
zione nel veicolo. Le imbracature possono essere regolate a tre altezze e devono passare attraverso le asole più
vicine alle spalle del bambino. Se le spalle del bambino si trovano tra due altezze delle asole, utilizzare sempre la
posizione più alta. Per regolare l’altezza delle imbracature, rimuovere una delle estremità superiori delle imbra-
cature facendo ruotare il dispositivo di arresto metallico sul retro dello schienale (2), quindi tirarla attraverso le
aperture della scocca dello schienale e della fodera (3). Riposizionare l’estremità dell’imbracatura all’altezza desi-
derata utilizzando le stesse aperture, sia nella fodera che nella scocca (4), quindi ssarla di nuovo sul retro dello
schienale (5). Assicurarsi che il dispositivo di arresto metallico sia correttamente posizionato e che l’estremità
dell’imbracatura non sia attorcigliata. Ripetere l’operazione per la seconda estremità superiore.
Installazione del seggiolino e posizionamento del bambino nel veicolo
Questo seggiolino per auto deve essere installato esclusivamente sul sedile posteriore di un veicolo do-
tato dei dispositivi di ssaggio ISOFIX e di un sistema di ancoraggio Top Tether (ISOFIX universale). Fare
riferimento al manuale d’uso del veicolo.
ATTENZIONE! Il seggiolino per auto ISOFIX del Gruppo 1 deve essere obbligatoriamente installato con la cinghia
Top Tether in dotazione. La sicurezza del bambino non può essere garantita in caso di installazione del seggiolino
per auto ISOFIX del Gruppo 1 senza la cinghia Top Tether.
Abbassare al massimo l’appoggiatesta del seggiolino per auto. Tirare la cinghia Top Tether sullo schienale del
seggiolino per auto per evitare che si incastri durante l’installazione (6). Allungare al massimo i connettori ISOFIX/
EASYFIX del seggiolino per auto (7).
Collocare il seggiolino per auto nel sedile posteriore del veicolo e posizionare i connettori ISOFIX/EASYFIX in
corrispondenza dei punti di ancoraggio ISOFIX del sedile (8). Inserire i connettori ISOFIX/EASYFIX nei punti di
ancoraggio. Gli indicatori presenti su ciascun connettore devono diventare da rossi a verdi (9). Sbloccare il dispo-
sitivo di sicurezza del sistema ISOFIX/EASYFIX tirando l’impugnatura rossa della base e spingendo leggermente
il seggiolino per auto (10). Una volta sbloccato il dispositivo di sicurezza, spingere il seggiolino per auto eser-
citando una pressione uniforme sullo schienale no a quando la parte posteriore del seggiolino non aderisce
perfettamente al sedile.
Far passare la cinghia Top Tether sulla parte superiore del sedile posteriore del veicolo e agganciare il moschetto-
ne della cinghia al punto di ancoraggio Top Tether del veicolo (11).
A seconda del modello del veicolo, il punto di ancoraggio complementare Top Tether può trovarsi:
• Dietro il sedile posteriore del veicolo.
• Sul pianale, nella parte posteriore del veicolo.
• Sul tettuccio, nella parte posteriore del veicolo.
Per individuare il punto di ancoraggio complementare Top Tether, fare riferimento al manuale d’uso del veicolo.
Non ssare mai il dispositivo Top Tether in un punto non consigliato dal costruttore del veicolo. Non modicare
in alcun caso il veicolo al ne di ssare il dispositivo Top Tether, ad esempio mediante foratura, avvitamento o
ssaggio di un ancoraggio.
Far aderire il seggiolino al sedile posteriore del veicolo e tirare l’estremità libera della cinghia Top Tether. Quando
la tensione della cinghia è ottimale, l’indicatore della cinghia Top Tether diventa da rosso a verde (12).
Aprire la bbia delle imbracature premendo il pulsante rosso al centro della bbia (13). Collocare il bambino nel
seggiolino per auto. I braccioli sollevabili facilitano l’accesso al seggiolino e il posizionamento del bambino.
Per bloccare l’imbracatura, unire le due estremità delle bretelle e introdurle nella bbia no a sentire un “clic”
(14).
• Per stringere l’imbracatura: tirare le cinghie di regolazione posizionate sulle imbracature. Non è necessario
premere i pulsanti dei regolatori (15). ATTENZIONE: un’imbracatura mal regolata può essere pericolosa. Tra la
cinghia della spalla e il busto del bambino non deve essere possibile inserire più di due dita.
• Per allentare l’imbracatura: premere i pulsanti dei regolatori posizionati sulle estremità superiori delle imbra-
cature, aerrare la parte inferiore delle imbracature e tirare contemporaneamente (16). Premere il pulsante rosso
della bbia delle imbracature per liberare completamente il bambino.
Alcuni modelli di seggiolini per auto ISOFIX sono dotati di una bbia con allarme sonoro come componente
opzionale. L’allarme di apertura consente ai genitori di essere avvisati qualora il bambino apra improvvisamente
la bbia durante il viaggio.
ATTENZIONE: prima di mettersi in viaggio, vericare sempre che i braccioli siano abbassati. Per proteggere ade-
guatamente il bambino, è fondamentale che l’imbracatura sia correttamente regolata. Lo spazio tra l’imbracatura
e il bambino non deve essere superiore allo spessore di due dita.
Installazione del seggiolino per auto senza imbracatura
Gr. 2-3, da 15 a 36 kg (da 3 a 12 anni circa)
AVVERTENZA
• Questo è un DISPOSITIVO DI RITENUTA PER BAMBINI “SEMI-UNIVERSALE”. È omologato ai sensi del regola-
mento n°44, serie di emendamenti 04. Questo dispositivo di ritenuta può essere utilizzato esclusivamente nei
veicoli indicati nella lista allegata di veicoli approvati.
• Adatto solo per veicoli muniti di cinture di sicurezza a 3 punti di ancoraggio, statiche o con riavvolgitori, omolo-
gate ai sensi del regolamento UN/ECE N°16 o di una norma equivalente.
In caso di dubbi, contattare il fabbricante del dispositivo di ritenuta o il rivenditore.
Assicurarsi che l’imbracatura e la cinghia Top Tether del seggiolino per auto siano smontate prima di ini-
ziare l’installazione nel veicolo.
Smontaggio dell’imbracatura e della cinghia Top Tether
Smontare la cinghia Top Tether (17) e conservarla con cura per eventuali future necessità. Se necessario, premere
il pulsante rosso della bbia per sbloccare le imbracature. Ripetere le operazioni (2) e (3) per ciascuna estremità
superiore delle imbracature. Aerrare un’estremità e farla passare sul retro dello schienale (18), ssare il dispo-
sitivo di arresto metallico dell’imbracatura allo schienale del seggiolino sul retro (19). Il dispositivo di arresto
metallico deve essere posizionato tra la scocca e la fodera del seggiolino per auto. Ripetere l’operazione per la
seconda estremità dell’imbracatura. Vericare che i connettori delle imbracature siano anch’essi posti dietro lo
schienale. Rimuovere la cinghia inguinale facendo ruotare il dispositivo di arresto metallico e facendolo passare
attraverso le fessure della seduta e del rivestimento (20).
Installazione del seggiolino e posizionamento del bambino nel veicolo
Il seggiolino per auto è dotato di un appoggiatesta regolabile concepito per accompagnare il bambino durante
la crescita garantendo la massima protezione laterale.
ATTENZIONE: nella congurazione senza imbracatura, il seggiolino per auto deve essere installato esclusiva-
mente mediante cinture di sicurezza a 3 punti di ancoraggio (21). Non installare mai il seggiolino per auto con
una cintura a 2 punti di ancoraggio (22)!
Sollevare al massimo l’appoggiatesta regolabile del seggiolino per auto. Allungare al massimo i connettori
ISOFIX/EASYFIX del seggiolino per auto (7). Collocare il seggiolino per auto nel sedile posteriore del veicolo e
posizionare i connettori ISOFIX/EASYFIX in corrispondenza dei punti di ancoraggio ISOFIX del sedile (23). Inse-
rire i connettori ISOFIX/EASYFIX nei punti di ancoraggio. Gli indicatori presenti su ciascun connettore devono
diventare da rossi a verdi (24). Assicurarsi che la bbia della cintura del veicolo rimanga accessibile e che non sia
posizionata sotto la base del sedile.
Sbloccare il dispositivo di sicurezza del sistema ISOFIX/EASYFIX tirando l’impugnatura rossa della base e spingen-
do leggermente il seggiolino per auto (25). Una volta sbloccato il dispositivo di sicurezza, spingere il seggiolino
per auto esercitando una pressione uniforme sullo schienale no a quando la parte posteriore del seggiolino non
aderisce perfettamente al sedile, quindi far passare l’estremità toracica della cintura attraverso la guida dell’ap-
poggiatesta (26).
Far sedere il bambino nel seggiolino per auto. I braccioli sollevabili facilitano l’accesso al seggiolino e il posizio-
namento del bambino. Assicurarsi che la schiena sia a contatto con lo schienale del seggiolino per auto. Tirare e
allacciare la cintura del veicolo. Far passare l’estremità toracica della cintura sotto il bracciolo opposto alla guida
per la cintura utilizzata. L’estremità addominale della cintura del veicolo deve passare sotto i due braccioli (27).
Abbassare l’appoggiatesta regolabile e regolarlo in base alla taglia del bambino (28). Deve essere posizionato in
maniera tale da avvolgere bene la testa del bambino e garantire la massima protezione laterale facendo passare
la cintura toracica sulla spalla senza debordare sul collo (29) (30). Tendere la cintura del veicolo.
Assicurarsi che la cintura sia correttamente tesa, non attorcigliata e non posizionata a livello del collo del bam-
bino.
Per estrarre il bambino dal seggiolino per auto, è suciente sbloccare la cintura del veicolo e posizionarla a anco
del seggiolino per auto. La cintura resterà appesa alla guida per la cintura dell’appoggiatesta. ATTENZIONE:
prima di mettersi in viaggio, vericare sempre che i braccioli siano abbassati. Fissare il seggiolino per auto con la
cintura del veicolo in qualsiasi circostanza, anche quando il bambino non è collocato nel seggiolino. Un seggioli-
no per auto non ssato può trasformarsi in un proiettile in caso di urto.
Smontaggio del seggiolino per auto
Fase 1 (Gruppo 1): allentare la cinghia Top Tether (31), quindi sganciare la cinghia dal punto di ancoraggio e
portarla verso sé (32).
Fase 1 (Gruppo 2/3): rimuovere l’estremità toracica della cintura di sicurezza dalla guida per la cinghia dell’ap-
poggiatesta regolabile (33).
Fase 2 (tutti i gruppi): tirare il seggiolino per auto utilizzando l’impugnatura rossa della base ISOFIX (34). Su
ciascun lato del seggiolino, sbloccare i connettori ISOFIX dai punti di ancoraggio tirando verso sé i pulsanti di
sblocco dei connettori. Gli indicatori dei connettori diventano da verdi a rossi (35) (36). Il seggiolino è attualmen-
te smontato e può essere rimosso dal sedile posteriore (37).
Ripristino della configurazione originale del seggiolino per
auto
Per ripristinare una congurazione con l’imbracatura, attenersi alle istruzioni seguenti.
Ricollocare la cinghia inguinale vericando che il dispositivo di arresto metallico sia posizionato correttamen-
te sotto la seduta (38). Sul davanti dello schienale, tra la fodera e la scocca, aerrare il dispositivo di arresto
metallico di una delle due estremità superiori delle imbracature, quindi farlo ruotare e contemporaneamente
tirare l’estremità dal retro (39) e riposizionarla sul davanti dello schienale all’altezza desiderata (40). Vericare
che il dispositivo di arresto metallico dell’estremità dell’imbracatura sia correttamente posizionato sul retro dello
schienale (41). Ripetere l’operazione per la seconda estremità dell’imbracatura. Vericare che le imbracature non
siano attorcigliate.
Riposizionare la cinghia Top Tether facendola passare tra lo schienale e la fodera del seggiolino per auto. Assi-
curarsi che il dispositivo di arresto metallico sia correttamente posizionato nell’alloggiamento centrale sul retro
dello schienale (42).
Sistemazione delle istruzioni
(43)
Consigli di manutenzione
Tutte le parti in tessuto sono sfoderabili. In caso di leggere macchie, pulire con una spugna imbevuta di acqua
e sapone oppure lavare a mano a 30° in acqua e sapone. Non utilizzare candeggina, non stirare, non lavare a
macchina e non mettere in asciugatrice.
IT


Partecipa alla conversazione su questo prodotto
Qui puoi condividere cosa pensi di Nania Group 123 I-Max Isofix Storm Seggiolino per auto. Se hai una domanda, leggi prima attentamente il manuale. La richiesta di un manuale può essere effettuata utilizzando il nostro modulo di contatto.