Vor der ersten Benutzung
x Unbedingt Gebrauchsanweisung und Sicher-
heitshinweise vollständig lesen.
x Überprüfen Sie, ob die Netzspannung mit der
Spannungsangabe auf der Geräteunterseite
übereinstimmt.
x Reinigen Sie das Gerät durch zwei komplette
Brühvorgänge mit klarem, kaltem Wasser
(ohne Kaffeemehl).
Die Kaffeezubereitung
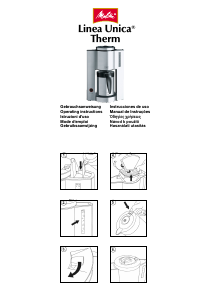
1. Gerät ans Stromnetz anschließen.
2. Gewünschte Menge frisches, kaltes
Wasser
in den geöffneten Wassertank füllen. (Abb. 1)
Tassenzahl ist an den Skalierungen am
Wassertank ablesbar. (Abb. 2)
3. Filterdeckel öffnen (Abb. 3). Dazu den Hebel
(A) nach vorne ziehen, die Deckelverrastung
löst sich, der Deckel kann jetzt geöffnet
werden.
4. Filtertüte
®
102 am seitlichen und unteren
Tütenrand umknicken und in den Schwenkfilter
einlegen. (Abb. 4)
5. Filterfein gemahlenen Kaffee in die Filtertüte
geben. Empfehlung: pro Tasse einen ge-
strichen vollen Messlöffel = ca. 6 g.
6. Filterdeckel schließen – der Verschluss rastet
ein! Isolierkanne mit Deckel
auf die Warmhalte-
platte unter den Filter stellen.
7. Mit dem „Aroma-Selector“ stufenlos die ge-
wünschte Kaffeestärke ( = mild - = stark)
einstellen (Abb. 6).
8. Gerät einschalten – der Ein-/Ausschalter
leuchtet auf – der Kaffee wird automatisch
zubereitet.
9. Der Tropf-Stopp verhindert Nachtropfen, wenn
die Kanne nach Beendigung des Brühvor-
ganges entnommen wird.
10. Die Isolierkanne ist mit einer Einhand-Bedie-
nung ausgestattet. Zum Kaffee-Ausschenken
einfach den Hebel (Abb. 5) drücken.
11. Das Gerät ist mit einer automatischen Ab-
schaltung ausgestattet, die die Stromzufuhr
nach 15 Minuten selbsttätig unterbricht. In
diesem Fall muss bei der nächsten Kaffee-
zubereitung zunächst der Ein-/Ausschalter
zurück in die „Aus“-Position geschaltet und
zum Starten des Brühvorgangs (nach ca.
3 sec) nochmals betätigt werden.
Selbstverständlich kann das Gerät aber auch
jederzeit manuell abgeschaltet werden.
Bei voller Kanne liegt der Temperaturverlust des
Kaffees bei maximal 6 Grad pro Stunde. Diese
Angaben gelten für eine nicht vorgewärmte
Kanne. Wenn Sie die Kanne vor dem Gebrauch
mit heißem Wasser ausspülen, wird die Warm-
halteleistung noch verbessert. Ist die Kanne nur
zum Teil gefüllt, ergibt sich eine verkürzte Warm-
haltung.
Zusätzliche Hinweise:
Ö Brühvorgang nur mit aufgesetztem Kannen-
deckel starten – nur so ist der Filterverschluss
geöffnet.
Ö Zwischen zwei Brühvorgängen das Gerät aus-
schalten und ca. 5 Min. abkühlen lassen.
Ö Achten Sie darauf, dass während des Brüh-
vorgangs der Filterdeckel immer eingerastet ist.
Ö Öffnen Sie den Filterdeckel während des
Brühvorgangs nicht.
Ö Stellen Sie die volle Isolierkanne immer
aufrecht hin.
Reinigung und Pflege
Abnehmbare Teile:
Filter kann mit heißem Wasser und Spülmittel oder
in der Geschirrspülmaschine gereinigt werden.
Isolierkanne:
Die Isolierkanne darf nicht in Wasser eingetaucht
oder in die Spülmaschine gestellt werden.
Nach Gebrauch nur mit heißem Wasser aus-
spülen. Hartnäckige Kaffeeansätze mit einem
Spülmittel und einer Flaschenbürste entfernen.
Die Außenhülle mit einem feuchten Tuch und evtl.
etwas flüssigem Spülmittel säubern.
Isolierkannendeckel:
Mit einem feuchten Tuch und evtl. etwas flüssigem
Spülmittel säubern. Der Tropfstopf-Auslöseknopf
kann zum Reinigen abgenommen werden.
Säubern Sie ihn mit einem feuchten Tuch und evtl.
etwas Spülmittel und setzen Sie ihn danach
wieder auf den Kannendeckel zurück (der Knopf
muß einrasten). WICHTIG: Setzen Sie das Gerät
niemals ohne den Knopf in Betrieb; der Tropfstop
wird dann nicht ausgelöst, es kann zu Überläufern
kommen.
Basis-Gerät:
Verwenden Sie ein weiches feuchtes Tuch und
etwas Spülmittel für die äußere Reinigung.
Gerät und Gerätezuleitung niemals unter fließen-
dem Wasser reinigen oder in Wasser eintauchen.
Keine scharfen oder scheuernden Reinigungs-
mittel verwenden.
Entkalken
Kalkablagerungen im Gerät sind unvermeidlich.
Regelmäßiges Entkalken (nach 40 Filtervorgän-
gen) sichert die einwandfreie Funktion. Verwen-
den Sie zum Entkalken Swirl Bio-Kalklöser oder
Swirl Schnellentkalker.
Wichtig:
Nach dem Entkalken unbedingt 2 bis 3 Brühvor-
gänge mit klarem, kaltem Wasser (ohne Kaffee-
mehl) durchführen.
Sicherheitshinweise:
x Beim Betrieb werden Teile des Gerätes (z. B.
die Warmhalteplatte) heiß: Vermeiden
Sie eine Berührung.
x Benutzen Sie das Gerät nur außerhalb der
Reichweite von Kindern.
x Sorgen Sie dafür, daß die Zuleitung nicht die
heiße Warmhalteplatte berührt.
x Vor jeder Reinigung und bei längerer Ab-
wesenheit den Netzstecker ziehen.
x Das Gerät niemals in Wasser tauchen.
x Kein heißes Wasser einfüllen, sondern nur
frisches, kaltes Wasser.
x Während des Brühvorganges nie den
Filterdeckel öffnen.
x Das Auswechseln des Netzkabels und alle
sonstigen Reparaturen dürfen nur vom Melitta
Kundendienst oder einer ähnlich qualifizierten
Person durchgeführt werden um Gefähr-
dungen zu vermeiden.
Before preparing your first cup
of coffee . . .
x read all operating and safety instructions
carefully.
x make sure that the voltage in your home
corresponds with the voltage indicated on the
bottom of the appliance.
x clean the appliance by filling the water tank
with clear cold
water and allow the water to run
through (without coffee).
Coffee Preparation
1. Insert plug of the appliance into socket.
2. Raise lid of water tank and pour the required
amount of fresh cold
water into the watertank.
(Fig. 1) The number of cups of coffee is
determined by referring to the scale on the
water level indicator. (Fig. 2)
3. Open the lid of the filter unit (Fig. 3); first you
have to release the lid, which is clicked into
place by pulling the lever (A), then you can
raise it.
4. Fold over the seamed edges of the filter bag
(size 102) and place it in the filter. (Fig. 4)
5. Scoop the filter-fine ground coffee into the filter
bag. Recommendation: use one level coffee
measure (approx. 6g) per cup or vary
according to taste.
6. Shut the lid of the filter unit and click it into
place. Place the therm jug, covered with the lid
,
on to the hot plate under the filter unit.
7. Choose your personal coffee taste with the
infinitely variable „Aroma Selector“-switch
( = mild - = strong) (Fig. 6).
8. Switch the appliance on – the on/off switch
lights up showing the machine is operating.
9. The “drip-stop” prevents dripping, when the jug
is taken away after filtration.
10. The therm jug is equipped with a single-hand
operation. For pouring out coffee drag the lever
(Fig. 5).
11. The coffeemaker ist equipped with an auto-
matic switch off which disconnects the coffee-
maker from voltage after 15 min. automatically.
In this case it is necessary to switch back to
the „Off“ position first and than start the new
brewing cycle by switching the appliance on
again after approx. 3 seconds
. Obviously it is
always possible to switch off the appliance by
using the „On/Off“-switch manual.
With full therm jug the maximal loss of tempe-
rature is approx. 6°/h. This quotation is valid for a
not preheated therm jug. By rinsing the jug with
hot water before use the warmkeeping perfor-
mance will be optimized. Is the jug only filled with
less than 8 cups the warmkeeping temperature
decreases.
Additional Instructions:
Ö Before starting the brewing cycle, the lid must
be on the jug to ensure that the filter outlet is
open.
Ö Switch the machine off between two brewing
cycles and leave it to cool down for approx. 5
minutes.
Ö Make sure that the lid of the filter unit always
remains shut, when the coffee is being brewed.
Ö Do not raise the lid of the filter unit whilst
brewing coffee.
Ö Place the filled therm jug always upright.
Cleaning and maintenance
Detachable parts:
Filter insert may be cleaned with hot water and
washing-up liquid or may be washed in the
dishwasher.
Therm jug:
Do not immerse the jug in water or put it into the
dishwasher. Rinse with hot water after use only.
Clean persistant coffee residues with washing-up
liquid and a bottle cleaning brush. Clean outer
housing with soft damp cloth and washing up
liquid.
Lid of therm jug:
Clean the lid with a soft damp cloth and washing
up liquid. The drip stop button can be removed for
cleaning by a soft damp cloth and washing up
liquid. Put the button after cleaning back on to the
jug lid (button has to click into place).
IMPORTANT: do not start brewing process without
the button; the drip stop will not work and hot
coffee may flow over.
Basic appliance:
Use a soft damp cloth and washing-up liquid for
cleaning the exterior. Appliance and cord should
never be cleaned under running water or immerse
in water. Do not use scouring pads or harsh
abrasives.
Descaling:
In hard water areas scale will eventually build up
in your machine which unfortunately cannot be
avoided.
You should descale your machine regularly
(at the latest after every 40 filtrations) to ensure
perfect operation, Use Swirl
®
Bio-Descaler or
Swirl
®
Quick-Descaler for efficient descaling.
Important:
After descaling repeat brewing process with clear
cold
water (without coffee) at least 2 to 3 times.
Safety instructions:
x When the appliance is switched on, some parts
(e.g. hot plate) of the appliance become hot. Do
not touch – risk of burning!
x Always keep the appliance out of the reach of
children.
x Never allow the cord to come into contact with
the plate.
x Always pull the plug out of the socket before
cleaning or in case of absence for a long time.
x Never immerse the appliance in water.
x Do not use hot water. Only fresh, cold water
should be used to fill in the water tank.
x Do not remove the glass jug from the hot plate
until all the water has run through, otherwise
the “drip-stop” might cause the filter to
overflow.
x Do not open the filter lid during brewing
process – risk of burning!
x The replacement of the cord and all other
repairs must be carried out by authorized
Melitta Customer Service Centres only or by a
person of similar qualifications.
D GB


Partecipa alla conversazione su questo prodotto
Qui puoi condividere cosa pensi di Melitta Linea Unica Therm Macchina da caffè. Se hai una domanda, leggi prima attentamente il manuale. La richiesta di un manuale può essere effettuata utilizzando il nostro modulo di contatto.