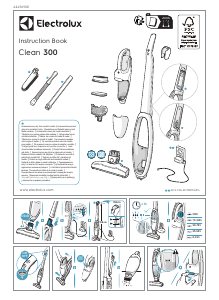
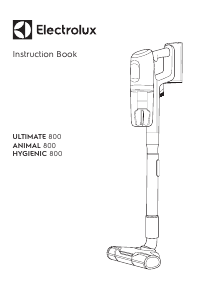
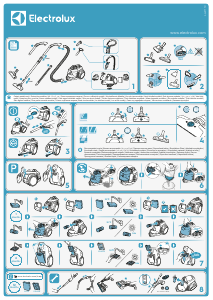
Manuale Electrolux PD91-6BP Aspirapolvere
Hai bisogno di un manuale per il tuo Electrolux PD91-6BP Aspirapolvere? Di seguito è possibile visualizzare e scaricare gratuitamente il manuale in PDF in italiano. Questo prodotto attualmente ha 10 domande frequenti, 0 commenti e ha 0 voti. Se questo non è il manuale che desideri, contattaci.
Il tuo prodotto è difettoso e il manuale non fornisce alcuna soluzione? Rivolgiti a un Repair Café per il servizio di riparazione gratuita.
Manuale
Loading…


Loading…
Valutazione
Facci sapere che cosa pensi della Electrolux PD91-6BP Aspirapolvere valutando il prodotto. Vuoi condividere la tua esperienze con questo prodotto o porre una domanda? Ti preghiamo di lasciare un commento al fondo della pagina.Maggiori informazioni su questo manuale
Comprendiamo che sia bello avere un manuale cartaceo per i tuoi Electrolux PD91-6BP Aspirapolvere. Puoi sempre scaricare il manuale dal nostro sito web e stamparlo tu stesso. Se desideri avere un manuale originale, ti consigliamo di contattare Electrolux. Potrebbero essere in grado di fornire un manuale originale. Stai cercando il manuale del tuo Electrolux PD91-6BP Aspirapolvere in un'altra lingua? Scegli la tua lingua preferita sulla nostra home page e cerca il numero del modello per vedere se è disponibile.
Specifiche
| Marca | Electrolux |
| Modello | PD91-6BP |
| Categoria | Aspirapolvere |
| Tipo di file | |
| Dimensione del file | 6.04 MB |
Tutti i manuali per Electrolux Aspirapolvere
Altri manuali di Aspirapolvere
Domande frequenti su Electrolux PD91-6BP Aspirapolvere
Il nostro team di supporto cerca informazioni utili sul prodotto e risposte alle domande più frequenti. Se trovi un’inesattezza nelle nostre domande frequenti, ti preghiamo di farcelo sapere utilizzando il nostro modulo di contatto.
Il tubo del mio aspirapolvere è intasato. Cosa posso fare? Verificato
Staccare il tubo e controllare se è effettivamente intasato. In questo caso prendere un oggetto lungo, a es. un manico di scopa, e spingerlo con cautela nel tubo. Ciò consentirà generalmente di rimuovere qualsiasi oggetto che intasa il tubo. Se questo non serve, occorre contattare il produttore.
È stato utile (1464) Per saperne di piùChe misure di sacchetto per la polvere esistono in commercio? Verificato
Ci sono due misure da considerare. La prima è la misura dell’imbocco del sacchetto. Questa indica se il sacchetto è adatto all’aspirapolvere. La seconda è la dimensione del sacchetto. Questa viene generalmente indicata in litri e determina quanta polvere può essere contenuta nel sacchetto.
È stato utile (944) Per saperne di piùVoglio sapere l’età del mio dispositivo Electrolux. Come posso farlo? Verificato
È possibile determinare l’età del proprio dispositivo utilizzando il numero di serie che si trova sul dispositivo. Il primo carattere del numero di serie indica l’anno (ad es. 1 = 2001) e i due caratteri dopo indicano la settimana di produzione (ad es. 35 = 35° settimana dell’anno). Pertanto il numero di serie 13500016 indica che il dispositivo è stato prodotto durante la 35° settimana del 2001.
È stato utile (836) Per saperne di piùIl cavo di alimentazione dell’aspirapolvere non si riavvolge nel dispositivo, cosa devo fare? Verificato
Il cavo potrebbe essere storto o piegato. Srotolare completamente il cavo un paio di volte e riavvolgerlo nel dispositivo guidandolo con le mani. Se il problema persiste, il meccanismo per riavvolgere il cavo potrebbe essere rotto. In tal caso, si prega di contattare il produttore o un centro assistenza.
È stato utile (658) Per saperne di piùL’aspirapolvere emette un fischio, cosa devo fare? Verificato
Questo problema spesso è dovuto al sacchetto o al filtro dell’aspirapolvere pieni o da un foro che fa entrare aria nel tubo. Controllare il sacchetto e il filtro dell’aspirapolvere e sostituirli qualora necessario. Controllare che nel tubo non ci siano fori o che sia collegato correttamente. Se il problema persiste, si prega di contattare il produttore.
È stato utile (553) Per saperne di piùCome posso rimuovere polvere e capelli dalla spazzola dell’aspirapolvere? Verificato
La rimozione di polvere e capelli dalla spazzola dell’aspirapolvere deve essere fatta manualmente. Se il risultato non è soddisfacente, si può utilizzare un pettine più sottile per rimuovere lo sporco residuo.
È stato utile (536) Per saperne di piùQuali impostazioni devo utilizzare per la spazzola dell’aspirapolvere? Verificato
Quasi tutte le aspirapolveri sono dotate di una testina con una spazzola regolabile. Utilizzare la spazzola per le superfici dure per evitare graffi e danni. Togliere la spazzola per tappeti e moquette.
È stato utile (420) Per saperne di piùPosso utilizzare più volte un sacchetto di carta per aspirapolvere? Verificato
Si consiglia di no. I pori del sacchetto si saturano con l’uso e potrebbero ridurre l’aspirazione e danneggiare il motore.
È stato utile (287) Per saperne di piùCos'è l'HEPA? Verificato
HEPA è l'acronimo di High-Efficiency Particulate Air. Molti aspirapolvere hanno un filtro HEPA. Un filtro HEPA fermerà almeno l'85% e al massimo il 99,999995% di tutte le particelle di 0,3 micrometri (µm) e superiori.
È stato utile (260) Per saperne di piùPosso usare un normale aspirapolvere per aspirare la cenere? Verificato
No, non è assolutamente possibile. La cenere che sembra raffreddata potrebbe essere ancora calda o addirittura bollente all'interno. Un normale aspirapolvere non è progettato per questo e può provocare un incendio. Inoltre, i filtri dei normali aspirapolvere non sono sempre adatti a trattenere particelle estremamente piccole come la cenere. Può quindi raggiungere il motore dell'aspirapolvere e causare danni.
È stato utile (251) Per saperne di più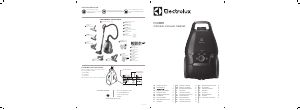
Partecipa alla conversazione su questo prodotto
Qui puoi condividere cosa pensi di Electrolux PD91-6BP Aspirapolvere. Se hai una domanda, leggi prima attentamente il manuale. La richiesta di un manuale può essere effettuata utilizzando il nostro modulo di contatto.