
DE/AT/CH DE/AT/CH
Produkt von uns – nach unserer Wahl –
für Sie kostenlos
repariert oder ersetzt. Diese Garanti
e verfällt, wenn das
Produkt beschädigt, nicht sachgemäß benutzt oder
gewartet wurde.
Die Garantieleistung gilt für Material- oder Fabrikations-
fehler. Diese Garantie erstreckt sich nicht auf
Produktteile,
die normaler Abnutzung ausgesetzt
sind (z. B. Batterien)
und daher als Verschleißteile angesehen werden können
oder für Beschädigungen an zerbrechlichen Teilen, z. B.
Schalter, Akkus oder die aus Glas gefertigt sind.
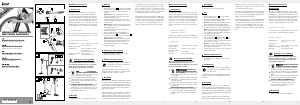
Bedienung
Öffnen Sie die Überwurfmutter
7
des Pumpenkopfes.
Für Schrader-Ventile stecken Sie reversiblen Einsatz
und Gummi ein wie in Abbildung B / I beschrieben.
Hinweis: Verbinden Sie die kleine Öffnung des
Gummis mit dem dünnen Anschlussstift des reversiblen
Einsatzes (Abb. B / I).
Für Blitz- und Sclaverand-Ventile stecken Sie reversiblen
Einsatz und Gummi ein wie in Abbildung B / I I
beschrieben.
Hinweis: Verbinden Sie die große Öffnung des
Gummis mit dem großen Anschlussstift des reversiblen
Einsatzes (Abb. B / I I).
Schließen Sie die Überwurfmutter und stecken Sie
den Pumpenkopf auf das Ventil.
Ziehen Sie den Spannhebel hoch (Abb. C).
Ziehen Sie solange den Griff
10
aus der Mini-Luft-
pumpe
8
heraus und drücken ihn wieder hinein, bis
der Fahrradreifen aufgepumpt ist.
Hinweis: Für Schrader-Ventile benutzen Sie die
große Ventilöffnung. Für Blitz- und Sclaverand-Ventile
benutzen Sie die kleine Ventilöffnung.
Drücken Sie den Spannhebel wieder nach unten,
wenn der Pumpvorgang abgeschlossen ist.
Reinigung und Pflege
Verwenden Sie zur Reinigung und Pflege nur ein leicht
angefeuchtetes, fusselfreies Tuch.
Entsorgung
Die Verpackung besteht aus umweltfreundlichen
Materialien, die Sie über die örtlichen Recycling-
stellen entsorgen können.
Möglichkeiten zur Entsorgung des ausgedienten Produktes
erfahren Sie bei Ihrer Gemeinde oder Stadtverwaltung.
Garantie
Das Produkt wurde nach strengen Qualitätsrichtlini
en sorg-
fältig produziert und vor Anlieferung gewissenhaft ge-
prüft. Im Falle von Mängeln dieses Produkts stehen Ihnen
gegen den Verkäufer des Produkts gesetzliche Rechte zu.
Diese gesetzlichen Rechte werden durch unsere im
Folgenden dargestellte Garantie nicht eingeschränkt.
Sie erhalten auf dieses Produkt 3 Jahre Garantie ab Kauf-
datum. Die Garantiefrist beginnt mit dem Kaufdatum. Bitte
bewahren Sie den Original-Kassenbon gut auf. Diese
Unterlage wird als Nachweis für den Kauf benötigt.
Tritt innerhalb von 3 Jahren ab dem Kaufdatum dieses
Produkts ein Material- oder Fabrikationsfehler auf, wird das
DE/AT/CH
Mini-Teleskoppumpe
Einleitung
Wir beglückwünschen Sie zum Kauf Ihres neuen Produkts.
Sie haben sich damit für ein hochwertiges Produkt ent-
schieden. Machen Sie sich vor der ersten Inbetriebnahme
mit dem Produkt vertraut. Lesen Sie hierzu aufmerksam die
nachfolgende Bedienungsanleitung und die Sicherheits-
hinweise. Benutzen Sie das Produkt nur wie beschrieben
und für die angegebenen Einsatzbereiche. Bewahren Sie
diese Anleitung auf. Händigen Sie alle Unterlagen bei
Weitergabe des Produktes an Dritte mit aus.
Bestimmungsgemäße Verwendung
Das Produkt ist zum Aufpumpen von Fahrradreifen vorge-
sehen. Das Produkt ist nicht für den gewerblichen Einsatz
bestimmt.
Technische Daten
Mini-Luftpumpe: ca. 27-41 (B) x 3 (H) x 4,7 (T) cm
Nylon Halterung /
Klettband: ca. 8,2 (B) x 6 (H) x 2 (T) cm
Nennüberdruck: 7 bar (100 psi)
Manometer: bis 10,5 bar (150 psi)
Sicherheitshinweise
LESEN SIE DIE BEDIENUNGSANLEITUNG VOR
BENUTZUNG DES PRODUKTES AUFMERKSAM DURCH!
BEWAHREN SIE ALLE SICHERHEITSHINWEISE UND
ANWEISUNGEN FÜR DIE ZUKUNFT AUF!
LEBENS- UND
UN-
FALLGEFAHR FÜR KLEINKINDER
UND KINDER! Halten Sie Kinder stets
vom Produkt fern. Das Produkt ist kein Spielzeug!
Bevor Sie mit dem Aufpumpen des Fahrradreifens be-
ginnen, überprüfen Sie dessen maximal zulässigen
Luftdruck.
Pumpen Sie den Fahrradreifen nur so lange auf, bis
dieser seinen maximal zulässigen Druck erreicht hat.
VORSICHT! VERLETZUNGSGEFAHR! Verwen-
den Sie keine beschädigte Pumpe oder eine Pumpe
mit beschädigten Anschlussstellen. Ein beschädigtes
Produkt kann die Sicherheit und Funktion beeinflussen.
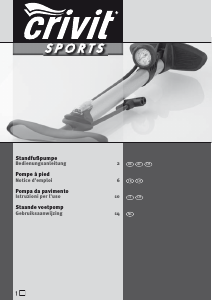
Montage
Montieren Sie das Produkt gemäß der Abbildung A.
PT GB/MTGB/MTGB/MTPT
The warranty applies to defects in material or manufacture.
This warranty does not cover product parts subject to
normal wear, thus possibly considered consumables (e.g.
batteries) or for damage to fragile parts, e.g. switches,
rechargeable batteries or glass parts.
Operation
Open the swivel nut
7
on the pump head.
For Schrader valves insert the reversible attachment
and rubber seal as shown in Figure B / I.
Note: connect the small opening of the rubber seal
with the slim connector pin on the reversible insert
(Fig. B / I).
For Dunlop and Presta valves insert the reversible in-
sert and rubber seal as shown in Figure B / I I.
Note: connect the large opening of the rubber seal
with the large connector pin of the reversible insert
(Fig. B / I I).
Close the swivel nut and attach the pump head onto
the valve.
Lift the tensioning lever (Fig. C).
Pull the handle
10
out of the mini air pump
8
then
push in, and repeat until the bicycle tyre is inflated.
Note: use the large valve opening for Schrader
valves. Use the small valve opening for Dunlop and
Presta valves.
Push the tensioning lever back down once finished
pumping.
Cleaning and care
Only clean with a slightly dampened, lint-free cloth.
Disposal
The packaging is made from recyclable materials,
which may be disposed through your local
recycling facilities.
Contact your local community or municipal administration
for information on disposing of worn-out products.
Warranty
The product has been manufactured to strict quality guide-
lines and meticulously examined before delivery. In the
event of product defects you have legal rights against the
retailer of this product. Your legal rights are not limited in
any way by our warranty detailed below.
The warranty for this product is 3 years from the date of
purchase. Should this product show any fault in materials
or manufacture within 3 years from the date of purchase,
we will repair or replace it – at our choice – free of
charge to you.
The warranty period begins on the date of purchase. Ple-
ase keep the original sales receipt in a safe location. This
document is required as your proof of purchase. This war-
ranty becomes void if the product has been damaged, or
used or maintained improperly.
Mini Extendable Pump
Introduction
We congratulate you on the purchase of your new prod-
uct. You have chosen a high quality product. Familiarise
yourself with the product before using it for the first time.
In addition, please carefully refer to the operating instruc-
tions and the safety advice below. Only use the product
as instructed and only for the indicated field of applica-
tion. Keep these instructions in a safe place. If you pass
the product on to anyone else, please ensure that you
also pass on all the documentation with it.
Proper use
This product is intended for inflating bicycle tyres. The
product is not intended for commercial use.
Technical data
Mini air pump: approx. 27–41 (W) x 3 (H) x 4.7 (D) cm
Nylon bracket /
velcro tap: approx. 8.2 (W) x 6 (H) x 2 (D) cm
Rated pressure: 7 bar (100 PSI)
Pressure gauge: up to 10.5 bar (150 PSI)
Safety notes
CAREFULLY READ THE INSTRUCTIONS FOR
USE BEFORE USING THIS PRODUCT! KEEP
ALL SAFETY NOTES AND INSTRUCTIONS FOR FU-
TURE REFERENCE!
RISK OF FATAL IN-
JURY AND ACCIDENT FOR INFANTS
AND CHILDREN! Always keep children
away from the product. This product is not a toy!
Check the maximum rated tyre pressure before inflating
the bicycle tyre.
Only inflate the bicycle tyre until it reaches its maximum
rated pressure.
CAUTION! RISK OF INJURY! Please do not use
a damaged pump or a pump with damaged junctions.
A damaged product could adversely affect safety
and proper function.
Assembly
Assemble the product according to Figure A.
Caso num espaço de tempo de 3 anos a partir da data da
compra deste producto surja um erro de material ou de
fabrico, o producto será reparado ou substituído por nós –
segundo a nossa escolha – e sem qualquer custo. Esta ga-
rantia expira se o producto estiver danificado, se não for
devidamente utilizado ou se não for efectuada a devida
manutenção.
A garantia é válida em caso de defeitos de material ou de
fabrico. Esta garantia não é extensível a componentes do
produto que se desgastam com o uso e que, por isso, po-
dem ser consideradas peças de desgaste (por ex.º pilhas)
ou a danos em peças frágeis, por ex.º interruptores, bate-
rias ou peças de vidro.
Com a troca do aparelho, de acordo com DL 67/2003,
o tempo de garantia se inicia novamente.
Utilização
Solte a porca de capa
7
da cabeça da bomba.
No caso de válvulas Schrader insira o bocal reversível
e borracha da forma indicada na figura B / I.
Nota: conecte a pequena abertura da borracha
com a pen fina de ligação da inserção reversível
(fig. B / I).
No caso de válvulas Blitz e Sclaverand insira o bocal
reversível e borracha da forma indicada na figura
B / I I.
Nota: conecte a grande abertura da borracha com
a pen de ligação grande da inserção reversível
(fig. B / I I).
Feche a porca de capa e coloque a cabeça de
bomba sobre a válvula.
Puxe a alavanca de fecho para cima (fig. C).
Extraia a pega
10
da mini-bomba de ar
8
para
fora e pressione-a novamente para dentro até o pneu
da bicicleta estar cheio.
Nota: Para válvulas Schrader utilize a abertura
grande da válvula. Para as válvulas Blitz e Sclaverand,
utilize a pequena abertura de válvula.
Pressione a alavanca de fixação novamente para
baixo quando o processo de enchimento estiver
terminado.
Limpeza e conservação
Para a limpeza e conservação utilize apenas um
pano ligeiramente humedecido e sem fios.
Eliminação
A embalagem é composta por materiais
recicláveis, que pode eliminar através dos
pontos de reciclagem locais.
As possibilidades de eliminação do produto utilizado
poderão ser averiguadas junto do seu Município ou
Câmara Municipal.
Garantia
O producto foi cuidadosamente fabricado segundo rigoro-
sas directivas de qualidade e meticulosamente testado an-
tes da sua distribuição. Em caso de falhas deste producto,
possui direitos legais relativamente ao vendedor do producto.
Os seus direitos legais não estão limitados pela garantia
representada de seguida.
Este produto tem 3 anos de garantia a partir da data de
compra. A validade da garantia inicia-se com a data de
compra. Guarde o talão da caixa como comprovativo da
compra. Esse documento é necessário para comprovar a
compra.
OWIM GmbH & Co. KG
Stiftsbergstraße 1
DE-74167 Neckarsulm
GERMANY
Model-No.: HG000937
Version: 02 / 2017
Estado de las informaciones
Versione delle informazioni · Estado das
informações · Last Information Update
Stand der Informationen: 03 / 2017
Ident.-No.: HG000937032017-5


Partecipa alla conversazione su questo prodotto
Qui puoi condividere cosa pensi di Crivit IAN 286006 Pompa per bicicletta. Se hai una domanda, leggi prima attentamente il manuale. La richiesta di un manuale può essere effettuata utilizzando il nostro modulo di contatto.