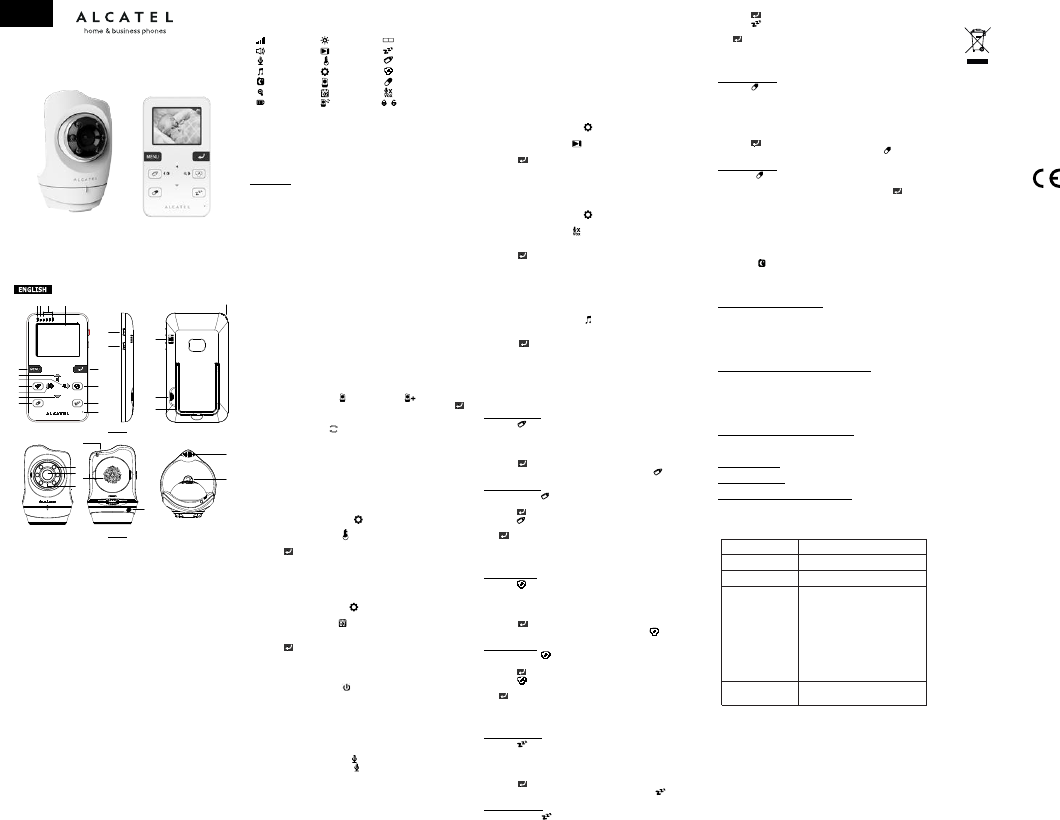
1. Overview
1.1. Package Content
• 1xParentUnit
• 1xBabyUnit
• 2xPoweradapter
1.2. Product description
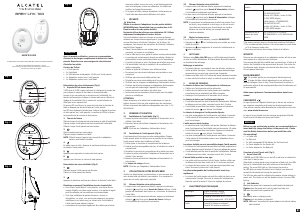
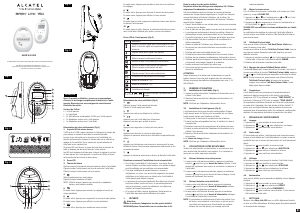
1.4. LCD DISPLAY ICONS
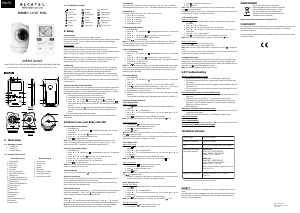
2. Setup
2.1 Parent Unit
ChargetheParentUnitusingthepoweradapterprovided.
PlugthepoweradapterintoawalloutletandconnectitsmicroUSBplugtotheParent
Unitchargingport(Fig1,19).Forsafetyreasons,useONLYthepoweradapters
includedinthepackage.
Whencharging:
(a)DuringpowerOFF,batteryiconwillcomeupatthemiddleofscreenandshow
batteryischarging.ThechargingLEDabovethetopleftturnsred.
(b)DuringpowerON,thebatteryiconattoprightcornerofdisplaywillshowthatthe
batteryischarging.ThechargingLEDabovethetopleftturnsred.
Note:Whenthebatteryislow,thebatteryiconondisplayturnsredandtheParent
Unitbeepsinevery10seconds,indicatingtheunitneedstoberecharged.The
chargingLEDwillturntosolidblueoncethebatteryisfullycharged.
2.2 Baby Unit
PlugtheprovidedpoweradapterintoawalloutletandconnectitsmicroUSBplug
toBabyUnitchargingport(Fig2,6),theBabyUnitwillturnonautomatically.For
safetyreasons,useONLYthepoweradaptersincludedwiththispackage.
WhentheBabyUnitispoweredon,thepowerLEDwillashfor1secondandthen
turnsolidgreentoindicatethecameraisON.UnplugpowercabletoturntheBaby
unitOFF.
PlacetheBabyUnitatanappropriate,safelocationandpointthecameratowardthe
monitoringarea.
2.3 Pairing the Baby Unit & Parent Unit
TheParentUnitandBabyUnitinthispackagecomepaired(connected)toeachother.
However,iftheyarenotconnectedautomaticallyafteryouturnedthemON,you
maypairthemmanually.TopairanadditionalBabyUnit,repeatsteps1~4below
andregisteradifferentcameranumbertoeachadditionalcamera:
1.
PressandholdpowerkeyofParentUnittoturnitON.
2.
PressMENUkey,themenuiconwillbeshownondisplay.
3.
Press p / q toselectandpress u.Selectandpress u.
4.
Press t / u toassigncameranumberyouwanttopairthenpressto
startpairing(duringpairingprocess,powerLEDwillbeashingtoindicateitis
pairing).
5.
PressandholdPairkeyonBabyUnituntilthepowerLEDashesgreen.
Oncetheyarepaired,thecameravideowillbeshownimmediatelyonLCD
screen.
6.
Ifunsuccessful,pleaserepeatabovesteps.
Note:Beforeyoubeginpairing,besuretohavetheParentUnitandBabyUnitin
closevicinity.
3.0 How to use your Baby Link 510
3.1 Temperature Display Setting
1.
PressMENUkey;
2.
Press p or q untiltheiconishighlightedthenpress u toenter
sub-menu;
3.
Press p or q toselectthenpress u toentersub-menu;
4.
Press p / q toselecttemperatureunit;
5.
Presstoconrmandexit;
Note:TemperaturereadingwillbedisplayedatthebottomrightcornerofLCD
screen.Ifthetemperaturegoesabove29˚C(84˚F)orbelow14˚C(57˚F),the
readingwillturnRED.Temperatureunitdefaultisdegreescelcius˚C.
3.2 Date & Time Display Setting
1.
PressMENUkey;
2.
Press p / q untiltheiconishighlightedthenpress u toentersub-
menu;
3.
Press p / q toselectthenpress u toentersub-menu;
4.
Press t / u toselecttheitemyouwanttoset;
5.
Press p forincrement;press q fordecrement;
6.
Presstoconrmandexit.
Note:Date&TimereadingwillbedisplayedatthebottomrightcorneroftheLCD
screen.Thedefaulttimeunitis12H.
3.3 Video ON/OFF
AshortpressofthePOWERbuttonwilltoggletheLCDdisplayON/OFF.
3.4 Unlock Touch Keys
Oncethescreenisturnedoff,thetouchkeyswillbelockedautomaticallyandakey
lockiconappearsonbottomleftcornerofthescreen.
Tounlocktouchkeys,touchpandmakeacounterclockwisemovementwithyour
ngerontherestofthenavigationkeys.
3.5 Talk Back Function
Pressandholdthepush-to-talkbuttononParentUnittotalktoyourbabythrough
BabyUnit'sloudspeaker.ThePTTiconwillbedisplayedinthemiddleofLCD
screen.ReleasethebuttontolistenfromtheBabyUnit.
3.6 Volume
Press p / q andthevolumecontrolswillpopup.Press p / q toselect
thedesiredvolumelevelfromlevel0to8.Thedefaultvolumelevelsettingislevel2.
Note:Placingthemonitorandthecameratooclosetogetherwillcreatefeedback.
Decreaseormutethevolumeandmovetheunitstoresolvetheproblem.
3.7 Brightness
Press t thenthebrightnesscontrolswillpopup.Press t / u toselectthe
desiredbrightnesslevelfromlevel1to8.Thedefaultbrigthnesslevelsettingislevel4.
3.8 Digital Zoom
Innormalviewingmode,press u toenterzoominmode.
1.
Press p totiltupward;
2.
press q totiltdownward;
3.
Press t topanleft;
4.
Press u topanright.
5.
PressMENUtoexit.
3.9 Display Standby Setting
1.
PressMENUkey;
2.
Press p / q untiltheiconishighlightedthenpress u toentersub-
menu;
3.
Press p / q toselectthenpress u toentersub-menu;
4.
Press p / q toselectOFF/1min/3min/5min;
5.
Presstosavethesetting.
Note:IfthisstandbytimerissetOFF,theLCDwillbeONallthetime.Otherwise,it
willenterstandbymodeandturnthescreenoffafteraspeciedperiodoftime.
Thedefaultstandbytimeis3minutes
3.10 VOX Sensitivity Setting
1.
PressMENUkey;
2.
Press p / q untiltheiconishighlightedthenpress u toentersub-
menu;
3.
Press p / q toselectthenpress u toentersub-menu;
4.
Press p / q toselectOFF/1/2/3(defaultisOFF.Thehigherthenumber,
thehigherthesensitivitylevel);
5.
Presstosavethesetting.
Note:ThescreenofParentUnitwillturnoffasitentersstandbymodetosavepower.
IftheVOX(Voice-OperatedTransmission)functionhasbeensettoON,thescreen
ofParentUnitwillbeturnedonwhenBabyUnitdetectssoundreachingsetlevels
accordingtotheVOXsetting.
3.11 Lullaby Playing
1.
PressMENUkey;
2.
Press p / q untiltheiconishighlightedthenpress u toentersub-
menu;
3.
Press p / q toselectlullabyOFF/#1to#5/loop(defaultisOFF);
4.
Pressandlullabyvolumesettingwillpopup.Press p / q toselect
thedesiredvolumelevelfromlevel#1to#5(defaultlevelis#2);
5.
PressMENUkeytoconrmandexit.
6.
LullabyiconwillbedisplayedatthetopofLCDscreeniflullabyplayiscurrently
activated.
7.
Theloopfunctionwillkeeploopingthelullabiesfromlullaby#1tolullaby#5.
3.12 Timer Setting and Review
3.12.1 Feeding Timer
Feeding Timer Setting
1.
PressandthenMENUkeywithin3seconds,thefeedingsettingswill
appear;
2.
Press t / u toselectON/OFF;
3.
Press p / q tosettimer/alarm(press p forincrement;press q for
decrement);
4.
PresstostartthetimerorpressMENUtoexitsetting.
Note:Wheneverthefeedingtimerisrunning,LCDwillshowtheicon
Feeding Timer Review
1.
Pressandholduntilthereviewscreenpopsup;
2.
PressMENUtoenterfeedingtimersetting;
3.
Presstorestartthefeedingtimer;
4.
Presstoexit.
Note:Whenthetimerrings,pressMENUtoturnthealertofandcancelthetimer.
Presstorestartthetimer.
Ifthereisnoresponse,itwillringfor1minutethenstop.Thisringwillrepeat3and6
minuteslaterasreminderifnoresponsereceived.
3.12.2 Diaper Timer
Diaper Timer Setting
1. PressthenpressMENUwithin3seconds,diapertimersettingscreenwill
appear;
2. Press
t
/
u
toselectON/OFF;
3. Press
p
/
q
tosettimer/alarm(press
p
forincrement;press
q
for
decrement);
4. PresstostartthetimerorpressMENUtoexitsetting.
Note:Wheneverthediapertimerisrunning,LCDwillshowtheicon
Diaper Timer Review
1. Pressandholduntilthereviewscreenpopsup;
2. PressMENUtoenterdiapertimersetting;
3. Presstorestartthediapertimer;
4. Presstoexit.
Note:Whenthetimerrings,pressMENUtoturnthealertOFFandcancelthetimer.
Presstorestartthetimer.
• Ifthereisnoresponse,itwillringfor1minutethenstop.Thisringwillrepeat
3and6minuteslaterasreminderifnoresponsereceived.
3.12.3 Sleeping Timer
Sleeping Timer Setting
1. PressthenpressMENUwithin3seconds,sleepingtimersettingscreen
willappear;
2. Press
t
/
u
toselectON/OFF;
3. Press
p
/
q
tosettimer/alarm(press
p
forincrement;press
q
for
decrement);
4. PresstostartthetimerorpressMENUtoexitsetting;
Note:Wheneverthesleepingtimerisrunning,LCDwillshowtheicon
Sleeping Timer Review
1. Pressandholduntilthereviewscreenpopup;
2. PressMENUtogotosleepingtimersetting;
3. Presstorestartthesleepingtimer;
4. Presstoexit.
Note:Whenthetimerrings,pressMENUtoturnoffthealertandcancelthetimer.
Presstorestartthetimer.
Ifthereisnoresponse,itwillringfor1minutethenstop.Thisringwillrepeat3and6
minuteslaterasreminderifnoresponsereceived.
3.12.4 Medicine Timer
Medicine Timer Setting
1. PressthenpressMENUwithin3seconds,medicinetimersettingscreen
willappear;
2. Press
t
/
u
toselectitem;
3. Presspress
p
forincrement;press
q
fordecrement;
4. Press
p
/
q
toselect:1timeaday/2timesaday/3timesaday/4
timesaday;
5. Press
t
/
u
toselectON/OFF;
6. PresstostartmedicinetimerorpressMENUtoexitsetting;
Note:Wheneverthemedicinetimerisrunning,LCDshowstheicon.
Medicine Timer Review
Pressandholduntilthereviewscreenpopup;
AtthereviewscreenmodepresstheMENUtoexit
Note:Whenthetimerrings,pressMENUtocancelthetimer.Presstorestartthe
timer.
Ifthereisnoresponse,itwillringfor1minutethenstop.Thisringwillrepeat3and6
minuteslaterasreminderifnoresponsereceived.
3.13 Night Vision Mode
TheBabyUnithas6high-intensityinfraredLEDsforpickingupclearimagesindark
environments.Whenthebuilt-inphotosensordetectsalowlevelofambientlight,
theLEDswillautomaticallyactivateandthescreenonParentUnitwilldisplayinblack
andwhite.Theiconwillbedisplayedonscreen.
Note:Theoptimumdistancefornightvisionis15feet.
4.0 Troubleshooting
If there is nothing shown on screen:
• ParentUnitmaybeout-of-battery.Tryrechargingthebatterypack.
• ResetbothParentandBabyUnits.Unplugelectricalpoweronboththenplug
thembackin.
• ParentUnitmayhavebeenturnedoffaccidentally.PressandholdtheON/OFF
keytoturniton.
• Thecorrectcameramayhavenotbeenselected.Checkandchangetocorrect
cameranumber.
If the link between the Baby and Parent Units is lost:
• BabyUnitmaybeout-of-range,tryplacingtheBabyandParentUnitscloserto
eachother.
• ParentUnitmaybeout-of-battery.Tryrechargingthebatterypack.
• ResetbothParentandBabyUnits.Unplugbothelectricalpower,thenplug
thembackinafter15seconds.Allowupto1minuteforboththeBabyand
ParentUnitstolinktoeachother.
• Redothepairing.
When there is Reception Interference or Noise:
• Theremaybetoomanyelectronicdevicesormetalobjectsintheenvironment
interferingwiththesignal.
• ParentUnitmaybeout-of-battery.Tryrechargingthebatterypack.
Video without Sound:
• Increasevolume.
Video in Black & White:
• NightModeisON;increasetheamountoflightinthemonitoringenvironment.
The Rechargeable Battery Cannot Be Charged:
• Poweradaptermaynotconnectedproperly.
TECHNICAL DETAILS
SAFETY
DonotopenthedeviceoritsACadapterinordernottoconstituteariskofelectric
shock.
YourBabyMonitormustbeinstalledinadryplace,awayfromheat,moistureand
directsunlight.Toavoidradiointerference,keepyourbaby-monitoringatleast1
meteranyelectricalappliance.
ENVIRONMENT
Help us protect the environment in which we live!
CONFORMITY
Thelogoprintedontheunitcertiesthatitmeetstheessentialrequirementsandall
relevantdirectives.Youcanseethisdeclarationofconformityonourwebsite:
www.alcatel-home.com
TheAlcatellogoandAlcatelnamearetrademarksofAlcatelLucentandusedunder
licencebyATLINKS
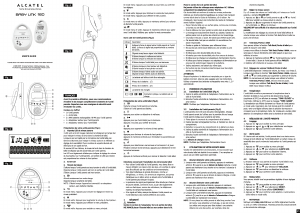
Parent Unit (Fig.1)
1.
ChargingLED
2.
PowerLED
3.
VolumeLED
4.
LCDdisplay
5.
Menukey
6.
NavUP&VolUpkey
7.
NavRIGHT&Zoomkey
8.
Feedingtimer
9.
NavLEFT&Brightnesskey
10.
NavDOWN&VolDownkey
11.
Medicinetimer
12.
Power&ScreenOn/Offkey
13.
Talktobabykey
14.
Conrmkey
15.
Diapertimer
16.
Sleepingtimer
17.
Microphone
18.
Speaker
19.
MicroUSBchargingport
20.
Kickstand
21.
Lanyardhole
Baby Unit (Fig 2)
1.
Photosensor
2.
InfraredLEDs
3.
Camera
4.
Speaker
5.
Microphone
6.
MicroUSBpowerport
7.
Temperaturesensor
8.
Pairkey&PowerLED
USER’S GUIDE
PLEASEREADTHISUSER’SGUIDEBEFOREUSINGYOURBABYMONITOR
ATLINKSEUROPE-147avenuePaulDoumer-92500RueilMalmaison-France
Signallevel
Volume
Talktobaby
Lullaby
Nightvision
Zoom
Battery
Brightness
Standby
Temperature
Setting
Camera
Date&time
Scanmode
Dualmode
Sleepingtimer
Feedingtimer
Diapertimer
Medicinetimer
VOXmode
Touchkeylock
Model : Baby Link 510
A/W No. : 10001574 Rev.0 (EN)
Made in PRC
Baby Link 510
Indoor range
Up to 50 metres*
Outdoor to free field Up to 300 metres*
*values may vary according to environment.
LCD 2.31" HD TFT (QVGA 320 x 240 pixel)
Parent Unit
Lithium POLYMER 3.7V / 1200mA
(built in)
Parent unit and Baby
unit power adaptor
Battery for Parent unit
Model No.: CS6D050080FG
Input: AC100-240V 50/60Hz
Output: DC5V / 800mA
Model No.: CS6D050080FG
Input: AC100-240V 50/60Hz
Output: DC5V / 1000mA
Baby unit
Only use the adaptors supplied with your
Baby Link 510.
Thissymbolmeansthatyourinoperative
electronicappliancemustbecollectedseparately
andnotmixedwithhouseholdwaste.Tothis
end,theEuropeanUnionhasimplementeda
speciccollectionandrecyclingsystemforwhich
manufacturersareresponsible.
EN/FR
5V,800mA
1 2 3 4
5
6
7
8
9
10
11
14
15
16
17
12
13
18
19
20
21
5V,800mA
5V,800mA
1 2 3 4
5
6
7
8
9
10
11
14
15
16
17
12
13
18
19
20
21
1
7
8
5V,800mA
5V,800mA
1 2 3 4
5
6
7
8
9
10
11
14
15
16
17
12
13
18
19
20
21
1
4
2
3
5
6
Fig.1
Fig.2

Partecipa alla conversazione su questo prodotto
Qui puoi condividere cosa pensi di Alcatel Baby Link 510 Baby monitor. Se hai una domanda, leggi prima attentamente il manuale. La richiesta di un manuale può essere effettuata utilizzando il nostro modulo di contatto.
rispondi | È stato utile (0) (Tradotto da Google)