Manuale Vango Lauder 500 Tenda

Hai bisogno di un manuale per il tuo Vango Lauder 500 Tenda? Di seguito è possibile visualizzare e scaricare gratuitamente il manuale in PDF in italiano. Questo prodotto attualmente ha 7 domande frequenti, 0 commenti e ha 0 voti. Se questo non è il manuale che desideri, contattaci.

Il tuo prodotto è difettoso e il manuale non fornisce alcuna soluzione? Rivolgiti a un Repair Café per il servizio di riparazione gratuita.
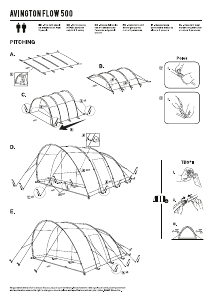
Manuale

Loading…

TENT PITCHING INSTRUCTIONS –
LAUDER
FLYSHEET FIRST PITCHING:
• Open out flysheet and position in required direction
Locate pole sleeves on roof section of flysheet and insert the curved roof poles
• Insert the
corresponding upright poles to the roof poles
On both sides of the tent, locate the ends of each pole into the corresponding ring & pin
Tighten all the tensions straps at the base of the poles.
• Attach all flysheet pole clips onto poles
• Lay the flysheet and poles on the ground
• Securely peg out the rear corners of the tent
Locate the front pegging points and pull away from rear (this is easier if a second person
holds the steel pole in an upright position). When fully tensioned away from the rear,
Insert the fibreglass poles into the front and rear pole sleeves and locate the ends onto the pins on the steel pole
• The groundsheet should be flat and wrinkle free
Peg out the remaining poles and pegging points using pin pegs at the ba
• Peg out ALL guy lines using pin-
pegs ensuring that guy line fabric attachment points are evenly tensioned.
INNER ATTACHMENT:
Open out inner tent inside flysheet and position doorways to correspond with the living area
• Suspend the inner
by attaching toggles of inner tent through rings on inside of flysheet
The inner attachments are colour coded to match the clips on the roof of the flysheet
• Do the rear first and work forward
It is advisable to remove the inner when taking down the t
RING & PIN SYSTEM:
• Locate one end of pole onto the c
orresponding metal pin (figure 1
Peg the corners of the tent through the metal rings using pin
Pegs should be positioned at a 45 degree angle to ensure maximum grip
……………………………………………………………………………………………………
TENT PITCHING INSTRUCTIONS –
LAUDER
MIT AUßENZELTAUFBAU ZUERST:
• Außenzelt auslegen und korrekt ausrichten.
• Finden Sie die
Gestängekanäle an der Dachsektion des Außenzelts und stecken Sie die gebogenen Dachstangen ein.
Stecken Sie die zu den Dachstangen zugehörigen Senkrechtstangen ein.
• Befestigen Sie alle Außenzelt-
Halterungsklemmen an den Stangen.
• Außenzelt und Stangen auf dem Boden auslegen.
• Stecken Sie die hinteren Ecken des Zelts fest aus.
• Fixieren Sie d
ie vorderen Befestigungspunkte und ziehen Sie von hinten (das ist leichter, wenn eine zweite Person die Stahlstange in aufrec
Wenn das Zelt von hinten voll gespannt ist, setzen Sie die Klammern ein.
• Setzen Sie die Fiberglasstangen in
die vorderen und hinteren Stangenhüllen ein und fixieren Sie die Enden auf den Steckstiften der Stahlstange
• Die Bodenplane sollte glatt und knitterfrei sein.
festgezogen sind.
INNENBEFESTIGUNG:
Legen Sie die Innenzelte im Außenzelt aus und richten Sie die Eingä
Die Aufhängung des Innenzelts erfolgt, indem die Knebel des Innenzelts durch die auf der Innenseite des Außenzelts befindlich
Die Innenhalterungen sind farbcodiert und farblich au
• Beginnen Sie hinten und arbeiten Sie sich nach vorn.
Es ist ratsam, das Innenzelt zu lösen, wenn Sie das Zelt bei Nässe abbauen.
RING-UND-STIFT-SYSTEM:
• Fixieren Sie ein Ende der
Vorbaustange am dazu passenden Metallstift
Stecken Sie die Ecken des Zelts durch die Metallringe, indem Sie die Arretierstifte benutzen.
Die Heringe sollten in einem Winkel von 45 Grad platziert werden, um maximalen Halt zu erzielen.
………………………………………………………
………………………………
LAUDER
400/500 (UK)
Locate pole sleeves on roof section of flysheet and insert the curved roof poles
corresponding upright poles to the roof poles
On both sides of the tent, locate the ends of each pole into the corresponding ring & pin
Tighten all the tensions straps at the base of the poles.
Locate the front pegging points and pull away from rear (this is easier if a second person
holds the steel pole in an upright position). When fully tensioned away from the rear,
insert pegs.
Insert the fibreglass poles into the front and rear pole sleeves and locate the ends onto the pins on the steel pole
Peg out the remaining poles and pegging points using pin pegs at the ba
se of poles
pegs ensuring that guy line fabric attachment points are evenly tensioned.
Open out inner tent inside flysheet and position doorways to correspond with the living area
by attaching toggles of inner tent through rings on inside of flysheet
The inner attachments are colour coded to match the clips on the roof of the flysheet
It is advisable to remove the inner when taking down the t
ent when wet.
orresponding metal pin (figure 1
)
Peg the corners of the tent through the metal rings using pin
-pegs (figure 2)
Pegs should be positioned at a 45 degree angle to ensure maximum grip
……………………………………………………………………………………………………
………………………………
…………………………………………………………………
LAUDER
400/500 (DE)
Gestängekanäle an der Dachsektion des Außenzelts und stecken Sie die gebogenen Dachstangen ein.
Stecken Sie die zu den Dachstangen zugehörigen Senkrechtstangen ein.
Auf beiden Seiten des Zelts: Befestigen Sie die Enden aller Stangen im zugehörigen Rin
g- & Stift-System.
Alle Spanngurte unten an den Stangen fest anziehen.
Halterungsklemmen an den Stangen.
ie vorderen Befestigungspunkte und ziehen Sie von hinten (das ist leichter, wenn eine zweite Person die Stahlstange in aufrec
Wenn das Zelt von hinten voll gespannt ist, setzen Sie die Klammern ein.
die vorderen und hinteren Stangenhüllen ein und fixieren Sie die Enden auf den Steckstiften der Stahlstange
Übrige Stangen und Verankerungspunkte mithilfe der Stiftheringe unten an den Stangen fixieren.
ALLE Abspannleinen mit Stiftheringen fixieren, wobei darauf zu achten ist, dass die Befestigungspunkte der Abspannleinen an d
Legen Sie die Innenzelte im Außenzelt aus und richten Sie die Eingä
nge so aus, dass sie in den Wohnbereich führen.
Die Aufhängung des Innenzelts erfolgt, indem die Knebel des Innenzelts durch die auf der Innenseite des Außenzelts befindlich
Die Innenhalterungen sind farbcodiert und farblich au
f die auf dem Dach des Außenzelts befindlichen Klemmen abgestimmt.
Es ist ratsam, das Innenzelt zu lösen, wenn Sie das Zelt bei Nässe abbauen.
Vorbaustange am dazu passenden Metallstift
Stecken Sie die Ecken des Zelts durch die Metallringe, indem Sie die Arretierstifte benutzen.
Die Heringe sollten in einem Winkel von 45 Grad platziert werden, um maximalen Halt zu erzielen.
………………………………
……………………………………………………………………………………………………………
…………………………………………………………………
Gestängekanäle an der Dachsektion des Außenzelts und stecken Sie die gebogenen Dachstangen ein.
ie vorderen Befestigungspunkte und ziehen Sie von hinten (das ist leichter, wenn eine zweite Person die Stahlstange in aufrec
hter Position hält).
die vorderen und hinteren Stangenhüllen ein und fixieren Sie die Enden auf den Steckstiften der Stahlstange
ALLE Abspannleinen mit Stiftheringen fixieren, wobei darauf zu achten ist, dass die Befestigungspunkte der Abspannleinen an d
er Plane gleichmäßig
Die Aufhängung des Innenzelts erfolgt, indem die Knebel des Innenzelts durch die auf der Innenseite des Außenzelts befindlich
en Ringe gesteckt werden.
f die auf dem Dach des Außenzelts befindlichen Klemmen abgestimmt.
……………………………………………………………………………………………………………
Scarica il manuale in italiano (PDF, 0.54 MB)
(Rispetta l’ambiente e stampa questo manuale solo se è veramente necessario)

Loading…

Valutazione

Facci sapere che cosa pensi della Vango Lauder 500 Tenda valutando il prodotto. Vuoi condividere la tua esperienze con questo prodotto o porre una domanda? Ti preghiamo di lasciare un commento al fondo della pagina.
Sei soddisfatto di Vango Lauder 500 Tenda?
No
Valuta per primo questo prodotto
0 voti

Partecipa alla conversazione su questo prodotto

Qui puoi condividere cosa pensi di Vango Lauder 500 Tenda. Se hai una domanda, leggi prima attentamente il manuale. La richiesta di un manuale può essere effettuata utilizzando il nostro modulo di contatto.

Maggiori informazioni su questo manuale

Comprendiamo che sia bello avere un manuale cartaceo per i tuoi Vango Lauder 500 Tenda. Puoi sempre scaricare il manuale dal nostro sito web e stamparlo tu stesso. Se desideri avere un manuale originale, ti consigliamo di contattare Vango. Potrebbero essere in grado di fornire un manuale originale. Stai cercando il manuale del tuo Vango Lauder 500 Tenda in un'altra lingua? Scegli la tua lingua preferita sulla nostra home page e cerca il numero del modello per vedere se è disponibile.

Specifiche

Marca Vango
Modello Lauder 500
Categoria Tende
Tipo di file PDF
Dimensione del file 0.54 MB

Tutti i manuali per Vango Tende
Altri manuali di Tende

Domande frequenti su Vango Lauder 500 Tenda

Il nostro team di supporto cerca informazioni utili sul prodotto e risposte alle domande più frequenti. Se trovi un’inesattezza nelle nostre domande frequenti, ti preghiamo di farcelo sapere utilizzando il nostro modulo di contatto.

Posso conservare la tenda quando è umida? Verificato

Solo per periodi molto brevi. Se una tenda viene consevata quando è umida, può ammuffirsi, il che è dannoso per la tenda e con possibili effetti nocivi per la salute.

È stato utile (384) Per saperne di più

Come si impregna una tenda? Verificato

Piantare la tenda, pulire il tessuto e lasciar asciugare. Applicare l’agente impregnante sul tessuto con uno spruzzino, con un pennello o un rullo. Il tessuto deve essere completamente saturo dell’agente impregnante. Effettuare lo stesso trattamento anche all’interno della tenda. Pulire accuratamente eventuali finestre con un panno umido. Non lasciarvi asciugare l’agente impregnante. Lasciare asciugare completamente la tenda. Ripetere il trattamento se necessario.

È stato utile (285) Per saperne di più

Posso riparare da solo uno strappo o un buco sul tessuto della tenda? Verificato

Esistono degli appositi patch adesivi in tessuto per le tende sintetiche. Incollare un patch su ciascun lato del buco o dello strappo. Per le tende in cotone o in materiale misto si consiglia di utilizzare patch da stirare In questo caso sarà necessario un ferro da stiro.

È stato utile (218) Per saperne di più

Non riesco ad aprire la zip della tenda, cosa devo fare? Verificato

Quando una zip si inceppa, si consiglia di utilizzare uno spray PTFE o al silicone. Non utilizzare lo spray sul tessuto e applicarlo preventivamente per evitare problemi in futuro.

È stato utile (156) Per saperne di più

All’interno della tenda ci sono delle goccioline, significa che c’è una perdita? Verificato

No, probabilmente è solo condensa. Assicurarsi che la tenda sia ventilata correttamente per ridurre al minimo la condensa.

È stato utile (129) Per saperne di più

Che picchetti per tende si consiglia di utilizzare a seconda dei terreni? Verificato

Sull’erba e sui terreni boschivi si consiglia di utilizzare picchetti semicircolari o in plastica. Sui terreni rocciosi si consiglia di utilizzare picchetti per roccia. Su terreni rocciosi si consiglia di utilizzare picchetti semicircolari, in plastica o universali. Sui terreni ghiaiosi si consiglia di utilizzare picchetti semicircolari o universali e sulla sabbia picchetti in legno.

È stato utile (105) Per saperne di più

L’agente impregnante lascia un alone o delle macchie bianche sulla tenda, cosa posso fare? Verificato

Se l’agente lascia un alone o delle macchie bianche sul tessuto, significa che si è applicato più prodotto in queste zone. Non è dannoso e le macchie scompaiono di solito con il tempo. Si sconsiglia di utilizzare meno agente impregnante per evitare la formazione di macchie. Il tessuto deve essere completamente saturo dell’agente impregnante per un buon risultato.

È stato utile (97) Per saperne di più
Manuale Vango Lauder 500 Tenda

Prodotti correlati

Categorie correlate